
Introduction
When it comes to PC Chassis, the market is filled with a variety of competitive offers starting from low budget range to as high as enthusiast chassis costing up to $900. Recent trends are geared towards the modular approach and with Chassis like Phanteks Evolv ATX and Core X9 from Thermaltake, etc. Users now have flexibility in terms of designing the layout for their build and taking out the chassis parts which are not needed. Recently, Phanteks has launched their high-end, enthusiast grade Chassis Enthoo Elite costive massive $900 for a chassis and giving stiff competition to the likes of Case Labs.
Corsair was founded in 1994. The company started as high-performance DRAM manufacturer. Now they are the provider of enthusiast-grade PC components and peripherals. The company launched their Corsair Gaming brand in 2014 and targets the eSports professionals and gamers alike with the products like keyboards, mice, headsets and mouse mats.
Now, Corsair is manufacturing products like Chassis, Power Supply Units, DRAM, Solid State Drives, cooling solutions for CPU and Graphics Cards, sleeved cables for their PSU units, and various gaming peripherals using cutting edge technology. I always rate Corsair as excellent based on their superb customer support program. Every time I had contacted Corsair over some issue or difficulty facing me, they responded well in time and always addressed the issue in a totally satisfactory manner. This is coming from my personal experience.
Corsair is among the industry’s leading Chassis manufacturers. Their Chassis are quite popular among the enthusiasts for the form, functionality and build quality. Their chassis like Obsidian series 750D, Graphite series 600 followed by 760T and 780T are quite popular. Corsair 460X falls in their new Crystal series featuring tempered glass and RGB.
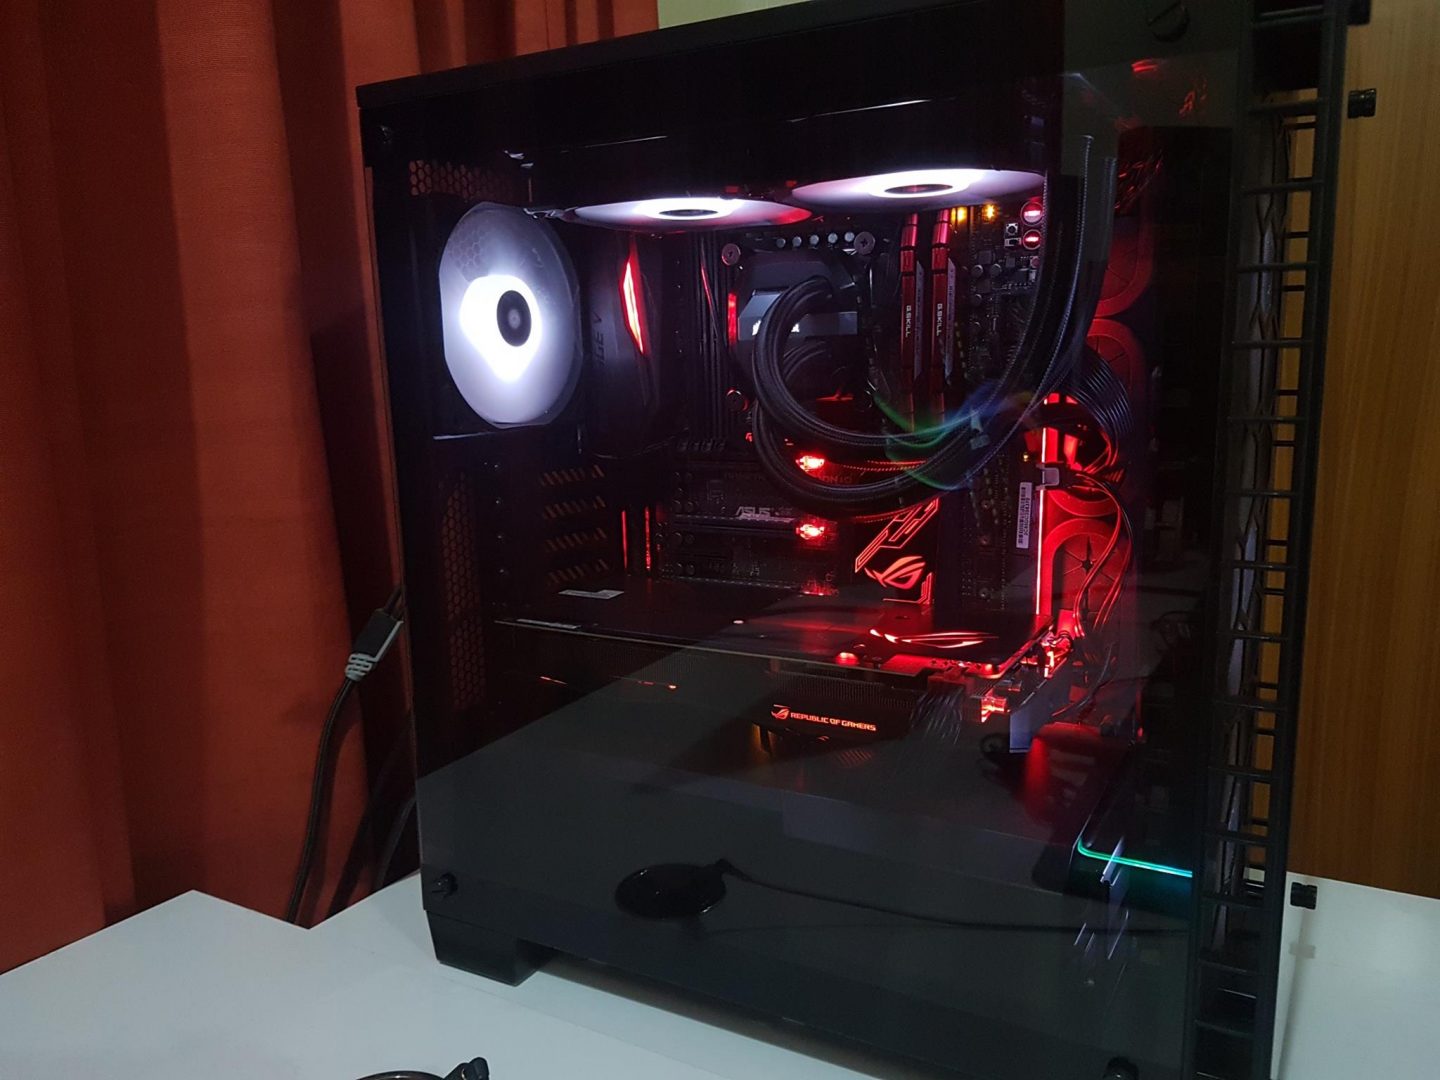
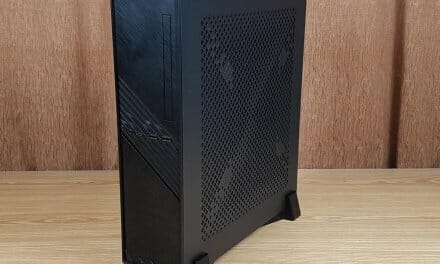
In my 22 years of hardware experience, I’ve seldom come across the items which made me like and dislike them at the same time. Today, I’ll be reviewing Corsair Crystal series 460X RGB. The Corsair 460X is a compact ATX mid tower chassis. Two salient features of it are Tempered Glass implementation on the front and left panels and RGB fans on the front panel. There is a non-RGB version available as well.

Product: Corsair Crystal 460X RGB
Manufacturer: Corsair
Price: £149.99 / $139.99 / Rs.17000 at the time of the review
Ease Tec Product Page: Corsair 460X RGB
Specification
| Case Form Factor | Compact ATX Mid Tower |
| Case Dimensions | 440mm x 220mm x 464mm |
| Case Motherboard Support | Mini-ITX, Micro-ATX, ATX |
| Case Material | Steel |
| Case Power Supply | ATX (not included) |
| Maximum Graphics Card Length | 370mm |
| Maximum CPU Cooler Height | 170mm |
| Maximum PSU Length | 200mm |
| Case Expansion Slots | 7 |
| Case Drive Bays | Two 3.5″
Three 2.5″ |
| External Connections | Two USB 3.0
One Headphone Port One Microphone Port |
| Fan Mount Locations | Front: Three 120mm / Two 140mm
Top: Two 120mm/140mm Rear: One 120mm |
| Fans Included | Front: Three SP120 RGB LED |
| Radiator Mount Locations | Front: 120/240/280/360mm
Top: 240mm Rear: 120mm |
| Compatible Corsair Liquid Coolers | H55, H60, H75, H80i, H90, H100i, H105, H110 |
| Warranty | Two Years |
| Weight | 7.97KG |
Packing
Chassis packing box is a typical corrugated cardboard box. On the front side, we’ve diagram of the chassis itself with Crystal series 460X RGB mentioned right underneath it. Here is what Corsair has to say about this chassis, “With its tempered glass front and side panel, the Corsair Crystal Series 460X is a compact and gorgeous ATX case with great cooling potential. Wires and drives are stowed away under a removable two-piece PSU and HDD cover. The Direct Airflow Path design ensures that fans don’t have to work to get air through unused drive cages, but can gently direct air to your hottest components and keep things quiet and still cool.”

The back side of the box has diagrams of all removable parts. These diagrams are coded with letters and their descriptions are mentioned on the bottom section.

Left and right sides of the box have specifications of the chassis, printed in the middle beneath Corsair brand and logo. Two diagrams on the bottom show the dimensions of the chassis (depth and length). The left diagram shows the front panel of the chassis. Right diagram shows the inner layout of the chassis.

One thing, I would like to appreciate here is the packing material used by the Corsair. Chassis comes wrapped in a plastic sheet and tightly placed inside two styrofoams. These foam coated are thick enough to ensure the safe shipping of the unit.


Accessories
Alongside the chassis, Corsair also includes the warranty guide, the user manual of the chassis itself and the user manual of the SP120 RGB fans. Accessories include various types of screws like for mounting motherboard, drives, fans, 4 long screws for radiator mounting and zip ties.

Closer Look
This chassis is gorgeous and one might not feel its beauty until the fully functional PC is assembled in it. The structure is made of steel. It definitely serves the purpose of two main selling features: Tempered Glass and RGB fans. Remember what I wrote in the introduction that few components have come to me in my 22 years of hardware experience which got my like and dislike at a time much like a hit or miss. This chassis falls in the same category. To answer your question of why let’s dig in it.

The front panel is one heck of a design and immediately grasps the attention of the viewers. We have a tinted tempered glass mounted on a removable shroud. Corsair logo is on the bottom section of the glass which does not lit up on its own but the light of the bottom SP120 RGB fan illuminates it which really gives a unique look to it. Glass has dimension of 208.28mm x 411.48mm (L x H). Glass is mounted on the shroud using 4 long screws that pass through the glass to the shroud all the way to the main structure of the chassis.

Screws are metallic and blend very well in the overall form and factor. Top screws have displacement from top to be of 5.08mm and from left and right edges to be of 7.62mm. Bottom screws have same displacement the left and right edges but 10.16mm from the bottom edge. Shroud has vents of size 25.4mm on both sides to ensure the sufficient air intake for the front mounted fans.

Removing the four screws would take the glass panel and the shroud off. Be careful while removing the glass panel to avoid any damage. There is full-size dust filter/cover on the front which is magnetic and can be taken off and on very easily. Besides the filter, we have mount locations for the 120mm or 140mm fans. Take note that there are no screw holes but the mountings for fan installation. Corsair has made excellent implementation there.

We’ve three SP120 RGB fans pre-installed in the chassis. These are the new generation of SP series fans from the Corsair. I won’t be discussing these fans in this review as I did a full review of these fans which can be checked at http://tinyurl.com/lgkjrdr. These fans have won our Performance award. Our thermal testing proves them to be worth of that award. I’ve zero complaints on the front side of this chassis. Up to 3 120mm or 2 140mm fans can be installed on the front. Please note that there is no 140mm variant in SP RGB series. The front has support for 120mm, 240mm, 280mm and 360mm radiators.

The left side panel is implemented in a tinted tempered glass as well. It is mounted on the main frame using metallic thumbscrews. Glass panel has dimensions of 391.16mm x 416.56mm ( L x H). These screws have rubber washers on their thread end.

The thread is torqued in the rubber grommets mounted on the mainframe. Fitting of glass is perfect and leaves no room behind. Right side top and bottom screws have displacement from the top and bottom respectively of 10.16mm. Displacement from the edges is 15.24mm. Left side screws have displacement from the top/bottom and edges to be of 10.16mm. Top and bottom sections of the glass panel are covered in black color which blends very well with the overall form of the chassis. Both strips have 25.4mm thickness.


I would again emphasize to take utmost care while handling the glass to avoid any damage to the glass panels or self-injury. It is also highly suggested to take the glass panels off before building the PC and keep them on a plain and smooth surface.
Inside layout is quite compact yet spacious. This chassis can accommodate motherboard of form factors Mini-ITX, Micro-ATX, and ATX. I tested the chassis with Asus Rampage V Edition 10 motherboard which is E-ATX size board. It not only fits very well but still clearance from the rubber grommets for cables. Corsair has implemented the rubber grommets such that they are installed far from the ATX standard mounts. This gives very good clearance.

This is what I meant earlier with spacious. We have a single motherboard tray going from edge to edge of the chassis. There is a large size CPU cooler cutout which enough clearance for installation of the backplate for any CPU cooler. We’ve 7 PCIe slots and vented mesh following them for air exhaust. Note the 7 holes on the outer frame of the chassis. These are there to help the user easily screw the graphics card (s). Hats off to the Corsair for providing much-needed requirement in the design of the chassis’.

The user now can easily pass the screwdriver through these hole(s) and tighten the screw of the graphics card when installing. I hope other manufacturers follow in the Corsair’s footsteps.
We’ve three large size rubber grommets right next to the SP120 RGB fans. There are two medium size cut outs between rubber grommets and the fans. Cables coming off the fans are passed through them.
On the bottom, we’ve two-piece shroud for PSU and HDD cage. Right side piece slides over the left side one. The left side has the HDD cage underneath it. These shrouds are made of plastic. The Corsair logo is quite visible on the left side shroud.

There is single opening on the left side shroud. This opening is for the graphics card(s) power cables and for any other cable that needs to be connected to the bottom headers of the motherboard. This opening is not well aligned with where the power connectors would be on the graphics cards which result in tilt cables passing through it. This does not give good looks to the build.

Both pieces of the shroud can be taken off. Right side piece is connected with a screw. Taking the screw off would help in taking out this piece. There is a tab on the rear side of the chassis, pushing it inwards would release the left piece of the shroud. Make sure to remove the right side piece first.

The rear of the chassis has fan mount (not holes) for a single 120mm fan whose height can be adjusted. Take care if you are installing the wide 120mm radiator on the rear as some may not fit due to space restriction.
Top panel can accommodate 2 120mm or 140mm fans. Though there are mountings for 140mm fans, mounting 280mm radiator seems out of the question. This is due to the severe height restriction from the top. We’ve roughly 28mm space above the motherboard top which further gets restricted if we use the high profile RAM. 240mm radiators can be installed but keep in mind that for that you would need low profile ram and that fan height needs to be of 25mm. My Corsair Vengeance Red LED RAMs have the height of 49mm and I could not install the Corsair H100i V2 on the top for that reason.

Also, as the hoses of the Corsair AIOs are not flexible enough, you may get tough time installing them on the front. I got the GSkill RipJaws V DDR4 RAM which has the height of 42mm but the height on the edges is less than the 42mm. Corsair AIO fits in with this RAM though fan’s frame is touching the edges of the RAMs. If you are setting up AIO on top, install it after you have hooked up the EPS or the CPU Power Cable.
We’ve 3 cut-outs on the top for cable passing. The single large cutout is visible in the bottom section above the PSU shroud. Removing both shroud pieces would reveal the chassis in its entirety and yes it is compact. We’ve four raised surface on the PSU mount location. PSU vent has a dust filter underneath which can be removed for cleaning. It is not magnetic and can be slide in and out. The large two cut outs on the bottom next to the PSU mount are where the HDD cage is slide and fixed.

The default position of the HDD cage is closer to the PSU. It can be mounted further away from the PSU in case longer than 160mm length PSU units are to be used. The maximum supported length of the PSU is 200mm. Even if the HDD cage is moved up to create room for PSU, note that there is only 28mm of space between the HDD cage and the PSU which is definitely not enough if you are to tuck the cables here. This is a serious limitation.


On a side note, it is suggested that you pass through cables like HD Audio before installing anything through the bottom cut outs. I faced issues while installing this cable. Also, install the PSU first, connect all the cables, pass them through the require cut outs and then install the PSU shroud piece. Install the motherboard in the last. I installed the motherboard first then the PSU and faced quite a challenge in setting up PSU shroud. This was the time, I had to reroute the HD Audio.
HDD cage has two trays in it. Four pins on each tray have vibration dampening to help reduce the noise. After setting up 3.5″ or 2.5″ drives in the trays, slide them in the HDD cage. Install the HDD shroud piece afterwards.

Another limitation is that if we move the HDD cage upward, we literally eliminate the possibility of the 360mm radiator mount on the front. So, that would leave us with the conclusion that a larger PSU and a 360mm radiator are not possible with the HDD cage. One would have to ditch the HDD cage to accommodate larger PSU and a 360mm radiator.
By now, you would be realizing what I meant by liking and disliking the item at a time. Let’s have a look at the backside of the chassis. Here are the pics of the PSU and HDD shrouds respectively.


The backside of the chassis has steel panel cover. It can be taken off by removing two thumbscrews on the rear side.

First look on the backside with the panel removed clearly indicates the lack of cable management space. We’ve three cut outs on the top right side for passing cables through. Below them, we have a large CPU cut out.

Below that, we have a bracket for 3 2.5″ SSDs. These are spring loaded for easy ejection of the SSD and top part has tabs for latching and releasing. This SSD bracket further limits the cable management as it takes a lot of space behind the motherboard tray. We’ve roughly 15mm or so of space behind.

Though this much space is enough for cable management but that SSD bracket takes out much of the space and then the lack of enough space between HDD cage and PSU creates the further bottleneck. One would need to spend some time to figure out how to route cables. Routeing cables around the SSD bracket is also a challenge. SSD bracket can be removed by unscrewing two screws on its bottom. This would release the much-occupied space by this bracket but it would do so at the cost of SSD mounts availability.

On the bottom right side, we have the RGB LED hub which is powered by SATA connector. Up to 6 fans can be connected to this hub. Read my review of the Corsair SP120 RGB fans for more info. Notice the cables management coming out of the front mounted fans on the top of the RGB LED hub. Nice job by the Corsair.

On the far left side, we’ve RGB LED Controller for the Corsair SP120 RGB fans. Though, it may look redundant as Corsair has provided controller on the IO panel on the top side of the chassis but this is how it has been implemented. It is needed nonetheless. The top end of this controller has cable coming out of it and going up top in the controller implemented on the top IO panel and bottom lead connects with the RGB LED hub.

We can see three large size rubber grommets for cables. We’ve 24 tie down spots which are plenty for cable management. The bottom left side cut out shows the HDD cage. Accessories box can be found there. On its right, we’ve another cut out for PSU cables pass through. Not the lack of space between HDD cage and PSU mount. This compounds the cable management limitations.
SSD bracket has three springs on the bottom edge. Once an SSD is slid inside, spring is compressed and SSD fits in with the upper tab locking to avoid ejection. To remove the SSD, simply slide the tab, it will release the pressure on the spring and SSD will be popped out.
The top side of the chassis has one large magnetic dust filter which is quite easy to handle. Removing the dust filter would show the steel implemented flexible fan mounts for 120mm and 140mm fans.

There is also a plate on the right edge of the top which can be removed and be used as a pass through for fill port should a custom loop be implemented in the chassis.

The IO Panel is implemented on the top. Panel includes: –
Power Button
Two USB 3.0 ports
Microphone jack
Headphone jack
Storage drive activity LED
Reset Button
There is a 3 button controller for the Corsair SP120 RGB fans. Left most button cycles the color with one color per press. Center button control the speed of the LED effect. The right most button changes the color effects. For more information, please read my review of the Corsair SP120 RGB fans. The link is mentioned above. If chassis is placed on the top of the table, then the user might experience difficulty in accessing this controller without leaving the chair.

Cables coming from IO Panel include: –
USB 3.0 cable
HD Audio Cable
Front Panel Cables including Power, Reset, HDD LED.
There are 4 large size feet under the chassis which give approx. 30mm of ground clearance. This is ample space to have airflow for the PSU. PSU vent is covered with a dust filter. This filter is not magnetic and can be slid in and out for cleaning purpose. Chassis feet have rubber mount to avoid scratching if it is placed on a plain surface.

The rear panel has IO Shield mount for the motherboard on the top left side. We’ve flexible fan mount for the 120mm fan for height adjustment on the top right side. There are 7 PCI expansion slots. On the bottom, we have a standard PSU mount.
Final Build
Test Build
At the time of the review, I did not have ATX size motherboard so an E-ATX motherboard was used for the test build. These are the specifications of the test build:
Asus Rampage V Edition 10
Intel i7 6850k @ 4.0GHz
GSkill RipJaws V 2x8GB @ 2400MHz C15
Corsair H100i V2
3 more Corsair SP120 RGB fans in addition to pre-installed 3 fans on the front
Asus Strix Rx 480 O8G
Samsung 840 EVO 250GB SSD
WD 6TB Black
Thermaltake Tough Power DPS-G RGB 750W PSU

The motherboard was an easy fit. I did not encounter any incompatibility for the motherboard of this size in such a compact ATX mid tower. As described above that there is a serious limitation when it comes to mounting 240mm AIO on the top. Our Corsair Vengeance Red LED DDR4 RAM having the height of 49mm did not give clearance to fit the Corsair H100i V2. Alternatively, I had to use GSkill RipJaws V DDR4 RAM. Though it gives clearance but it was a tight fit as fan frame was touching the low end of the RAM.
I had to route front panel cables, USB 2.0 cable for the Corsair H100i V2 through the bottom rubber grommet. Unfortunately, bottom cut outs and shroud implementation did not leave me any chance to route them from the bottom side of the chassis.
Despite the fact that I used 160mm length PSU, I ended up by setting the HDD cage further away from its default position to make more room between PSU and HDD cage to tuck my cables but it was not of that much help.
I did not spend enough time with the cable management but this picture would help you to have an idea how much space constraint this chassis is when it comes to the cable management.

Overall, the test build was very pleasing from looks wise though it was not behind the thermal performance either. I simply could not resist gazing upon the marvelous blend of lighting effects profuse by the tempered glass. It was definitely a site worth watching for.
Thermal and Acoustic Performance
To check the thermal performance of the chassis, CPU and the graphics card were put under stress tests. Furmark was used to stress test the graphics card at 1920 x 1080 at 8x MSAA. CPU was put under stress test at the same time using AIDA64. Microsoft Windows 10 x64 was used.
All the reported temps are in degree C. Room temp was at 35C. The summer season has started here and it is already getting heat up here. All the fans were set at custom fan curve with changes according to the temperature.


Foneso Digital Sound Level Meter version A0 was used to test the sound level of the chassis.

Thermal performance of the Corsair 460X RGB is very good indeed. Given the fact that how furmark juices out the graphics card and AIDA64 is known for its comprehensive stress testing for stability test, both components are expected to yield much more heat resultantly higher temperatures but 59C on the CPU and 68C on the graphics card with just 32dBA is quite remarkable. During routine desktop use system was dead silent. Corsair has my praise in this department.
Final Thoughts
Corsair has made an entry in the category of tempered glass chassis with their Crystal series line up. So far, two chassis have been introduced namely Corsair Crystal 460X RGB and 570X RGB. The tinted tempered glass and the SP120 RGB fans are the heart of the Corsair Crystal 460X RGB chassis. This chassis is the compact ATX mid tower with the support of up to 360mm radiator on the front. PSU and HDD have shroud in two pieces. There is a removable 2.5″ SSD bracket on the backside of the motherboard tray. Up to 3 SSDs can be mounted in that bracket. RGB fans add to the magic of the overall build’s look and feel, tempered glass profuse that effect. Up to 360mm radiator can be mounted up front. Chassis can support up to E-ATX size motherboards without any incompatibility. Touch and feel of the Power button are superb. Excellent thermal performance was beyond my expectation. While the Chassis has got these perks yet there are some limitations which users need to be aware of for smooth assembling experience. We’ve got extremely limited cable management space on the back side which is partly due to the implementation of the SSD bracket. There is not enough space between PSU and HDD cage which could hinder the cable handling. To mount 240mm radiator and fans on the top side, one would need to have low profile RAM below the 40mm. Motherboards with high rise heat sinks could also hinder the top mounts particularly the 140mm fans on the top. The top does not support 280mm AIO. One can’t turn the lights of the RGB fans off. Chassis can’t support 360mm radiator on the front, long power supply, and HDD cage at the same time. I found it quite challenging to install PSU Shroud after the installation of the motherboard and the PSU.
Value
The Corsair Crystal Series 460X RGB is listed at $139.99 / PKR 17,000. This price definitely seems to be high but one should bear in mind that the Corsair SP120 RGB series pack of 3 fans with a controller costs around $62.99. Price of the Corsair Crystal Series 460X RGB is $104.99. Doing the simple math would reveal the good pricing on the Corsair Crystal Series 460X RGB for what it offers to the users.
Performance
Thermal performance of the Corsair Crystal 460X RGB was too good and to be honest, it exceeded my expectations. Corsair SP120 RGB fans did the magic by not only giving some eye pleasing LED effects but also providing ultimate cooling performance. In my review of the Corsair SP120 RGB fans, they won our Performance award and they certainly live up to this mark when putting in the action. I’ve absolutely no complaint when it comes to the thermal performance of the chassis.
Overall, despite its limitations, this chassis is one heck of a product that serves to its name and its purpose. Once you get through all the build time constraints and what not, you would instantly fall in love as soon as that power button is pressed. I could not resist gazing at the marvellous build. Look and feel of the tempered glass backed by some awesome lighting is what makes this product shines out. This chassis comes recommended.

I’m thankful to M/s Ease Tec for giving me the opportunity of reviewing this unit.


