
Introduction
Raijintek was established in 2013 and within this short time, the company has made its way to earn themselves a good reputation in the market. Their aim is to design high-end products for lifestyle, computer, and day-to-day usage. Their products are designed in Germany and manufactured in China. Their products range include Power Supplies for the PC, Cooling solutions in both categories of air and water, custom loop components, PC Chassis, fans, and accessories. Their lifestyle product line is intended for the smartphone and tablet users in the form of accessories.
Raijintek has recently upped their game of custom water cooling by releasing new core components such as CPU Water Block, Pump/Reservoir combo, 240mm and 360mm radiators in Atlantis series. Though they are not available in the form of a kit, hard tubing based kit is expected from the manufacturer very soon. Since these components are not in the form of a kit hence, we will be taking at each individually and with a combined testing to measure the thermal performance. Today, we will be taking a spin on CWB-RGB. The CWB-RGB is a new copper-based CPU Water block featuring 3D micro-fin structure and alloying brazing. The complete base is nickel plated and almost flat surface. To make it more attractive to the user, this block has addressable RGB LEDs on the top housing to create one heck of stunning looks.
Item: CWB-RGB CPU Water Block
Manufacturer: Raijintek
Price: £47.00
Specification

Packaging and Unboxing
The CPU Water block CWB-RGB comes inside a cardboard box covered by a paperboard. The front side of the box has a model of the unit printed on the top and a picture of the unit in the middle. The backside has specifications of two versions in the tabular format. The CI version is a non LED one.

Opening the box will show the block tuck in the middle of the Styrofoam pad of white color. Accessories and user manual are placed below them.

Contents
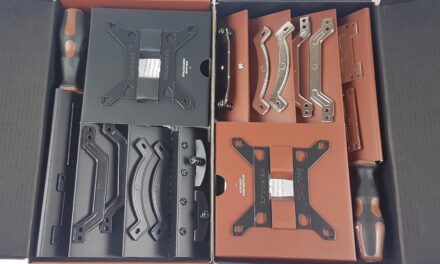
Raijintek has provided following with the block:
- CPU Block
- Intel/AMD backplate
- Universal Mounting Bracket
- 4x Metal Nuts
- 4x M4 6mm Screws
- 4x M4 13mm Screws
- 5x washers
- A user manual
- Thermal Paste
- Applicator
- SATA Cable
- Controller Hub

Closer Look
The dimension of the block is 94x77x26.1mm. The housing of the block is made of PMAA while the base and block are made of nickel plated copper. This block is compatible with the Intel LGA 115X/20XX/775 sockets and AMx/FMx sockets from AMD. It is compatible with AMD AM4 and Intel LGA 2066 if you are looking for this information. The top side of the block has a grayish finish. There are two G1/4” ports in parallel to each other. One is at the top and the other is at the bottom. There is no dedicated Inlet or outlet port hence the user is free to use the ports as required. There are Raijintek brand logo and name printed in the white color between these two ports. There are plastic covers or plugs covering both the ports with Pg 7 printed on them. The overall design of the block is in almost Octagon shape with 8 sides but 4 edged sides have less length to them.


Looking at the bottom of the block, we can see a mirror finished nickel plated copper base secured with the housing using standard 8 screws which do not need Allen key to remove. There is a plastic cover on the block cautioning the user to peel it off before installing. We can see another set of screws holding the base part of the block to the main top side of the housing. This housing is made of plastic. We can spot the pre-assembled mounting arms on the left and right sides of the housing with two screws on them. This is an interesting aspect as the majority of the other blocks in the market have 4 screws to provide even pressure from all sides when mounting the block on the CPU surface.

This also eliminates the need of any universal mounting bracket but Raijintek has implemented their standard mounting assembly as we have seen on their Leto Pro and Orcus 360 CPU Coolers. I hope they would come to this point for implementing the dedicated hardware mounting for this block as this silver color universal mounting bracket is boldly visible once the block is installed or at-least make it black for neutral accent. It is time to look at the main element of the block which is the cooling engine. The base measures 54x54x1.50mm. We took the block apart after its testing on our test bench by removing the 8 screws off it. The Raijintek is using 3D micro-structure flow tunnel design. The complete fin stack is made of a single copper unit. There are three columns the middle one has silver color while the exterior two are in black color. The fin structure measures 28x28x3mm approximately with 3mm being the height of the stack. This design though efficient poses one challenge to the loop configuration which is it adds more to the overall flow resistant hence a powerful pump is in order.


One can easily spot a thick Oring sealing the area between the housing and the copper base. The angle of the picture may give the impression that the ports are blocked, they are not. The coolant comes inside from one port and flows out through the fin structure of the second port. Since the block was opened after the testing; a few drops of the coolant can be seen in the housing.

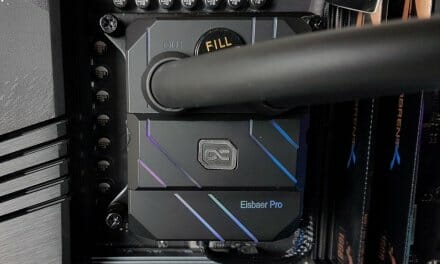
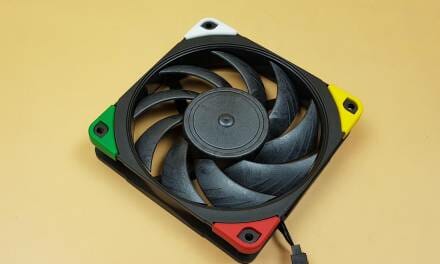
It is time to take a look at the sides of the block. There is a thick frosted white diffuser running on the entire length of the block housing. Even the ports on the top have a circular frosted diffuser at their bottom. This is there because the top side of the block has 12 ARGB LEDs installed under the top grayish cover which lights up when the 4-pin LED cable is connected to the controller. The length of the cable is 300mm approximately. The rest of the plastic housing has two-tone colors. The bottom portion is in black color whereas the portion which is overlapping the diffuser is in gray color.


RGB Lighting
The CWB-RGB has addressable RGB lighting solution being featured right inside the block and it certainly looks that dope in person. It is using 5V/3A power rating and using the 4-pin format [G, NA, D,+5V]. To control the lighting effects on this block, Raijintek has provided a controller in the box which is SATA powered. The length of the SATA connector is 530mm approximately. THE RGB cable from the block is connected to the controller and the SATA cable is connected to the controller and the PSU. There are 184 lighting modes on this block and this is where my complaint is. This controller has two buttons to switch to the lighting modes. Just imagine the hassle and frustration of going through these 184 lighting modes using that simple controller! Also given the limited length of the RGB cable coming from the block, this controller would need to be left inside the chassis. That would mean no convenient access to the controller. Raijintek should have provided ample length of the RGB cable coming from the block and a dedicated controller for convenient access to the lighting modes operations. The block can also be connected to the controller hub provided with the IRIS 12 RBW fan to sync and coordinate the lighting effects. Here are some of the pictures showing the absolute RGB goodness that this block offers:


Installation
We have tested the block on the Intel LGA-2011(V3) and LGA 1151 sockets. Here is the installation walkthrough on the LGA-2011(V3):
- Take out the long metal nuts. Raijintek has suggested putting the metal nuts on each of the mounting holes around the CPU socket. Then place the bracket on top of these nuts and using M4 13mm screws, secure the complete assembly by tightening these screws. Unfortunately, this will not work if you have already installed the motherboard in the chassis and it is in vertical layout or like in my case the motherboard is tilted as it is on the Praxis Wetbench. Here is my take on the assembling.
- Pass an M4 13mm screw through anyone mounting hole on the mounting bracket.
- Take a metal nut and screws it completely with the M4 13mm screw till it touches the mounting brackets.
- Repeat the above steps till all four metal nuts are secured to the mounting bracket.
- Now, place the assembled hardware on the CPU socket by aligning the metal nuts with the mounting holes around the CPU socket.
- Tighten the screws till they run out of the thread.
- Peel off the sticker from the base of the block.
- Apply the thermal paste on the CPU surface.
- Place the block on the CPU by aligning the screws on the block with the middle holes on the mounting bracket and screw tighten the block.
- Connect the 4-pin RGB cable with the controller.
- Connect the SATA cable coming out of the controller with the PSU.
- This would complete the installation of the block.
- Since the block has two G1/4” threaded ports, any fitting supporting G1/4” threading could be used.


Here is the walkthrough for the Intel LGA-1151:
- Place the backplate on the backside of the motherboard.
- Pass the M4 13mm screws through the middle hole on each mounting corner for Intel such that screw passes through the hole on the motherboard around the CPU socket.
- Place the washers through each M4 13mm screw.
- Place metal nuts and hand tighten them on the M4 13mm threads till the thread runs out.
- Place the mounting bracket on the top of the metal nuts and use M4 6mm screws to secure the bracket on the assembly.
- Peel off the sticker from the base of the block.
- Apply the thermal paste on the CPU surface.
- Place the block on the CPU by aligning the screws on the block with the middle holes on the mounting bracket and screw tighten the block.
- Connect the 4-pin RGB cable with the controller.
- Connect the SATA cable coming out of the controller with the PSU.
- This would complete the installation of the block.
- Since the block has two G1/4” threaded ports, any fitting supporting G1/4” threading could be used.


I would like to highlight one important aspect of the rather large size backplate. It has a black color foam padding pasted to it which makes contact with the sub-components on the backside of the PCB. Though the stress would be much less as compared to the solid contact which could easily damage the sub-components, still there is a need to redefine this design for better safety of the sub-components.
Clearance
The block is a smart design enough not to create any clearance issue with respect to the DIMM slots and first PCIe slot.
Testing
Following test setup has been used for the testing purpose:
- Intel i7 6850k
- Asus Rampage V Edition 10
- Ballistic Elite 4x4GB DDR4 @ 3000MHz
- Samsung 840 EVO 240GB SSD
- Seagate Barracuda 2TB HDD
- Corsair AX1200i
- PrimoChill Praxis WetBench
Following open loop setup has been used for the testing purpose:
- Alphacool G1/4” 13/10mm Compression Fittings
- Alphacool G1/4” 13/10mm Compression 90° Fittings
- Alphacool NexXxos 45ST 360mm full copper Radiator
- Alphacool Drain Valve
- Alphacool 13/10mm Soft Tubing
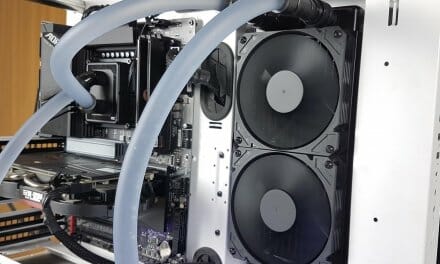
- Noctua NF-A12x25 PWM Fans
- Swiftech D5 Malestorm X100
We are humbly thankful to the Alphacool for sponsoring us the open loop stuff which has enabled us to complete this review. Since at the moment we don’t have a manometer, hence we won’t be able to measure the liquid flow restriction of the block at the moment. We have a plan for other testing equipment including manometer in coming time that will enable us to do more detailed testing of the hardware at hand. For now, we will stick to the thermal testing as this is the ultimate goal of any CPU Water Block.
We are using Noctua NT-H1 thermal paste on our test bench to ensure the standardization among the coolers testing and to mitigate any benefit coming from the bundled thermal paste with the cooler. We are using Asus RealBench 2.44 to stress test the CPU on stock clocks of 3.6GHz at 1.130V and on an overclocked chip to 4.3GHz at 1.350V. One hour run of the test is done for each time. The average of all cores temperature readings is calculated by summing up the temperature reading of individual cores and diving this figure by the number of the cores. Then we calculate the delta temperature by subtracting the ambient temperature from the average value. All the testing was done on Microsoft Windows 10 x64 Professional Edition. For this testing, we have used a pump at 100% of its nominal speed. The MCP655-PWM pump has been used by the Swiftech in their D5 Maelstrom line of the reservoir/pump combo. Its nominal head is 13 ft and a maximum pressure of 50 PSI. Its speed range is 800 to 4800 RPM controllable using PWM header.
Let’s take a look at the results.
On stock clocks, under stress test, the delta temperature was 21.10°C at 100% of the pump’s speed. There is a difference of 2.6°C between the Swiftech Apogee SKF Prestige and Raijitnek CWB-RGB with former taking a lead.

With overclocked chip to 4.3GHz using 1.350V the delta temperature was 40.5°C at 100% of the pump’s speed. There is a difference of mere 0.92°C between both blocks with Swiftech Apogee SKF Prestige taking the lead again. This is still a good performance given the price of the block and visuals it offers.

Conclusion
Raijintek announced their Atlantis series of the custom water cooling during the Computex 2018. It consisted of two new radiators named Calore C240 and C360 made entirely of the copper fins and brass tanks. Then there is Antila D5 with two versions one without addressable RGB and the other which seems to be improved version of the basic one as it has two ports at the bottom and addressable RGB lighting solution. The last one is a beautifully crafted CWB-RGB CPU Water block featuring nickel-plated copper block and addressable RGB lighting solution on top of it.
The dimension of the block is 94x77x26.1mm. It is in an Octagon shape. The housing of the block is made of PMAA while the base and block are made of nickel plated copper. This block is compatible with the Intel LGA 115X/20XX/775 sockets and AMx/FMx sockets from AMD. It is compatible with AMD AM4 and Intel LGA 2066 if you are looking for this information. The top side of the block has a grayish black color cover with Raijintek brand name and logo printed on its center. There are two G1/4” threaded ports implemented in parallel to each other. One is located on the top of the branding and the other is below it. There is no dedicated inlet/outlet port hence the user is free to use as per the requirement. This is exactly what we saw on the Swiftech Apogee SKF prestige.
There is a white color frosted diffuser running on the entire length of the block’s side. There are 12 addressable RGB LEDs installed under the top cover. The diffuser is designed such as that the ports have diffuser portion as well to create some dope visuals not only across the frame of the block but on the ports as well. The plastic housing has two-tone colors to it. The bottom portion is entirely in the black color whereas the transition area between the top and the bottom is in a gray shade.
RAIJINTEK’s CPU water block with Rainbow LED (Addressable) light, CWB-RGB is made of a full copper material which was melted by alloying and features adapting 3D micro-fin structure and alloying brazing to ensure optimal heat transfer for better thermal performance. Looking at the main ingredient of the block that is the cooling engine we could see a 54x54x1.5mm mirror finished nickel plated copper base plate which is secured to the housing of the block using 8 standard screws for which Allen key is not needed. There is a 3 columns micro-fin structure apparently made out of a single copper block. The machining work could need more refinement as can be seen at the bottom of the micro-fin structure making contact with the copper base. The micro-fin structure measures 28x28x3mm where 3mm is the height of the fin stack. This design though less restrictive as we have seen on the Swiftech Apogee SKF Prestige is still restrictive and warrants a powerful pump with more pressure head. Looking at the back of the disassembled block housing, we can spot an oring to ensure a proper seal between the copper base and the housing. The coolant flows through one port and flows through the micro-fin structure to exit the block through the second port. Due to the nature of the design implementation, there is no dedicated inlet/outlet port.
The Raijintek surprisingly has used universal mounting assembly for this water block which could have been much better if Raijintek had opted for a dedicated assembly only for the block. Also, the silver color outlook on the mounting bracket makes it rather look odd with the block and if Raijintek is not going to opt for a dedicated assembly then at-least redo the mounting assembly in the black color for neutral accent. The backplate has a black color foam padding pasted to it which makes contact with the sub-components on the backside of the PCB. Though the stress would be much less as compared to the solid contact which could easily damage the sub-components, still there is a need to redefine this design for better safety of the sub-components.
Coming to the last design element of the block is the stunning addressable RGB lighting solution which creates dope looking visuals on the block and its surrounding area. There is a 4-pin GND/NA/D/5V pin format of the cable having an approximate length of 300mm. Raijntek has bundled a controller which is SATA powered to change the 184 lighting modes on the block. This is an insane amount of the modes but there are two caveats to this design. One is that there are only two buttons on the controller to switch through these 184 modes and secondly due to less length of the LED cable coming out of the block, this controller needs to be placed inside the chassis making it inconvenient for the user to access it for changing the modes. A remote control would have been more appropriate. The block can also be connected to the IRIS 12 RBW (only) controller to color coordinate the lighting effects on the fans and the block. Despite these limitations, the lighting effects are brilliant and pleasant to the eyes.
Value and Performance
The Raijintek CWB-RGB block is listed at £47.00 at the time of the review making it the best value that your money could buy and it has two years of limited warranty as well. This is further augmented by the good performance level within this price range making it one heck of the best value product. We have tested this block on the Intel i7 6850k which is a 140W TDP chip and this block was put up against one of the best blocks out there in the market which is Swiftech Apogee SKF Prestige and it has performed well. This block has also been tested on the Intel i7 8700k, the result of which will be mentioned in our second upcoming content on the remaining stuff in the Raijintek Atlantis series. The Raijintek CWB-RGB CPU Water block comes recommended by us given the totality of the package that this single block offers as it has the form and the functionality written to its face.

We are thankful to the Raijintek for sending us their CWB-RGB CPU Water Block for the review.


