
Raijintek was established in 2013 and within this sort time, the company has made its way to earn themselves a good reputation in the market. Their aim is to design high-end products for lifestyle, computer, and day-to-day usage. Their products are designed in Germany and manufactured in China. Their products range include Power Supplies for the PC, Cooling solutions in both categories of air and water, custom loop components, PC Chassis, fans, and accessories. Their lifestyle product line is intended for the smartphone and tablet users in the form of accessories.
Raijintek has sent us their newly released Leto Pro RGB CPU Cooler for the review. Raijintek has taken the concept of Leto to a next level where they have added a form to the functionality. The design of the Leto Pro RGB has slight changes as well as compared to the original Leto version which we reviewed early. The Raijintek Leto Pro RGB is a budget level CPU cooler which is compatible with all the major sockets out there including the AM4 out of the box. It has two 12025 PWM RGB Macula fans with O type ring LED design. Yes, that is right this cooler comes with not just one but with two RGB fans and this is not the chanting part of the story. These fans can be connected to the RGB LED lighting headers that are now being offered as a necessary part of the motherboard from all the manufacturers. We have tested the cooler on the Asus ROG Maximus X Hero motherboard and connected the fans using the supplied 2-1 RGB LED connector cable with the Aura header on the Asus motherboard. The Aura software was used to check the lighting on the fans they have worked like charm. Without any further a due, let’s dig this cooler and compare it with the Leto.
Product: Leto Pro RGB
Manufacturer: Raijintek
Price: €40 including VAT / $35 [at the time of the review]
Specifications

Packaging and Unboxing
The cooler comes in a colorful packing made of the cardboard box. Raijintek is using the same retail packing for their Leto Pro RGB and Leto Pro Black. The front side of the box has the cooler picture on the main section. Raijintek brand name and logo are printed on the left side under the picture. Leto Pro Black CPU Air cooler is printed at the bottom on the left side. Don’t be confused with these wordings. I took it for the Black version as well but Raijintek informed me that they are using the same retail packing for two variants. An easy way to find out which version is included in the pack is to check the left side of the box and see which version is checked in black.

The left side of the packing box UPC and EAN labels printed on the top left side. Leto Pro RGB is checked indicating that this is an RGB version of the Leto Pro cooler. Two pictures of the coolers are printed. One is showing the base of the cooler and the other one has a focus on the top and the front side.

The right side has the picture of the cooler on the main section. Fans are shown in multiple colors to signify that they are RGB versions. Raijintek brand name and logo are printed under the picture on the left side. Leto Pro RGB CPU Air Cooler is printed at the bottom.

The backside of the box has the specifications of the Leto Pro RGB and Leto Pro black in a tabular manner. Two pictures of the coolers are printed around the table. Raijintek brand name and logo are printed on the left side of the specs table. Leto Pro RGB/Black CPU Air Cooler is printed at the bottom.

The top cover has the picture of the cooler with fans installed printed on the top left. Raijintek brand name and logo are printed under the picture. Leto Pro RGB/Black CPU Air Cooler is printed at the bottom. Socket compatibility is printed on the right side in the white color font. This cooler is compatible with the AM4 socket out of the box.

The bottom side of the box has the company’s contact info printed. The cooler is designed in Germany and made in China.

Let’s open the box. Cooler is nicely placed inside the box with the accessory box placed in front of the cooler. The user manual is placed on the right side. The fans are pre-installed on the heatsink.

Accessories
The Raijintek has provided following contents:
- 1x Heatsink
- 2x Fan
- 1x Backplate for Intel/AMD
- 1x Intel mounting clip
- 4x Fan clips
- 1x crossbar
- 4x Knurled threaded screws
- 2x M3 screws
- 4x LGA2011 screws
- 4x Metal Nuts
- 4x Metal nuts/spacers
- 4x red color washers
- 2x Standoffs
- 1x Thermal Paste
- 1x Y-Splitter for Fans’power cables
- 1x RGB LED Splitter Cable


Closer Look
The Leto Pro RGB is a 120mm Slim Profile CPU Cooler. The heatsink itself has no top or side covers with the lighting effect but there are two 120mm PWM RGB fans with all the magic. Here is what the manufacturer has to say about it. “RAIJINTEK LETO PRO series CPU cooler, with performing 12025 RGB PWM fan, is “Designed in Germany“, manufactured by several patents to reach advanced performance, high quality & workmanship. LETO PRO heatsink, a slim type 120mm cooler D:50mm & height 153mm, is very suitable for most chassis. 12025 performing RGB fan, Macula 12 RGB fan, is with Anti-vibration rubber pads on all corners, an O-type LED for visible color & brightness uniformity, RGB or PWM Y-cable. LETO PRO series supports all modern CPU sockets. LETO PRO series brings you not only a cooler with outstanding performance and friendly installation, but also is a spotlight of your system.” Let’s take a closer look at the design.

The dimension of the cooler is 127x101x155mm. The weight of the cooler is 925g. The heatsink is in black powder coating and feels quite a solid build in hands. It has a matte black finish. The heatsink packs 4 heatpipes with a less dense fin stack. This side has the dimension of 126x111x50mm. Please note that this is strictly a dimension of the heatsink without taking into consideration the protruding heatpipes and the base. There are total 43 aluminum fins in black powder coating which are placed wider to each other. Because the fin stack is not dense the fans can be made to rotate at low speeds to still drive your cooling needs in an effective manner.


Please note that the fins are implemented in a step manner. Top 32 fins have the same dimension whereas the lower 11 fins are cut out from their left and right sides. The dimension of the lower cutout fin stack is 94x27mm. This is one of the differences between the Leto and Leto Pro RGB versions. The Leto has full length heatsink without any stepping or cutout fins. In my personal opinion, Raijintek should have stuck with the full block on Leto Pro RGB as well.


The Leto Pro RGB packs 4 heat pipes each of 6mm thickness. This is a major difference between both coolers. The Leto has 3 heatpipes each of the 6mm. The addition of the one more heat pipe would help the Leto Pro RGB to achieve more efficient heat dissipation. Also, take a note of how the heatpipes are going inside the heatsink. On the Leto, they are forming a perfect U by going inside in a same line of sight but in the Leto Pro RGB, they are doing it in a different manner though still in U shape. The two interior pipes are going towards the middle side of the heatsink whereas the exterior most pipes are going at a wider angle. This design is effective as the heatpipes are making contact with most of the surface area for effective heat dissipation.

The top side has a Raijintek brand logo in the middle. Four heat pipes are terminating above the top fin in a half circle manner. This side only has a dimension of 127x50mm. The left and right sides show the inset in a curve design.

The left and the right sides are identical. Fins joint assembly is located on both of these sides which makes the overall look cleaner. There is an inset in a curved manner. These sides are where the metal clips of the fans are hooked into. Step design of the fins is clear here. We can see the heat pipes going inside the heatsink from different points in a group of two. The middle two have the same line of sight whereas the outer two have the same line of sight.

Above picture shows the pipes alignment inside the heatsink.

Let’s take a look at the bottom of the heatsink. We can see 4 heat pipes coming out of the heatsink and going in the copper base. The heatpipes are made of copper and are in a black coating. They are 6mm thick. Each fin has the Raijintek brand logo embossed in the middle. The base is designed in an angular manner and it has two holes on the top. This is where the crossbar fits into.

This cooler is using the C.D.C design. In this approach, the heat pipes make direct contact with the IHS of the CPU. This helps in much faster heat dissipation onto the heatsink. The same design was used in the Leto cooler. Also, make a note that these heatpipes are not following the continuous C.D.C design approach as there are spaces between the heat pipes on their points of contact. In continuous C.D.C there is no gap between the heatpipes. The base is clearly hinting that the heatpipes are made of copper.

Let’s take a look at the magic part of the cooler which is its form. In addition to all neutral black color approach, it also features true RGB lighting effect which looks quite dope once in action. These RGB LED lightings are on the provided two fans. Raijintek has provided two 12025 Macula PWM RGB fans with the cooler with O type ring LEd design. There are two transparent rings on the outer frame of the fan. The top side ring is circulating around the fan blades. It has 4 RGB LEDs in total with one on each corner. There is a sticker pasted on the motor hub with the Raijintek bran logo printed in the middle. Raijintek Corporation is printed around it. Each fan has 7 blades. The mounting sides have anti-vibration paddings. The top side ring is mostly visible except on the corners where it is sandwiched.

The backside has a sticker pasted on the motor hub. Raijintek brand name and logo are printed in the middle. The fan is using DC Brushless motor with 12V at 0.484A. The design approach is quite unique. The transparent ring is actually holding the motor and the blades on to it and connecting them with the fan’s frame. This ring also has 4 RGB LEDs with one on each corner.

There are two cables coming out of the fan’s motor. One is the 4-pin PWM power cable and the other is the 4-pin 12V GRB cable for the RGB control. This cable can be connected on the motherboard’s RGB LED lighting header and can be synced with the motherboard’s lighting solution as well the complete chassis lighting solution if that is also connected on the motherboard’s RGB LED lighting header. Each cable is approximately 469mm in length are flat ones without any braiding. You would be wondering how to connect the RGB LED cables onto the motherboard’s lighting header if there is only one such header. Well, worry not as Raijintek has got you covered. They have provided two Y-splitter cables. One is for the 4-pin PWM power cables and the other is for the 4-pin 12V GRB RGB LED cables. Using these two cables, you would be using single lighting header and a single fan header.

The fan dimension is 120x120x25mm. They are rated at 12V with 7.5V being the starting voltage. Speed is 800~1800 RPM. They are using Sleeve Bearings with 56 CFM airflow rating. Static pressure is 1.6mmH₂O. Their MTBF is 40000 hours. Maximum noise level is 25 dB(A).
Installation
The cooler was installed on the Asus ROG Maximus X Hero. Before proceeding I would like to share few words on the improved mountings with this cooler. Finally, Raijintek has used foam padding on the metallic backplate. Say bye to the hard plastic backplate. There is no plastic washer either but metal nuts that hold the backplate onto the motherboard’s PCB. Let’s take a look at the installation procedure of this cooler. Let’s see about the installation procedure.
Place the backplate on the backside of the motherboard in such a way that the foam padding faces the PCB of the motherboard. The same backplate will be used for the AMD socket and this cooler is out of the box AM4 compatible.

Route the 4x knurled headed screws from the 4 holes on the CPU socket through the backplate.

Place the 4 red color washers on each of the screws.

Using the 4 long metal nuts/washers secure the backplate with the motherboard. They are hand tightened.

Place the mounting clip on top of the screws. Orientation is of no concern as they have mounting holes in the middle of each side. At this point the user manual was confusing. They have wrongly mentioned the top screws for the Intel socket whereas they are for the AMD socket. Use the corner holes for the Intel socket.

Secure the plate onto the screws using the small size metal nuts or heads. Next up, take out the two golden color standoffs and mount them on the decided sides facing each other.

Apply the thermal paste on the IHS of the CPU. Place the crossbar on top of the cooler’s base. Place the heatsink on the top of the IHS of the CPU such that the holes on the crossbar align with the standoffs. Use the two M3 screws and secure the heatsink on the mounting bracket.

Connect the fans with the heatsinks using the metal clips. Connect the both 4-pin PWM power cable to the supplied Y-Splitter. Similarly, connect the two RGB LED cables to the Y-splitter LED cable. Connect the LED cable on the motherboard’s lighting header. Connect the Y-splitter cable to the fan header of your preference. This would complete the installation.

I connected the cable in the wrong direction as shown in the above picture. I had to connect it in reverse for correct installation.
Compatibility and Clearance
Before discussing the performance of the cooler, let’s take a peak on the compatibility and clearance of this cooler with respect to the PCIe slot, RAMs’ height Motherboard’s I/O cover, and PC Chassis.
PCIe Slot Clearance
This cooler has no clearance issue what so ever with respect to the top PCIe slots.
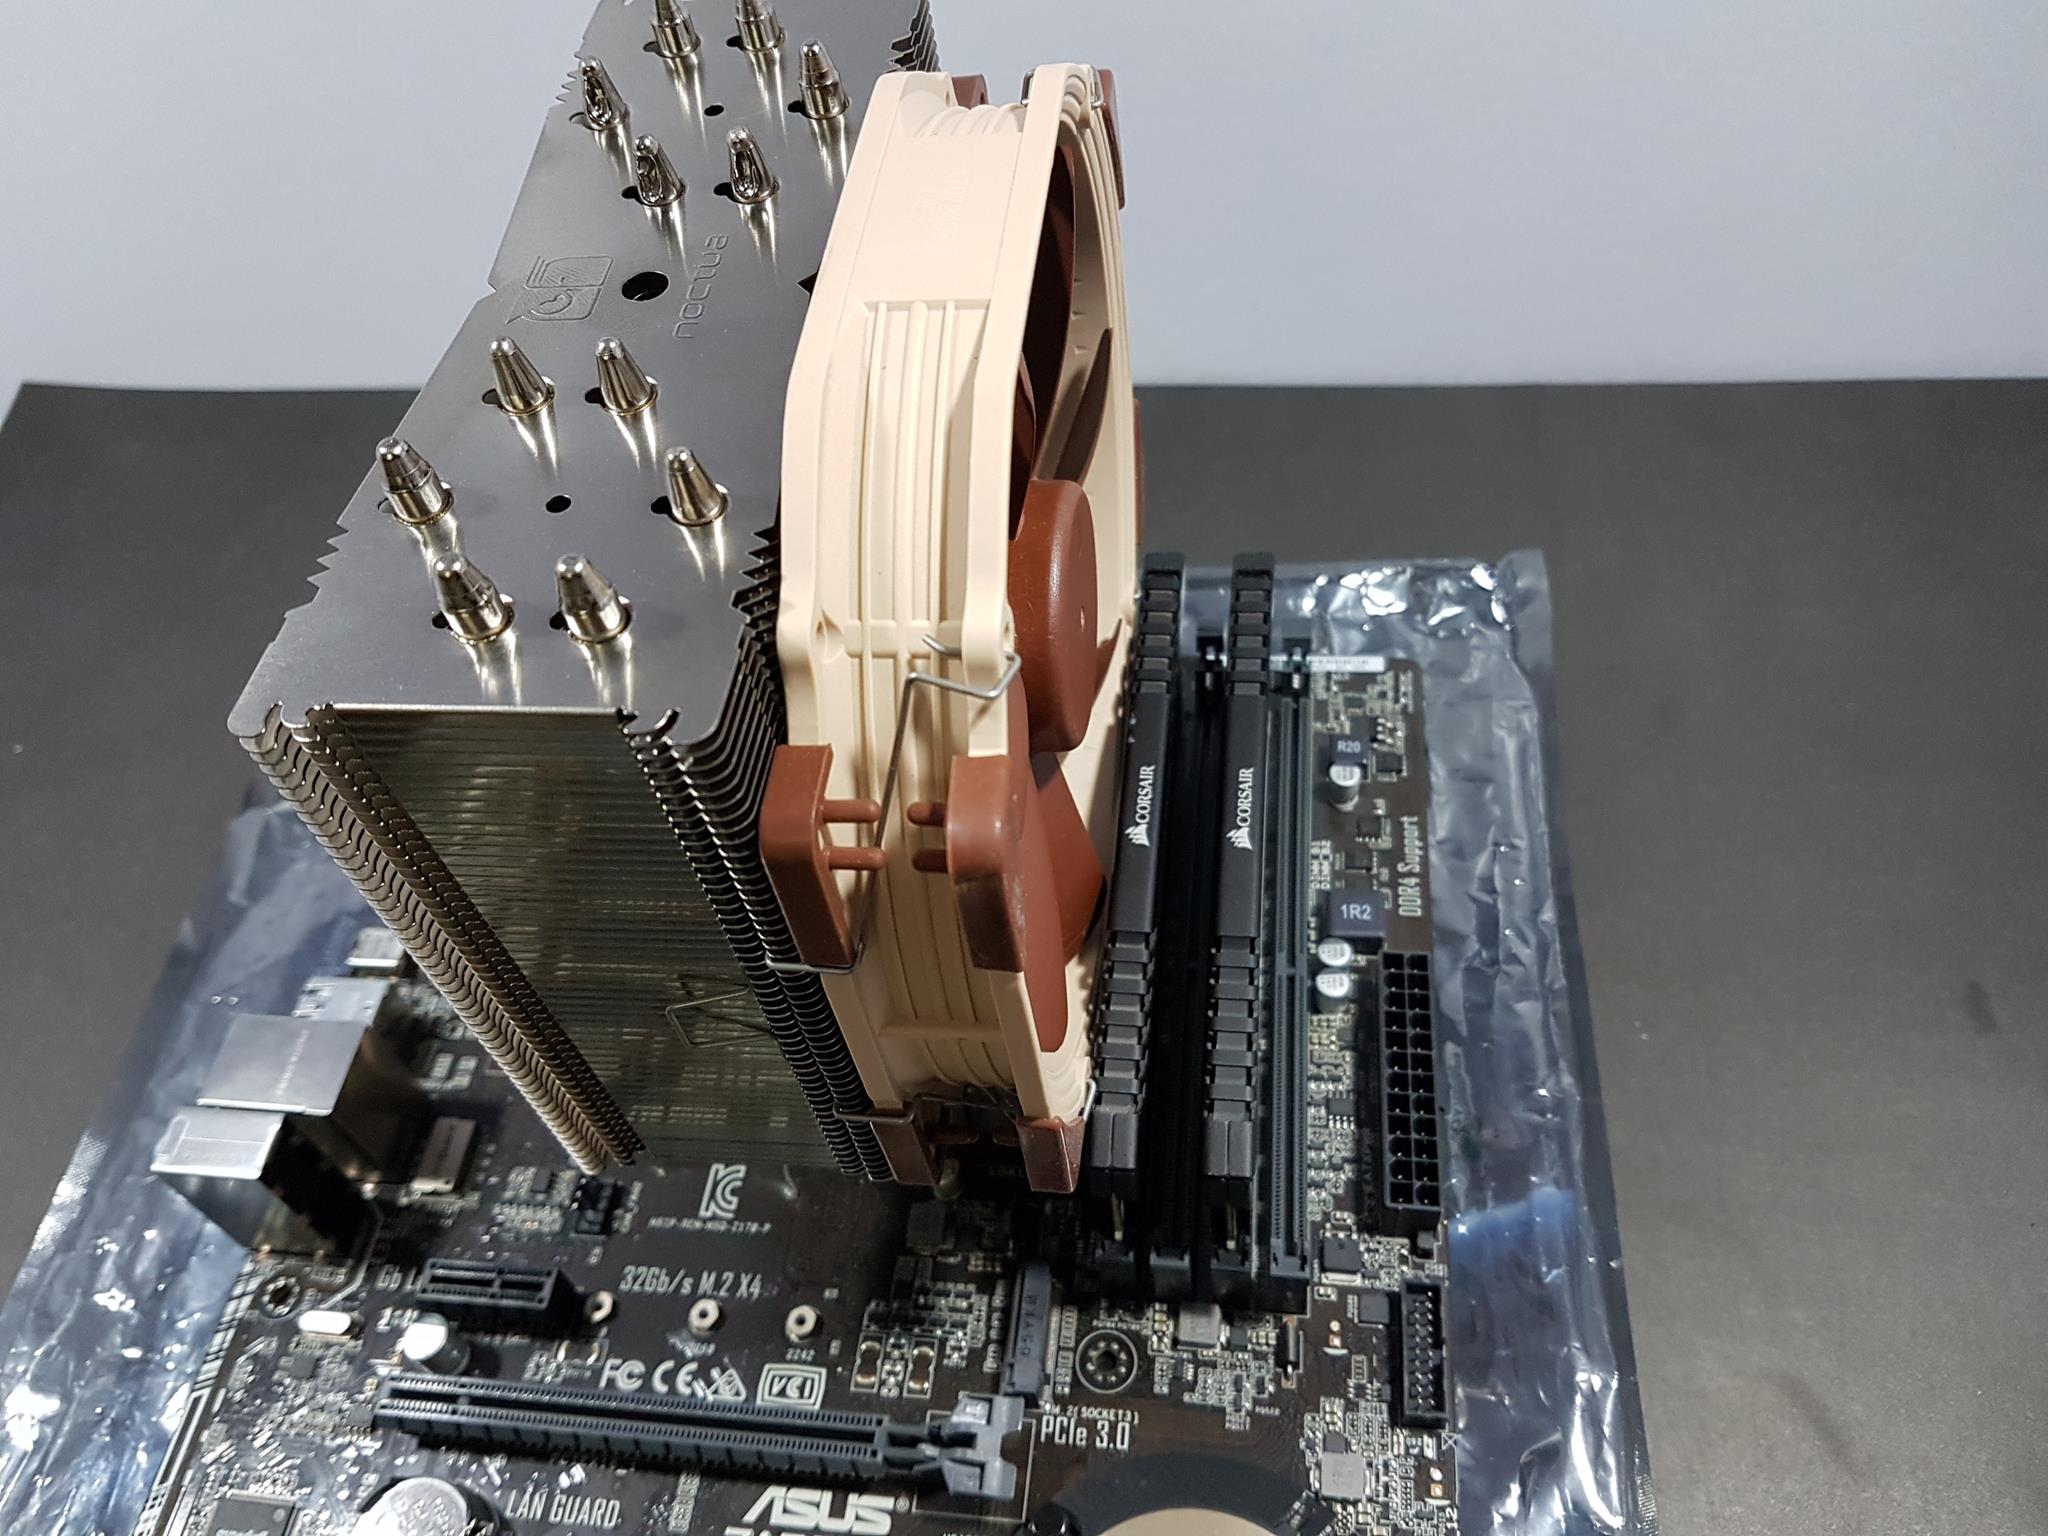
RAM Height Clearance
This cooler has no restriction on the RAMs’ height. RAM of any height can be used. On a side note, the high profile RAMs may cover bit front of the 120mm fan.
Motherboard’s I/O Cover Clearance
Absolutely no clearance issue with respect to the motherboard’s IO.
PC Chassis Clearance
The height of the cooler with the fans is 155mm. This is compatible with the majority of the chassis in the market. Still, check the chassis manufacturer’s website for the maximum cooler’s height possibility.

Before closing this section, I would like to share with you how this approach of using foam padding on the backplate actually looks like after mounting the cooler. Take a look at the below picture.

As you can see there are grooves like holes encircled in the red color. These are the result of backplate making contact with the sub-components around the CPU socket on the backside of the motherboard. Just imagine if this was the hard plastic backplate, it would have damaged those sub-components. This may not be apparent on the regular ATX size boards but on the mini-ITX version, this could be quite an issue. I would have preferred the silicone washers between the mounting holes on the backplate and holes on the motherboard to avoid any such situation. Even these paddings have some resistance to those components. But still, this is much better than the hard plastic backplates. This is my personal opinion only.
Testing
We have recently upgraded our second test bench to the Coffee Lake platform. Unfortunately, we have not yet tested the coolers on this platform, hence we are comparing between the Leto and the Leto Pro RGB coolers only. Here is the test build configuration:
- Intel i7 8700k
- Asus ROG Maximus X Hero
- Ballistix Elite 2x4GB @ 3000MHz DDR4
- HyperX 120GB SSD
- Thermaltake TP DPS-G 750W PSU
- Colorful GTX 1050Ti Vulcan U 4G EC
Each cooler was tested on stock clocks at 1.140V with turbo boost. Asus Real Bench 2.4 was used to stress the CPU. RealTemp was used to monitor the temperatures during the testing. A single run of RealBench was run on stock clocks and an average of max temperatures on all cores was recorded. We are using delta temperature to counter the uncontrolled environment. The average figure is subtracted from the recorded ambient temperature to obtain the delta temperature.
CPU was overclocked to 4.8GHz at 1.28V. This i7 8700k runs way hotter and due to the warranty concern we have not yet delided the chip. 3 runs of RealBench were made with overclocked chip each with the interval of minimum 15 minutes to let the CPU cool down before the next run. The average of each run is obtained and the maximum value is mentioned on the graph as worst case possible scenario. Fans were made to run at 100% of their rated speeds across all tests. Each run was of 60 minutes.
We are using Noctua NT-H1 to test all coolers. This helps to ensure the standardization in the testing by mitigating any possible performance effect that can be had with the bundled thermal paste with the cooler. Microsoft Windows 10 x64 is used.
Let’s take a look at the performance graphs.

The Raijintek Pallas did a maximum of 48.21°C under load on the stock clocks. This is quite an improvement over the Leto cooler which did 58.35°C.

These coolers are not designed for extreme overclocking. Keep that in mind. From stock clocks to the mild overclocks these coolers would drive your cooling need just fine. The Leto Pro RGB did a maximum of 65.17°C with overclocked chip. The Leto did a maximum of 69.89°C. Our chip is making itself an ideal candidate for the deliding.

Both fans at 100% speed were reaching 39 dB(A). This is on a high side. This was partly due to the high pitched shrill noise coming from the second fan. I turned the second fan off and the dB(A) level was 28 dB(A) which is quite a good reading.
RGB LED Lighting Effect
Before jumping to the conclusion, let’s take a look at some of the stunning pictures of this cooler in action with the RGB lighting on. I have used Asus AURA software to control the lighting solution. All the lighting effects were working well and there was no hitch or miss of any sort. Fans’LED were highly responsive to the change in the lighting effect and Raijintek has definitely deliver. The lighting effect is pleasant and O type design helps in better diffusion of the light around the ring which really catches the eye.

Here are some pictures for your eyes pleasure.


Conclusion
The Raijintek has recently released their new Leto Pro RGB and Leto Pro Black versions further enhancing the performance of their Leto cooler yet with quite a bold and stunning style. We were sent Leto Pro RGB version of the coolers to be reviewed. Earlier we had reviewed their Leto variant which is a decent budget level cooler. The dimension of the Leto Pro RGB is 127x101x155mm [WxDxH]. The heatsink is finished in matte black color using a black powder coating. The weight of the cooler including fans is 925gm with the thermal resistance of 0.11 °C/W. The build quality of the heatsink is solid. It feels like a premium one in the hands. It packs 43 aluminum fins. The fin stack is a stepped design. The top block has 32 fins whereas the bottom block has 11 fins. This is where this cooler differs from the Leto as later has a full-length block. Every fin has Raijintek logo embossed in the middle. The cooler has 4 heat pipes each of 6mm thickness. This is another difference with the Leto which has only 3 heat pipes each of 6mm thickness. Also, the displacement of the heatpipes inside the heatsink is far effective in the Leto Pro RGB than in the Leto. Heatpipes are made of copper and are black color powder coated.
The base has a different approach for making contact with the CPU surface. Instead of having a copper-based making a point of contact with heatpipes soldered inside the base this cooler is C.D.C design. C.D.C stands for CPU Direct Contact. Idea is to let the heatpipes make direct contact with the heat source and dissipate the heat more effectively and quickly. However, this cooler is not using a continuous C.D.C design as there are gaps between the heatpipes on the base. Under the continuous C.D.C, there is no such gap and advocates of later points to higher thermal performance owing to the design mechanism. This cooler has RGB LED lighting on the fans. Raijintek has provided 12025 PWM RGB Macula fans. The real magic is not only the RGB fans themselves but the functionality of connecting these with the RGB Lighting enabled headers on the motherboards like in our case we connected them to the AURA header on the Asus ROG Maximus X Hero and controlled the lighting effect using the Asus AURA software. Raijintek was considerate in providing RGB Y-Splitter and PWM Y-Splitter making this a complete solution for which there won’t be a need for anything else. The lighting effects are pleasant and O type design helps in a better diffusion of lights around the O ring. This creates stunning looks on the cooler.
The fans dimension is 120x120x25mm. They are rated at 12V with 7.5V being the starting voltage. Speed is 800~1800 RPM. They are using Sleeve Bearings with 56 CFM airflow rating. Static pressure is 1.6mmH₂O. Their MTBF is 40000 hours. Maximum noise level is 25 dB(A). Raijintek has changed the mounting provisions and these are better than the previous mountings. Instead of a hard plastic backplate, they have provided a metallic backplate with foam paddings on it. Foam padding is bit hard and it makes contact with the sub-components on the motherboard’s PCB from the backside. Still, this is a much better solution than the hard plastic made backplate which could damage those sub-components, especially on the mini-ITX form factor motherboards. Raijintek is offering 5 years of warranty on the heatsink and 2 years of warranty on the fans. I wish they had provided 5 years of warranty on the complete cooler. This is my personal opinion only.
Value and Performance
This cooler is retailing at $35 at the time of the review. This is too good a price to ignore for this level of form and functionality that this cooler is offering. This is still a budget level cooler with a better thermal performance which is further augmented by the killer RGB lighting solution on the board. This cooler has upped the game of the Leto series of the coolers. Despite being a budget level cooler it has performed well to keep the hot 8700k cool relatively. I would not have expected much either from this cooler. The only Con that I encountered was the high noise levels with both fans at 100% of the speeds. This was largely due to high pitch noise from the second fan which may be due to more air pressure from the heatsink and the front fan but I could be wrong about it as well.
The Raijintek Pallas has performed well on our test bench. In this price bracket with 5 years of Raijintek warranty (on heatsink only), decent performance and killer RGB lighting solution which is flexible enough to be controlled through the motherboard’s lighting solution this is too good a deal to break. This cooler is not designed to handle your extreme overclocking needs but they would handle the job on stock clocks and mild overclocks easily and Leto Pro RGB has done exactly that. This cooler comes recommended from our side for the users who are in the market looking for a CPU Cooler who can drive their cooling needs without extreme overclocking and yet packs stunning RGB lighting solution. Look no further.

We are thankful to the Raijintek for sending us their Leto Pro RGB cooler for the review.


