
Introduction
The SilverStone Technology was founded in 2003 on the principle of recognition that merely having innovative expertise within the industry is not enough. Their objective is to ensure that their expertise is delivered to all products with consistency, in response to user’s needs, and with maximum user satisfaction. SilverStone Technology thrives on challenges of rapid technological advancements and creating an aesthetic standard for the industry. Their products are of high quality. Product lines include PC Chassis, PSU, Cooling Solution, Storage devices, etc.
Today, I am taking a look at the company’s low profile cooler, NT06-Pro. The SilverStone NT06-Pro is a completely redesigned cooler based on the NT06-E. It has optimized heatsink fins soldered onto six 6mm thick copper heat pipes to provide more contact to produce higher efficiency rate of heat dissipation. A new, compact 120mm PWM fan with the balance of airflow and noise is included to provide forced-air heat dissipation with the ability to cool components around the CPU area. The NT06-Pro is from their Nitrogon Series of the CPU coolers. It was put on the Intel’s hot chip, i7 7700k. How did it perform, let’s find out?
Item: NT06-Pro
Manufacturer: SilverStone
Price: $59.99 at the time of the review
Specifications

Packaging and Contents
The cooler comes in the brown color cardboard box. The top cover has the diagram of the cooler with its top view on the bottom right side. The SilverStone brand name and the logo are printed on the top left side. The Cooler’s model no is printed in bold and large size font under the brand name. The salient features are printed on the left side. Socket compatibility info is included in the features.

The front and the back sides of the cooler have the SilverStone brand name and the logo printed on the top left side. The cooler’s model no is printed in bold in the middle section on the left side. The Nitrogon Series is printed under the model no.

The left side of the packing box has the special features printed in 9 different languages.

The right side of the packing box has specifications of the cooler printed in the tabular format in the two color tone. The company’s contact info is printed on the top left side. The UAC and EAN info labels are printed on the bottom side.

The bottom side has the company’s contact info printed on the top left side.

Opening the box would reveal the contents. The user manual is printed in the booklet format. It is placed on the top. Taking it off would show the fan placed on the heatsink. There is a white box containing all the accessories placed on a side. White color Styrofoam paddings are placed on the other sides. These paddings have insets where the fan and the heatsink are nicely tucked in.


Accessories
The SilverStone has provided a plethora of the accessories for the ease of the installation. The user manual is well laid out with pictures to help understand the installation process.


Accessories include:
- 4x metal Fan Clips
- 1x backplate for the AMD and the Intel
- 1x square spacer for the Intel LGA-775
- 1x Crossbar
- 2x Intel Clips
- 2x AMD Clips
- 4x Nuts
- 4x Standoffs
- 4x M3.5*30 Screws
- 4x M3*6mm Screws
- 1x Insulation Sheet
- 1x Thermal Grease
- 4x LGA2011 screws
NT06-Pro Closer look
Air cooling has been at the heart of the PC cooling for quite some time though we have seen quite a fierce competition from CLCs in this segment that has not undermined the air cooling market. Air cooling is still considered safe as compared to the leakage risk which could potentially destroy the components.

The SilverStone NT06-Pro is a completely redesigned cooler based on the NT06-E. It has optimized heatsink fins soldered onto six 6mm thick copper heat pipes to provide more contact to produce higher efficiency rate of heat dissipation. A new, compact 120mm PWM fan with the balance of airflow and noise is included to provide forced-air heat dissipation with the ability to cool components around the CPU area. Let’s take a closer look at the cooler. This cooler has two versions. The version V2 is AM4 ready out of the box. The one we are reviewing is non-V2 and the user will have to buy the AM4 kit separately from the SilverStone for this version. This cooler has 82mm height making it the largest one that we have reviewed so far in the low-profile coolers.

The dimensions of the heatsink only are 28mm X 139mm X 114mm (H X D X W) from the edge to the edge. There are 51 aluminum fins stacked together to form a dense stack. The gap between any two fins is a bit wider. There are 2 cutouts in the main body on the bottom section. These are placed so that the mounting screws can be accessed from the top for the ease of the installation. We can see the 6 heatpipes inside the heatsink.

Looking at the front side of the heatsink, we can see the SilverStone brand name and the logo in the middle. 6 heat pipes are coming out of the heatsink and being terminated here. There is an equal distance between the terminating ends of the heat pipes. If this was the regular heatsink, then this would have been the top side of the heatsink.


Let’s take a look at the sides of the cooler. The left and right side of the cooler are symmetric. The fins are raised on the middle section on both sides. We can see the cutout sections with the heatpipe going through them. The metal fan clips are secured on these raised sides.

Looking at the backside of the heatsink, we can see the 6 heat pipes going inside the heatsink at an equal distance with each other. This helps ensures the maximum surface coverage for effective heat dissipation. The heatpipes are soldered to the heatsink. The SilverStone brand name and the logo are in the bottom middle section. Notice that the bottom side of the central fins is bit curvy.

The cooler features 6 heatpipes each of 6mm thickness. They are implemented in copped and finished with nickel plating. The cooler has a copper base measuring 38mm X 41mm. The base comes covered with the transparent safety sticker cautioning the user to peel it off before installing the cooler.


There is a block on the top of the copper base with the mounting points for the crossbar. The heatpipes are soldered to the base above the baseplate. The heatpipes extend through the base and terminate at the far end of the copper base. Their alignment shows that there is a bit of a gap between them inside the base.

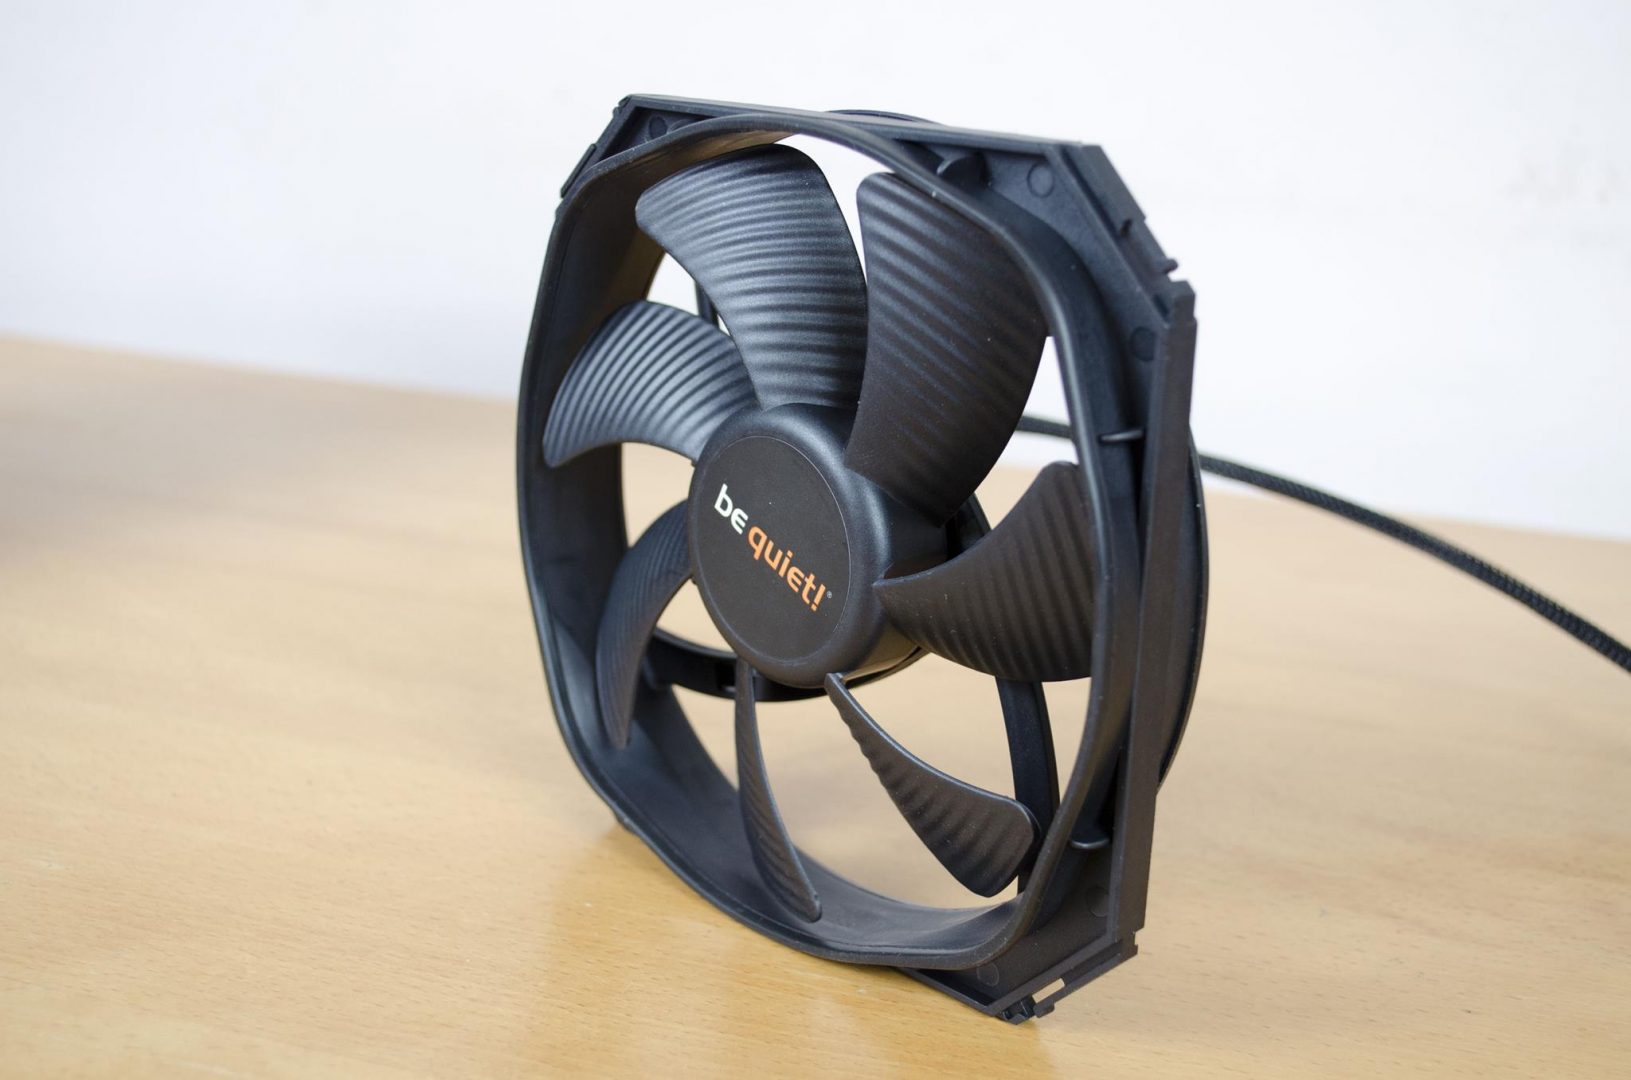
This is a beefiest low-profile cooler that has ever been reviewed on our test bench. The fan supplied with the cooler has the dimensions of the 120mm X 120mm X 20mm. The normal 120mm fan has the thickness of the 25mm. There are 9 blades. The motor hub is rather large with the diameter of the approx. 42mm. It has a silver color sticker pasted on it with the SilverStone brand name and the logo in the middle. The fan’s frame and the blades are in black color. There is no rubber padding on the corners.
Please note that you can use the standard 120mm fan with the dimensions 120 X 120 X 25mm with this cooler. If you go that route, install that fan on the top of the cooler for better compatibility.

The fan has sleeve bearings. This is a PWM fan with the 4-pin connector. The power cable is sleeved and is approximately 290mm in the length. The maximum airflow is 73.969 CFM. The power draw of this fan is 0.35A at DC 12V. The cooler can be used in Push/Pull configuration for which additional 2 clips have been provided.
The backside of the fan has 4-arms assembly making contact with the mainframe and holding the motor hub. The sticker is two tones on the motor hub. The SilverStone brand name and the logo are printed in the top half of the sticker.
NT06-Pro Installation
The Intel’s LGA-1151 socket was used to test the cooler. Please, note that I don’t have mini-ITX size motherboard which would have been an ideal choice as this cooler is recommended for the SFF/HTPC builds.
First, pass the long M3.5*30 screws from the middle hole on the backplate corners. Do it in such a way that the side with the text “The Side for Intel” faces upwards. Place the backplate on the backside of the motherboard around the CPU socket and pass the screws through the four holes.
Next, place the spacers on the screws from the front side of the motherboard. The standoffs will be snugged on the screws and they will hold the backplate nice and firm.
Next, place the Intel Clips with their inset side facing the CPU socket on the screws. Do that after deciding the orientation of the cooler. Use the metal nuts to secure the clips.

Apply the thermal paste on the IHS of the CPU. Place the crossbar on the mounting point of the cooler’s base block. Now, place the cooler on the CPU in such a way that spring loaded screws of the crossbar align with the screw holders on the Intel plates. Start tightening the screws with few torques on each one to make sure that the block fits evenly. Repeat that till the thread runs out.

Put the fan back on the heatsink depending on where you want it to be installed, on the top which would increase the height of the cooler or in the middle of the heatsink and the base. Connect the 4-pin power connector on the CPU fan header or any fan header of your desire. This would complete the installation of the cooler.

Compatibility and Clearance
Now comes the critical section equally as important as the thermal performance itself. There are three important areas to always check for whenever buying an air cooler. These are Clearance for the chassis, Clearance from the first PCIe slot and the Clearance for the DIMMs. When it comes to the low-profile coolers, we need to test for different orientations with respect to the motherboard’s IO side, VRM side and of course the DIMM clearance.
Clearance with Chassis
The SilverStone NT06-Pro has the dimension of 140mm x 139mm x 82mm (W x D x H) with the fan. It is suitable for the SFF/HTPC chassis in the market.
Clearance with first PCIe Lane
As the cooler was tested on the regular ATX size motherboard, I did not see any such incompatibility.
Clearance with Motherboard and RAM
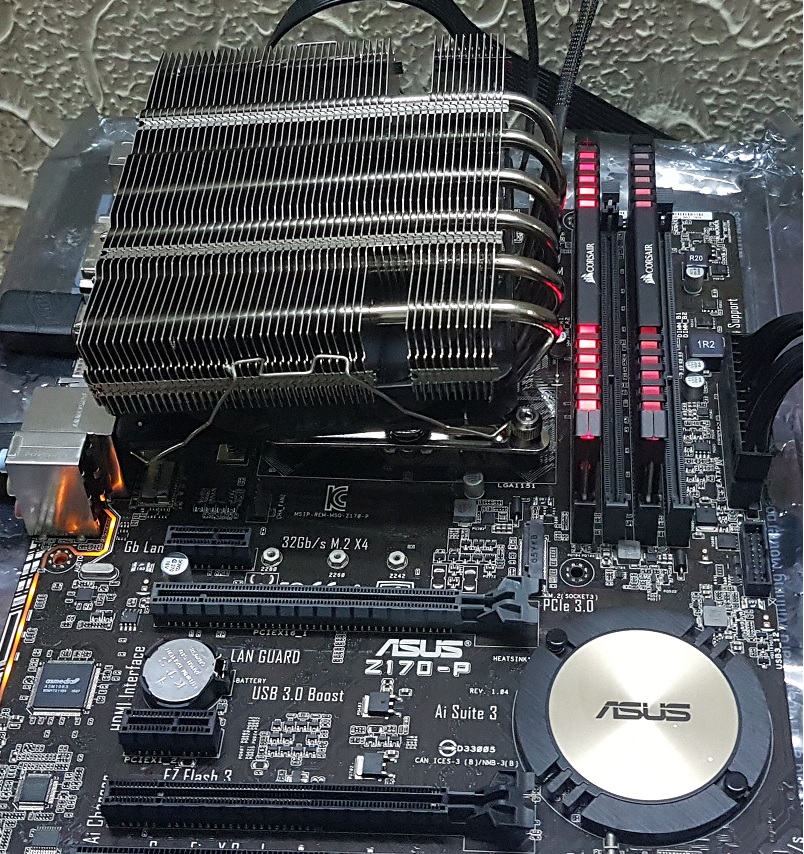
I tested the cooler by trying to install in 4 orientations. You would need to be careful if the IO cover is raised as it could hinder the installation of the cooler in the 90-degree orientation. Same goes for the RAM. The cooler’s heatpipes cover the first DIMM slot in that orientation and only making room for a true low profile RAM. The other way around, I did not see incompatibility as such. The fan in the picture is not aligned well. It was corrected before the installation.


Test Bench
The following test bench was used to test the cooler:
- Intel i7 7700k [Thanks to the PCFanatics]
- Asus Z170-P [Thanks to the PCFanatics]
- Corsair 2x8GB Vengeance Red LED @ 2666MHz
- HyperX 120GB SSD
- Thermaltake TP DPS RGB 750W PSU
Asus Realbench 2.44 and the RealTemp 3.70 are used for the stress test and the temperature monitoring. The Noctua NT-H1 thermal paste is used to test all the coolers on my test benches. This helps ensure the standardization and to reduce the effect of any bundled thermal paste that could benefit the performance.
Methodology
First, the cooler is tested on the stock clocks i.e 4.2GHz at manual 1.16V Vcore. The average of the core temps is calculated to provide the temps at idle and under the load. The ambient temps are subtracted from these temperature readings to give the delta temps. My graphs report the delta temps. This helps in an uncontrolled environment to mitigate the temperature variation.
Next, the CPU is overclocked to 4.7GHz using manual 1.22V VCore. Three runs of the stress test program are carried out. The average of each run is separately taken and the highest reading of the three tests is used. Ambient temperatures are subtracted from the selected average temperature reading and delta temperature is reported on the graph. Each run was of 60 minutes.
Without further due, let’s take a look at the results.
Results
On the stock clocks i.e 4.2GHz [fixed], the maximum temperature on the SilverStone NT06-Pro was 41.25C while the Noctua NH-L12S was doping at the maximum of 41.85C. Both the coolers were neck-to-neck under stock testing.

CPU was overclocked to 4.7GHz. The Noctua NH-L12S did the maximum of 53.15C whereas the SilverStone NT06-Pro was doing at the 54.25C. There is a difference of 1.1C between the two coolers. Not a bad performance at all for a low-profile cooler. I would not blame the coolers if the temperatures look to be on the higher side as the chip I have got seems to have poor thermals on it. Even the coolers like the Noctua NH-D15 and the Reeven Naia 240 have struggled on this chip.

The sound level at full speed was approximately 38 dBA. Noise level is on the higher side at full speeds.

Conclusion
SilverStone has upped their game in the category of the low profile coolers by introducing the NT06-Pro and the NT06-Pro V2. The only difference between both versions is that the V2 is AM4 ready whereas user would have to buy the AM4 kit for non-V2 version. The SilverStone NT06-Pro is a completely redesigned cooler based on the NT06-E. It has optimized heatsink fins soldered onto six 6mm thick copper heat pipes to provide more contact to produce higher efficiency rate of heat dissipation. A new, compact 120mm PWM fan with the balance of airflow and noise is included to provide forced-air heat dissipation with the ability to cool components around the CPU area.
The dimensions of the cooler are 140mm x 139mm x 82mm (W x D x H) with the fan. It has 6 heat pipes each of 6mm thickness making a linear contact with the fin stacks. The base and the heat pipes are copper made with the nickel coating. The heatsink has 51 aluminum fins on it. The TDP info of the cooler is as follow:
- Fanless 65W
- 1 x 12020mm fan: 95W
- 1x 12025mm fan: 130W
- 12020 + 12025mm fan: 150W
I have tested the cooler with a 120mm fan which made the TDP of 95W in effect. I put the cooler to the challenge and tested it with overclocking the 7700k.
The SilverStone has provided a 120mm PWM fan with the 20mm thickness. The fan has sleeve bearings. This is a PWM fan with the 4-pin connector. The power cable is sleeved and is approximately 290mm in the length. The maximum airflow is 73.969 CFM. The power draw of this fan is 0.35A at DC 12V. The heatsink can be used in Push/Pull configuration for which additional 2 clips have been provided.
Being a low-profile, this cooler is targeted for the SFF/HTPC builds. It has a height of 82mm with a fan but when using two fans configuration, the overall height of the cooler will increase. For 90 degree mounting, raised IO cover will hinder the installation. Similarly, this orientation can cover the first DIMM slot. At full fan speed, the overall noise was not that comfortable. The maximum reading shown on the sound meter was 38 dBA. Other than that, I have no other observation to report.
I am classifying the low-profile coolers in the two major categories on my test bench. One is the Non-Compact coolers while the second is compact series. The Reeven Brontes RC-1001b and the SilverStone AR06 fall under the compact series of the coolers while the Noctua NH-L12S and the SilverStone NT06-Pro come under the Non-Compact series. The user must bear in mind the underlying factors and category while interpreting the results on the graphs.
Value and Performance
The price of the SilverStone NT06-Pro at the time of this review is $59.99. This cooler is a bit pricey for the performance it offers. Four low profile coolers were tested with the same configuration. The SilverStone NT06-Pro has gone neck-to-neck with the Noctua’s premium cooler. The Noctua NH-L12S has emerged as a winner of all four, though the difference between the SilverStone NT06-Pro and the NH-L12S is marginal.
All the coolers were put to cool the hot-headed i7 7700k chip. My chip has poor thermals on it out of the box so I would not be blaming the coolers entirely if the temperature is high as even the Noctua NH-D15 and the Reeven Naia 240 have struggled to keep the temperatures in check.
Based on the performance level of the SilverStone NT06-Pro, it has won our Recommended Award.

I am thankful to the SilverStone for giving me the opportunity to review their SST-NT06-Pro.


