


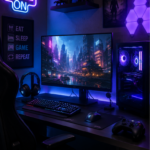


GAMEMAX N90 WH ARGB review – dual chamber design with dot matrix display
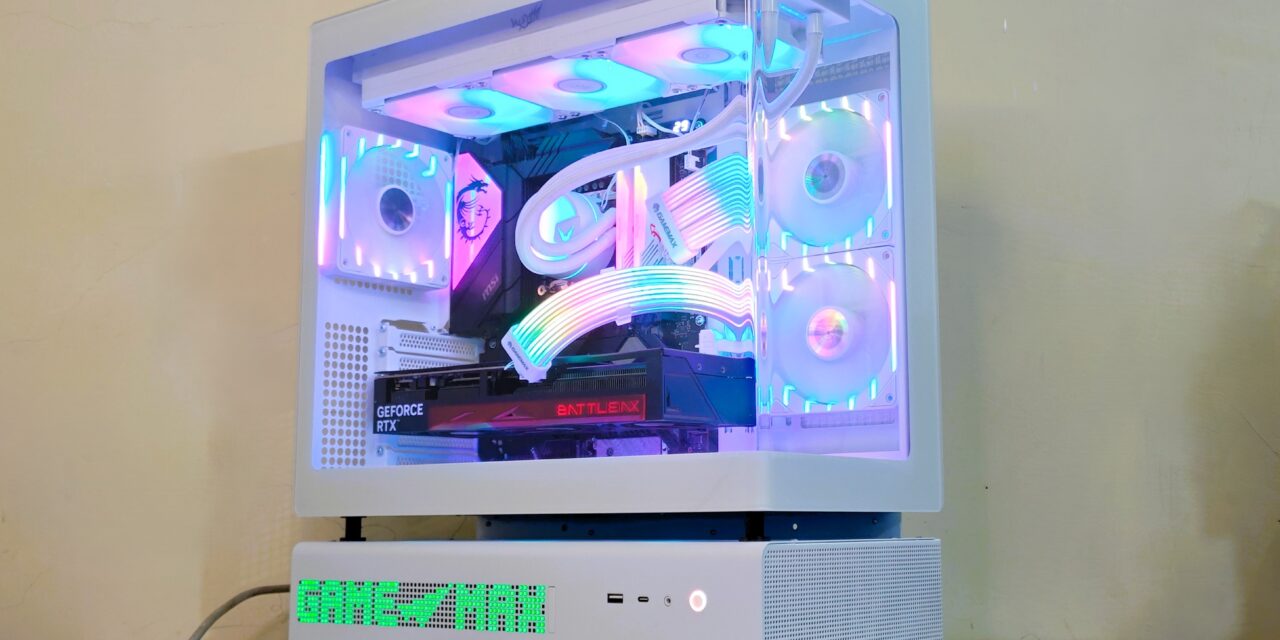
The GAMEMAX N90 WH is the upgraded version of the GAMEMAX N80. It keeps the same dual-chamber design but adds some cool new features. The lower part now has a 512-LED dot matrix display on the front, which looks really nice and bright. This GAMEMAX N90 ARGB gaming case is easy to build with, thanks to its modular design and tool-free panels. It has a big 270° curved wrap-around tempered glass on the front and side, so you can see your build clearly. The case supports BTF motherboards and hides cables neatly for a clean look. It also comes with six ARGB fans already installed, giving good airflow and keeping your PC cool.
Unboxing
Opening the GAMEMAX N90 WH ARGB does not feel like opening a normal PC case. It feels more premium right from the start. The case comes inside a thick and strong cardboard box. The packaging is simple and focused on protection rather than flashy design. On the outside, you can see technical details about the case, including its strong 0.8mm SPCC steel build and its split dual-chamber design.


When you open the box, the case is held tightly between two large foam blocks. These are solid and strong, not the cheap, messy foam you sometimes see in budget cases. They keep the case safe during shipping. The whole case is wrapped in plastic, so the white finish and curved tempered glass stay clean and scratch-free. When I removed the cover, the “True White” colour looked smooth and fresh.

Inside the case, the accessories are neatly packed. Everything is organised properly, which makes the setup process easier. You get:
- Motherboard screws (10 pieces) to install ATX, Micro-ATX, or ITX boards.
- PSU screws (5 pieces) to mount the power supply in the rear chamber.
- 2.5-inch SSD screws (8 pieces) for installing solid state drives.
- Hard drive rubber dampers (8 pieces) to reduce vibration and noise.
- White cable ties (6 pieces) to keep cables clean and tidy.
- A standoff socket tool (1 piece) to tighten or remove motherboard standoffs.
- An ARGB remote to control the lighting effects quickly.

The biggest highlight during unboxing is the curved glass panel. It gives a clean, wide view of the inside, almost like an aquarium. There is no front pillar blocking the view, so the case looks very open and spacious. Overall, the unboxing experience feels premium and well thought out, giving a strong first impression before the build even begins.
GAMEMAX N90 WH ARGB specifications
| Category | Details |
|---|---|
| Form Factor | Mid Tower |
| Chassis Material | SPCC 0.8mm Steel |
| PSU Support | Bottom Mount / ATX (PSU not included) |
| Motherboard Support | ATX, Micro-ATX, ITX (Supports BTF) |
| Front Panel | 270° Curved Tempered Glass |
| Top Panel | Mesh with wood grain decoration |
| Side Panel (Left) | Curved Tempered Glass |
| Side Panel (Right) | Metal |
| External Drive Bays | 0 × 5.25” / 0 × 3.5” |
| Internal Drive Bays | 2 × 3.5” HDD (Compatible with 2.5” SSD) + 2 × 2.5” SSD |
| Expansion Slots | 7 |
| I/O Ports | 1 × USB 3.0, 1 × USB Type-C (Gen2), 1 × Combo Audio |
| USB 2.0 | 0 |
| Buttons | 1 |
| RGB Controller | V4.10-24AS Controller + Remote |
| Max Fan Support (Controller) | Up to 10 Fans |
| Pre-installed Fans | 6 × ARGB Fans |
| Fan Support (Top) | 3 × 120mm / 2 × 140mm |
| Fan Support (Rear) | 1 × 120mm (Tornado T12 ARGB) |
| Fan Support (Motherboard Side) | 2 × 120mm (Tornado T12 ARGB-R) |
| Fan Support (Bottom) | 3 × 120mm (Tornado T12 ARGB-R) |
| Radiator Support (Top) | 120 / 140 / 240 / 280 / 360mm |
| Radiator Support (Motherboard Side) | 120 / 240mm |
| Radiator Support (Rear) | 120mm |
| Dust Filters | Bottom dust filter, Top mesh |
| VGA Clearance | Up to 415mm |
| CPU Cooler Height | Up to 175mm |
| Cable Management Space | 32mm |
| Display Screen | 512-LED Dot Matrix Display |
| Chassis Dimensions | 439 × 235 × 511mm |
| Full Case Dimensions | 439 × 240.5 × 530mm |
| Carton Dimensions | 512 × 310 × 601mm |
| Net Weight | 12.95 kg |
| Gross Weight | 14.55 kg |
A closer look – Exterior
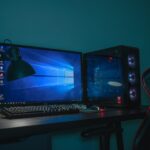
The GAMEMAX N90 WH ARGB has a dual-chamber design. The top section holds the motherboard and graphics card. The bottom section hides the power supply and cables. This keeps the build clean and neat. It also helps with airflow. In terms of size, the case measures 439 × 240.5 × 530mm. It weighs 12.95 kg, which gives it a solid and sturdy feel on the desk.


The case has tool-free panels. You can remove the side panels easily. This makes building faster and less stressful.
The best part is the L shaped 270° curved tempered glass. It covers the front and left side in one smooth piece. There is no front pillar blocking the view. You get a wide and clear look inside the case.
At the front bottom, there is a 512-LED dot matrix display. It can show system info and custom lighting effects. It gives the case a unique and modern look.

The build feels strong. It uses 0.8mm steel. The case is heavy at around 12.95 kg. The white finish looks clean. The top panel has a wood-style design, which looks different from normal gaming cases.

On the bottom chamber, you get I/O ports. There is one USB 3.0 port, one USB Type-C (Gen2), and one combo audio jack.

The top of the GAMEMAX N90 uses a smart three-layer design. Each layer has a clear purpose. It starts with looks and ends with cooling support.


At the very top, there is a Walnut-grain decorative Top Panel wood-style mesh dust filter. It gives the case a unique and classy feel. The filter is magnetic, so you can lift it off easily for cleaning. It blocks dust while still letting air pass through.
Under this layer sits a white metal cover with angled cut-out vents. This panel wraps around and continues to the right side of the case. It hides the internal structure and keeps the outside looking clean. Removing this cover gives full access to the top and side areas.


The last layer is the fan and radiator mounting area. This section is designed for cooling hardware. You can install up to three 120mm fans or a large liquid cooler. The layout feels open and easy to work with. All screws and mounts stay hidden once everything is installed.

The right side of the GAMEMAX N90 is focused on airflow and clean cable management. A mesh grille is provided for the side intake fans, allowing fresh air to flow inside. The main side panel is metal and is held in place with two thumb screws, so it can be removed easily without tools.

The bottom compartment is used for the power supply and storage bays. To access this area, a separate cover is provided. Like the other panels on the case, this cover follows a tool-less design. You can simply pull it out to reach the PSU and storage bays.

The rear of the GAMEMAX N90 follows a standard layout. The top section includes a motherboard I/O cutout and a rear exhaust fan mount with round ventilation holes. Below this are reusable graphics card expansion slots. On the right side, an additional mesh grille continues the same round-hole design.

The bottom section is dedicated to the power supply and uses a separate lower compartment. This area includes its own ventilation and follows the dual-chamber layout.

The bottom of the GAMEMAX N90 case features four round feet with rubber padding. It has a raised base with good ground clearance. A large honeycomb-style intake grille is placed underneath. This intake is covered by a removable mesh dust filter.

Interior
Inside the GAMEMAX N90, the left and front sides use a 270° curved tempered glass panel. This glass is easy to remove thanks to the tool-less design. The case follows a modular dual-chamber layout with quick-release panels, which makes access simple during building. The curved glass is made from a single piece and wraps around the front and side. It also comes with a high-transparency safety film. This keeps the look clean and uniform while adding protection.


Looking at the motherboard tray, you will notice large cut-outs. These are designed for modern builds and support BTF stealth motherboards. The case supports ATX and M-ATX BTF motherboards.

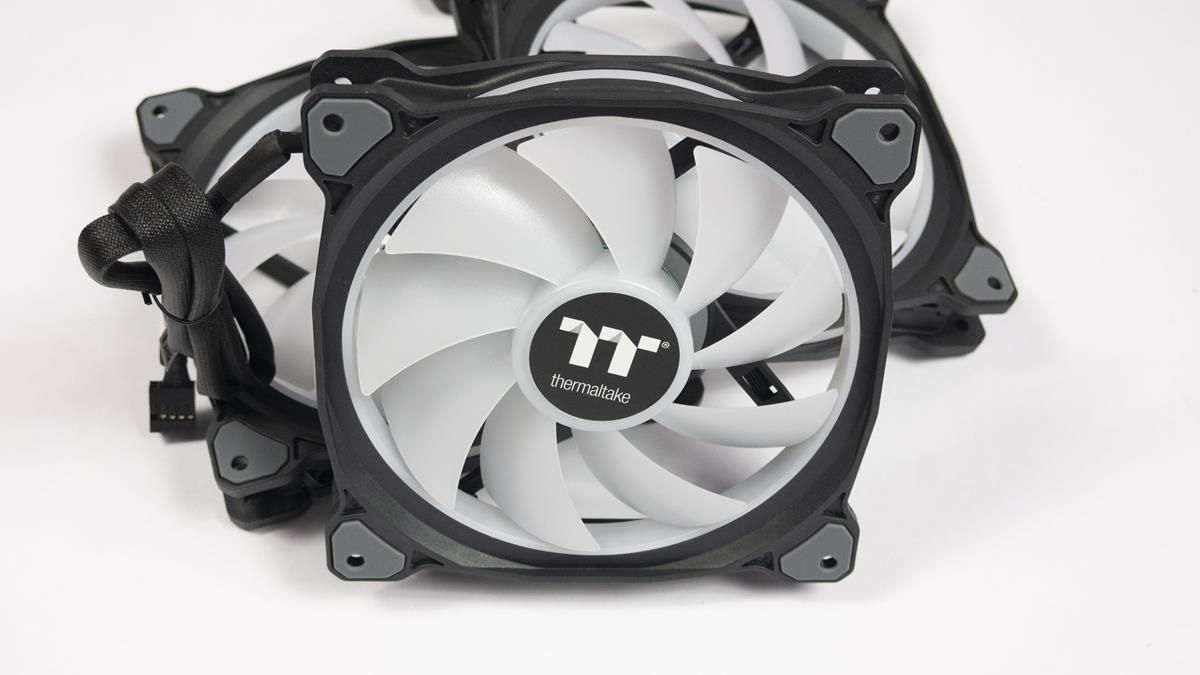
The case comes with six pre-installed fans. Three are placed at the bottom, two on the motherboard side, and one at the rear. All fans are Tornado T12 ARGB. The bottom and motherboard-side fans are reverse fans. Additional fan support includes 3×120mm or 2×140mm at the top.

There is good support for cooling hardware. The case supports air coolers up to 185mm in height. Liquid cooling options include 360mm on top, 240mm on the motherboard side, and 120mm at the rear.
Graphics card support goes up to 425mm, allowing large GPUs to fit easily.
In the bottom section, the I/O ports are placed on the left side. These include USB 3.2 Gen2 Type-C, USB 3.2 Gen1 Type-A, Power button, and Combo Audio. There is also a dedicated button for the dot matrix LED display, which will be discussed later.

After removing right side panel, you will find another cover. This cover is used to hide cables and keep everything looking neat. To remove this cover, two more thumb screws are placed at the back of the case. Once opened, you get full access to the cable area.


On the right side, this area is called the cable compartment. The cable cover can be pulled up easily and removed from its hinges. It does not require tools. Once removed, you get full access to the cable area.
A fan hub is also provided here. The six pre-installed fans are already connected to it. You can add more fans and ARGB connections if needed. The layout feels open and organised.

There is a large motherboard cut-out in this section. Separate cut-outs for BTF motherboards are also visible. You also get mounting options for 2.5-inch SSDs here. Even if cable management is not perfect, the cover helps hide the cables and keeps the build looking clean.

To access the lower compartment, you can easily pull the mesh cover from the back side. Once removed, the storage and PSU area becomes fully accessible.

Inside the drive bay, two plastic trays are provided. You can install two 3.5-inch HDDs here. There is also a dedicated 2.5-inch SSD mount on top of the bay. The case supports a PSU up to 170mm in length. Large soft pads are placed under the PSU area for proper support and clearance.


You get the front panel connector, a Thunderbolt connector, and a USB 3.0 connector. There are also dedicated connectors for the Dot Matrix display, along with USB and audio connectors.

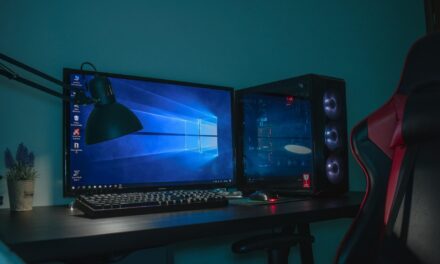
Installation
I shifted my main PC into the GAMEMAX N90 because this case is going to stay on my desk for a long time. Here are the components I used:
- Processor: Intel Core i7 12700K
- Motherboard: MSI Z790 Carbon Max WiFi
- Cooler: Valkyrie A360
- RAM: Kingbank DDR5 32GB 6800MHz CL32
- GPU: Colorful RTX 5070 Battle AX
- Storage: Silicon Power 2TB NVMe + Lexar 512GB (Windows)
- PSU: GAMEMAX 1050W
- RGB Cables: GAMEMAX
Building inside this case was a great experience. Even though it is a mid-tower case, space management feels well planned. Installation is easy, but there is one important thing to remember. If you are using an ATX motherboard, pass the HD Audio, front panel, fan, and ARGB connectors through the lower cutouts before fixing the motherboard in place.
I installed the motherboard first, and later I did not have enough space to route and plug in the bottom connectors easily. So it is better to connect or at least route them first.
After installing the 360mm cooler on top, there was still enough space to plug and unplug cables from the upper area without difficulty. The layout does not feel cramped.
On the right side, I honestly did not even try hard with cable management. I just connected everything and closed the dedicated cable cover. All the PSU cables adjusted easily inside. The cover hides everything well and gives a clean look.
The L-shaped panels are also easy to remove and reinstall. Overall, building in the N90 feels simple and builder friendly, even with high-end components.

Some more pictures of the build.


GAMEMAX N90 – Dot matrix LED display features
The GAMEMAX N90 comes with an 8×64 dot matrix LED display at the front bottom. It works with Windows. You need to install the software first. The file name is SysMonitorUSB_V1.0.7.msi. After installing, you can run the program. The temperature unit can be set to Celsius or Fahrenheit.
The display gets power from the PC power supply (5V). It connects to the motherboard using a USB 2.0 header. It reads system data directly from the motherboard.
When you turn on the PC, the full screen lights up for 3 seconds. Then the startup screen shows for 7 seconds. After that, it enters normal working mode.

In normal mode, it shows different system details one by one. This includes date, time, CPU temperature, GPU temperature, CPU usage, RAM usage, and other selected parameters. Each item stays on screen for about 5 seconds. Longer text scrolls across the screen. The display changes with a vertical sliding animation.


You can also set a custom message. In the software, type your message in the custom string box and press Send. It supports English letters and numbers only. After saving, the display shows “MyString” for one second. The message stays saved even after power off. To show your custom text, press and hold the button for 2 seconds. The text will scroll across the screen. If no message is saved, it shows “NULL”.


If the software is not running, or the USB cable is disconnected, the screen shows “NO SIGNAL”. After 20 seconds, it enters standby mode. After 40 more seconds, it goes into sleep mode and slowly turns off.

There is only one button for control.
Press and hold for 3 seconds to turn the display on or off.
Press and hold for 2 seconds to enter or exit custom message mode.
Press once to switch to the next parameter.
Press twice to lock or unlock the current parameter.
Press three times to enter brightness control mode. Brightness levels go from 0 to 7.
Overall, the dot matrix display adds a unique touch to the case. It shows live system data and allows simple customization without making things complicated.

Final verdict
After building and using the GAMEMAX N90 as my main system, I can confidently say this case feels well balanced in both design and performance. The dual-chamber layout keeps everything organised and gives the build a very clean appearance. The tool-free panels make installation and removal simple. Whether it is the curved glass, the cable cover, or the bottom compartment, everything can be opened and closed without stress.
Recently, one of my friends reviewed a similar dual-chamber case where the top AIO section was fully separated. The N90 follows a slightly different approach. It keeps the layout connected while still offering proper support for large coolers and clean cable routing. In daily use, this design feels practical and easy to work with.
Thermal performance is impressive. The six pre-installed fans provide strong airflow. The fans are slightly audible, but nothing extreme. CPU and GPU temperatures remained very reasonable at idle and during gaming sessions. That is what really matters in a gaming build.
Dust protection is also well handled. There are three magnetic dust covers in total. One is the wooden-accent top panel. The second is for the motherboard-side intake fans. The third is placed under the PSU area. All of them are easy to remove and clean.
The dot matrix LED display adds something different to the case. It shows system information and custom text, which makes the setup feel more personal. Many brands are now offering full front display panels with their cases, so it will be interesting to see when GAMEMAX steps into that space. For now, this display still makes the N90 stand out.
Overall, the N90 feels unique and complete. It looks different, performs well, and is easy to build in. For a gaming setup that needs both style and strong cooling, this case fits perfectly. I would confidently give it a design and performance award.


Availability and pricing
The GAMEMAX N90 is available in two colour options. The black version is priced at $189.99, while the white version reviewed here has an MSRP of $194.99. Availability may vary depending on the region and retailer, so buyers may need to check with local distributors or online stores for stock and delivery options.


