


ARCTIC Freezer 34 eSports Duo Tower Air Cooler Review
Introduction
Manufacturer: ARCTIC
Product Page: Freezer 34 eSports Duo
Purchase Price: $39.99 at the time of review at Amazon
Today I have the pleasure of taking a look at a compact 120mm tower cooler that packs some very surprising performance for its size. To date, I have mainly known ARCTIC for their thermal compound, ARCTIC MX-4, which I prefer after years of use and consistency. The ARCTIC Accelero Twin Turbo II has also been my goto GPU cooler upgrade/replacement choice for just as long. The Freezer 34 eSports Duo though is my very first look into what ARCTIC has to offer in the CPU cooling department.
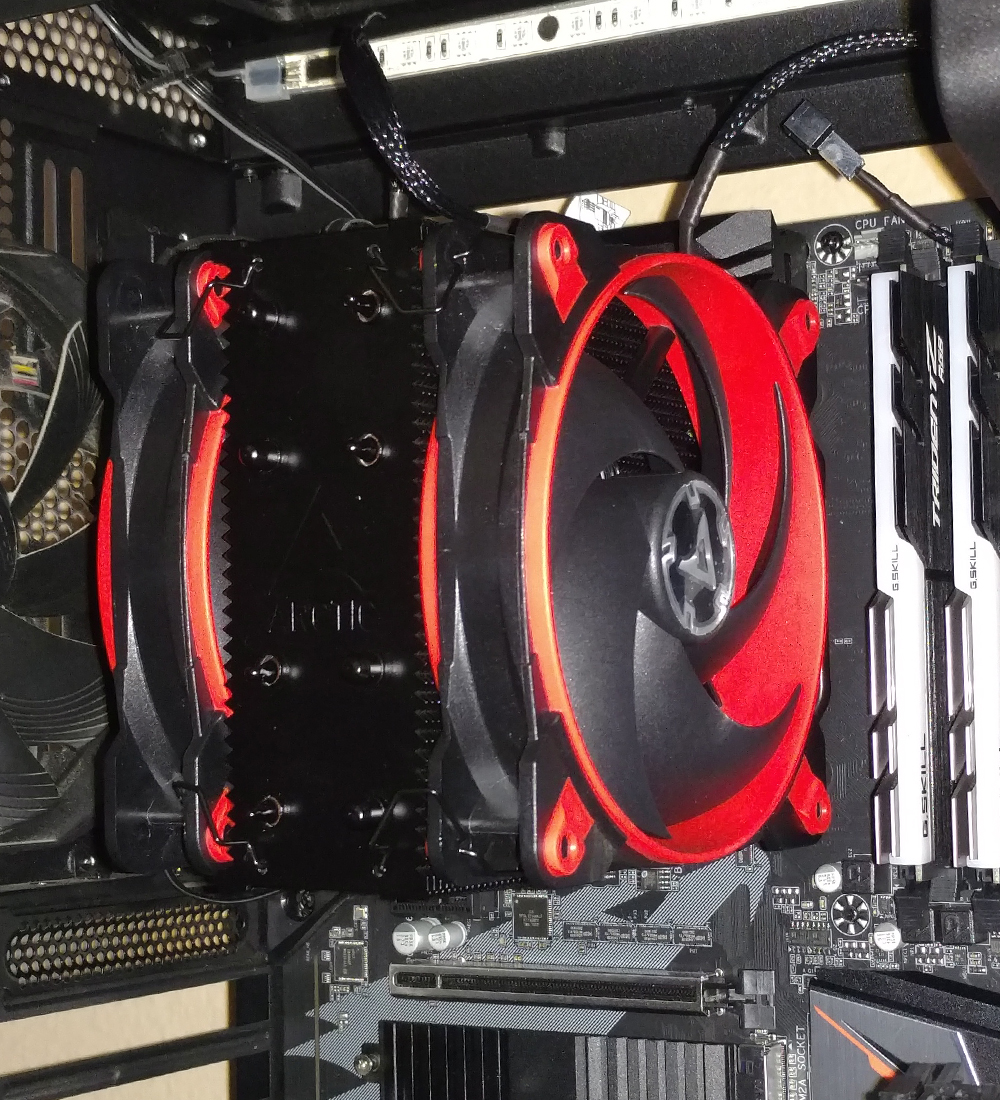
The Freezer 34 eSports Duo comes with a full black-out heatsink with two of ARCTICs new BioniX P-Series fans in 5 distinct colors (black, red, yellow, green and white). Being compatible with many Intel and AMD sockets today we will be sticking the Freezer 34 eSports Duo on an AM4 x470 platform with an R7 1700. Let us dive in then.
Here on the back of the box are a few details about the thermal coating and the pressure optimized fans with fluid dynamic bearings in a push-pull configuration.

Here on the side, we get a pulled apart view of the cooler with some specifications.

On the other side of the box are various bits of compatibility details and other information in a handful of languages.

Popping the top of the box open we are greeted with a digital code you can scan to get the installation manual. I honestly like this and would like to see more companies try the same. It is really nice to have a sticker to put on the inside the lid of your box, leaving your manual just a scan away for future installation use.

Removing the small bits of paperwork and a little box containing the mounting hardware reveals the Freezer 34 eSports Duo underneath, with fans attached (you will need to remove the fans to install the cooler).

Everything included in the box.

The little box that was on top of the cooler on initial opening has all of your mounting hardware and about two applications of ARCTIC MX-4 in a pouch.

Here is our first good look at the BioniX P-fans included with the unit. These are some interesting fans for sure and I am going to want to do some future testing with some tools on these. There are five very curved and sweeping fan blades, and each fan is really heavy compared to most of the others I have on hand. The new BioniX P-Series fans feel like quality fans for sure and will hopefully move some serious air.

Here on the side, you can see the 54 fins stacked together on the 4 heat pipes. To date that is the densest surface area or fin count for a 120mm cooler of this size I have tested, which is also a lot of the units 847g net weight.

Here is a view of the contact plate with its protective cover, be sure to remove this before installation.

Flipping the butterfly style fan mounts away from the fan reveals another look at the 54 fins stacked together. You can also see the BioniX P-Series fans were designed to be daisy-chained which is a nice bonus for cable management.

One more good look at the fin stack before we get the cooler installed in the system.

Installation
First of all, this is only following the AM4 installation instructions. Second I had to go back and retake the photos on my open ASUS Strix B350-F, and note that this will follow all AM4 “socketed” motherboards regardless of the chipset (ie B350/450, X370/470/570).
Here are the parts you will need to gather from both the included mounting hardware, plus you will need the original AM4 Backplate that came with your motherboard.

You will want to gather the two small screws, and two Mounting Clips and install them like so. They will slot into place so you will know when you have them set, then simply screw each one into place with one screw.

A view of the Mounting Clips installed from the bottom.

After you get the cooler set up with the Mounting Clips, you will want to place your motherboard on a flat surface and put the Backplate under the motherboard so that its standoffs are poking through like so. It is ok to leave the motherboard resting on the flat surface on top of the Backplate.

Next, you will want to grab the four Standoffs that have a single score around the sides. Simply tighten them into place with your fingers to the point they are snug. No need to wrench things down lock tight inside a computer.

So far there has been no CPU in this example and we are going to assume you have one installed if not, do so and then apply a small amount about the size of a grain of ‘rice’ to a small ‘pea’ in the middle on top of the CPU. Next, you will need to set the cooler down on the Standoffs so that they line up with the same holes on all sides of the Mounting Clips like so.

Next, grab the four included Thumb Nuts and tighten the cooler down. Take your time and tighten each one down a little until they start to all snug up and then give them a good tightening to top them all off trying to keep even pressure as much as possible. Yes you can use a screwdriver and no I did not have to, my fingers were more than enough to get solid mounting pressure.

After you have the tower itself installed you need to orient the two BioniX P-fans to blow air through the cooler front to back and clip them into place with the fixed butterfly style fan mounts. Here is a side view of the cooler just clearing the first memory slot on the motherboard, so there is plenty of clearance for many styles and heights of memory.

Another angle of the memory clearance from the fans.

Also, do not forget to plug in your fans, the BioniX P-Series fans come daisy-chainable which will help with motherboards with only one CPU fan header. Try and keep 3 fans as a maximum per fan header on your motherboard.

Here we are going to take a look at the contact plate of the Freezer 34 eSports Duo. Compared to what I would consider a more normal contact plate on the MYA RBW tower cooler it is exactly 1cm or 10mm smaller in size on both measurements! That is a crazy small contact plate in my book, but as you will see below it has zero negative impact on thermal performance. Not at any point did I see a spike or anomaly in thermals due to the smaller size of the contact plate or anything else, so rest assured there is full coverage of the CPU packages inside.

Second measurement.
Here is the spread of the ARCTIC MX-4 thermal compound used after installation and a full 1 hour run of Prime95. I don’t know the exact internal measurements of the R7 1700’s die but by all thermal tests there were zero spikes or oddities so this is making good contact with the IHS and CPU Dies below the IHS.

Test System and Methodology
Test System
- OS: Windows 10 (1903)
- CPU: Ryzen R7 1700 @ 3.8Ghz 1.25v
- Mobo: Gigabyte X470 AORUA Ultra Gaming
- RAM: G.Skill Trident Z RGB 2x8GB DDR4 CL16 3000MHz
- PSU: NZXT E850
- Case: NZXT H710i
Methodology
For our testing, we used the Prime95 stress test program to max all of our CPU cores out at 100% for 60min. We then monitor and take note of the max core temperature. We then subtract this number from the ambient temperature to get the temperature delta. Also letting the computer sit idle for 15 minutes before each run to stabilize the min results. The goal is to keep thermals in check under 75c if the cooler is able to do so it passes my overclocking performance test. Which will show how the cooler performs under the worst conditions my specific CPU can throw at it. I also do not do open test benches for thermals, I would rather put the coolers tested in a less than optimal environment for testing, an open bench is not a user-built system and will not operate under realistic thermals created inside a case with more restricted airflow. This is all done in an environment that is controlled and kept to 25c or 77f (+/- 1-2c) during testing.

Final Thoughts
Performance
Here I was honestly shocked a little bit. The ARCTIC Freezer 34 eSports Duo was able to tie the larger MYA RBW a tower cooler that I was sure would have the Freezer 34 by a few degrees. I was expecting on par or slightly better than Hyper EVO 212 thermals not something that kept up with an All In One Water Cooling solution installed in the top exhausting air (this is not an optimal spot for CPU cooling with an AIO the front of the case is and would net 8-10c lower thermals than the test results above).
After seeing what I at first thought was a dismally small contact plate on the Freezer 34 eSports Duo I was in no way expecting these kinds of results. I was sure I would see a steep climb in thermals that would result in my shutting down the tests with the 3.8Ghz overclock and just doing stock CPU clock thermal tests, but I was slapped in the face with some really solid results and the Freezer 34 did a great job in performing in the thermal performance.
Design
I am a sucker for coolers that are not silver, and ARCTIC’s custom black Thermal Coating and offset heat pipes strike a really good look while hitting thermal performance right in the nose. The BioniX P-Series fans are slick looking and pack one heck of a punch in the airflow department as well as coming in a series of colors that will fit a wide arrangement of build color schemes. The Freezer 34 has a very dense fin stack and one of the easiest AM4 installation methods I have had the pleasure of working with. I feel like ARCTIC has nailed the design of the Freezer 34 eSports Duo not only in the looks but also on the performance side of things as well, and these are two points that matter the most when choosing a cooler.
Value
The ARCTIC Freezer 34 eSports Duo is coming in at $39.99 at the time of review which puts it squarely in the same price range as the Hyper 212 EVO line up of coolers. Though for pretty much the same cost the Freezer 34 offers over the top build quality and performance and that is saying something. The simplicity of installation coupled with the price and performance makes this one solid 120mm tower cooler that is sure to fill out your build with strong cooling performance. Thanks to the new BioniX P-Series fans and their high static pressure to move a lot of air through the Freezer 34’s impressive 54 fins large surface to help wick heat away from your CPU this is one cooler that will get the job done while looking good in the process.
With all of this said I can say with confidence that I recommend the Freezer 34 eSports Duo to anyone building a system overclocking or not, the Freezer 34 eSports Duo delivers in both the looks and performance departments.


I want to thank ARCTIC for sending over the Freezer 34 eSports Duo for review.


