


LOKLiK ImPress™ Auto 2-Smart Heat Press Review

The LOKLiK ImPress™ Auto 2-Smart is an automatic heat press that will help you customize clothing, accessories, and much more. Not only that, but it is so simple to use that almost anyone will be able to make use of it in a matter of minutes. You simply plug it in, tap the screen a couple of times to choose your options and you’re good to go!
There was once a time that if you wanted a custom shirt, you had to pay loads of money for it and wait a week or so for it to arrive in the post. These days, it can all be done from the comfort of your own home, and it really isn’t that expensive. The LOKLiK ImPress™ Auto 2-Smart is compatible with Sublimation, DTF, and Heat Transfer Vinyl, giving you a myriad of options to customize almost anything you want!
Enos Tech Verdict
Pros:
- Ease of use
- Automatic temperature and time settings
- Extra safety measures
- Comes in multiple colors
- Supports a wide range of materials
- Adjustable pressure control
- 38×38 cm heat plate
- Auto shut off
Cons:
- More expensive than standard heat presses

Purchase the LOKLiK ImPress™ Auto 2-Smart Heat Press
The LOKLiK ImPress™ Auto 2-Smart Heat Press can be purchased directly on their website for €419.00. You can also purchase it from HTVRONT in the UK for £399.99.
Intro Video
Closer Look
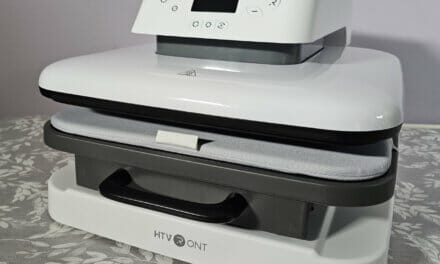
When you first get the ImPress out of the box, it will have some protective padding around it. The good thing is that once this is removed, the machine is set up and ready to go. There is no installing anything, just take it out of the box and plug it in, and get to work.

As you can see in the image below, there is a nice sticker where you can grab the tray and pull it out. Please note that while this tray may not heat up, it can be hot after use, so always be careful when opening and closing it.

On top of the machine is a small display that will flip up once powered on. It also automatically closes when the machine is powered off, so take this into account when using it and make sure that nothing is blocking it. The screen is a touch screen and is how you will select the materials you are using and set the temperature needed for the job at hand.

Just below the screen are three buttons that will help you power on the machine and use it to press your custom items.

When you pull the tray out, there is a nice pad on it that is strapped down quite well. This is going to allow you to better press your items, but it can also be changed out as and if needed.

Removing the preinstalled pad shows the tray/garment testing area. While it shouldn’t be needed much, being able to remove the included pad is a nice touch.

On the underside of the drawer, there isn’t a whole lot going on, but we can see that it is on runners to help ensure it pulls out smoothly and gets put back into place just as nicely.

There is a small catch that will click into place when the drawer is pushed back firmly and all the way. This is what lets the machine know that everything should be OK, and it can move along with the press once instructed to do so. This is just to ensure the drawer is pushed all the way in, so you will still need to take all your other precautionary steps as per normal.

On the bottom of the machine are six feet that can easily be removed or changed if needed. They may look uneven in the photo, but the machine does not rock or move at all; it stays right where you put it.

Using the LOKLiK ImPress™ Auto 2-Smart Heat Press
Using the LOKLiK ImPress™ Auto 2-Smart Heat Press couldn’t be easier. Once you turn it on, you will see the red LED ring, which means the machine is not ready to be used. Once it is ready, it will turn green.
When you first turn it on, you will need to use the screen to select the material you are pressing and the material on which you are pressing it. This will automatically adjust the temperature to the desired settings. However, you can also manually adjust the settings based on your own needs. For reference, we used the settings that the machine had to offer for all our tests, and we had absolutely zero issues with any of them.

LoKLIK was nice enough to include some DTF Prints of our various logos that they printed using the LOKLiK iPrinter™ DTF-A3-XP600. Pressing DTF onto shirts is really very simple.
Before you press the DTF, it is always recommended to iron the garment first. To do this, you put it on the drawer and use the machine to press it. This will help to remove any moisture and also iron out any wrinkles, giving you the best chance possible of having your print pressed neatly.
Once this is done, you can now line up your DTF or Vinyl. For this test, we used DTF as mentioned.l

Once lined up, you will want to place the protection sheet over everything. This is going to help make sure that the press doesn’t burn or mark you item in anyway.

Then all you need to do is push the drawer in and put your finger over the safety button on the side, and hit the press button. From here, it will automatically press your design, and once done, the press will lift. Just pull the drawer out and remove your garment. You will need to check whether you need to cold pull or hot pull the plastic backing from your material. This can vary, so you will need to look into this on your own, as it has nothing to do with the machine itself.

LOKLiK iPrinter™ DTF-A3-XP600
In certain regions, LOKLiK even has its own DTF printer available, helping to take your customization to even new heights! As you can see from the above images, we used DTF LoKLIK was nice enough to send us, that they printed using this machine. Should you be able to find one, it is definitely worth looking into!
Below is an image of some of the DTF sheets LOKLiK was kind enough to send us so we can use them with our ImPress™ Auto 2-Smart Heat Press for this review. As you can see, they look quite nice! We have used them on several different materials, and they look absolutely amazing.


Final Words
The LOKLiK ImPress™ Auto 2-Smart Heat Press is an absolute game changer for those looking for a heat press that is convenient and easy to use. It comes ready to use straight out of the box, and while I always recommend looking at the instructions first, it is so easy to use that there is almost no need. You will be hard pressed to find a machine easier than this!
The included material and garment settings make finding the best temperature and times for your pressing a breeze. Best of all, if your items are not compatible, the machine won’t let you select them together, which should lead to fewer mistakes in the long run of things. It also means with a couple of quick clicks on the screen, you can be up and running within seconds instead of having to manually input your temperature and press times.
The included safety measures are a nice touch, as while they may seem annoying at first, they help ensure you don’t mistakenly hit the press button when you’re not ready. To use the machine to press, you simply have to put your finger over the safety sensor on the side and then hit the press button, so it isn’t much extra work at all.
The machine heats itself up quite quickly, though it may still take a minute or two depending on the temperature you are trying to reach. This allows for a more even distribution of heat across the heatplate, ensuring the best press possible, no matter the design at hand.
The LOKLiK ImPress™ Auto 2-Smart Heat Press is my new go-to press and will be seeing plenty of regular use for the foreseeable future. The ease of use and automatic settings make my life so much easier for printing my custom merchandise.


