


SilverStone MILO 12 ITX Enclosure Review
Introduction
Personally, I am a fan of SUGO series from SilverStone when it comes to SFF/HTPC PC Cases though ALTA G1M changes that. SilverStone released a new ITX base SFF PC Case named MILO 12 last year. We got one for review but it got delayed due to my total hip replacement surgery and rehab. Well, I am getting back at it so here is the content. The MILO 12 seems to have its footprint in ever popular RVZ series of ITX PC Cases from SilverStone but this time this case has a different outlook and SilverStone is using chamber design for optimal cooling of the key components.
Here are some salient features:
- Compatible with Mini-ITX motherboard & ATX PSU
- Supports 3-slot graphics cards up to 345mm length
- Horizontal or vertical orientation
- Modular design with 4 removable panels (top, left, right, bottom)
- ATX to SFX adapter bracket included – 9.5mm slim ODD can be installed when using SFX PSU
- CPU cooler opening on motherboard back plate for convenient assembly and upgrade
Item: SST-ML-12B
Price: MSRP USD 189.99 at the time of the review
Specification

Dimension

Closer Look

The chassis is shipped inside a cardboard box of brown color which is a standard for chassis shipping. Slim and Compact are the two keywords here from SilverStone describing this case.

The case is made of plastic and steel material with steel being the main material used for main body of this case. This case supports only mini-ITX size motherboards which is obvious.

SilverStone has provided:
- Zip Ties
- Various Screws
- 4x feet
- A warranty guide
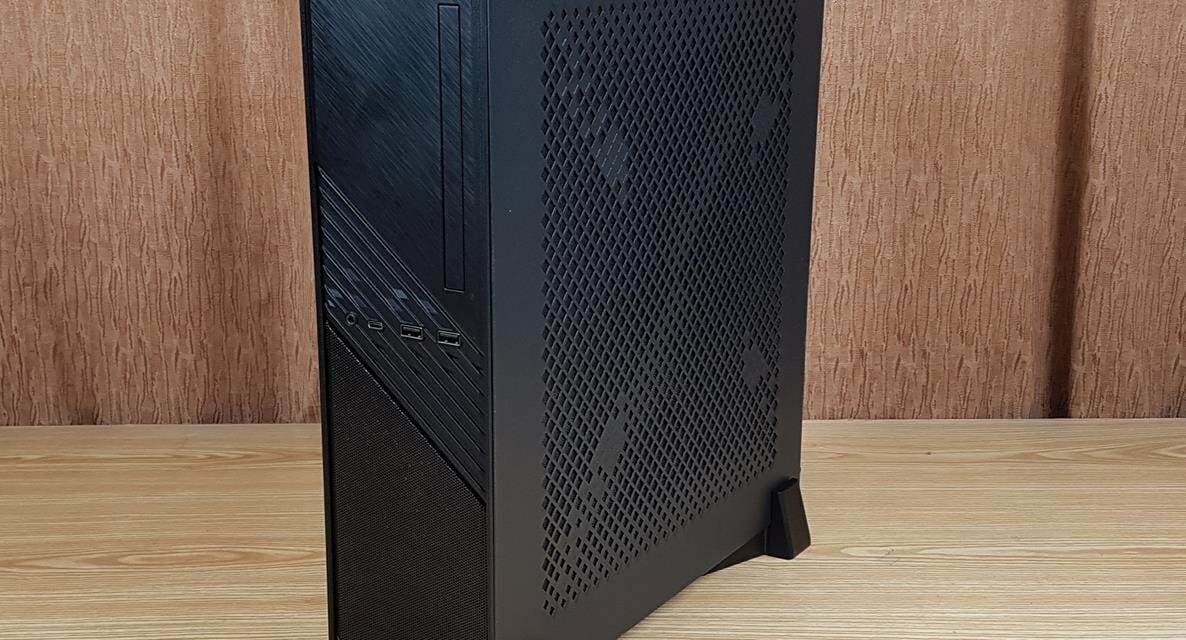
Let’s start taking a look at this case. The bezels of this case are made of plastic whereas the main body is made of steel material. This case has a dimension of 105x393x378mm (WxHxD). This case has a volume of 15.6 liters having a net weight of 4.89 kg.

The front cover is made of plastic material and it has a beautiful layout. This is the side that would be facing the user if placed over the table. This case can be placed horizontally as well as vertically which could help particularly in vertical layout where it would take less space. There are two buttons up top. One is to power the build and the other is for resetting. We can see a mesh over here. Its purpose is to provide airflow for an optional 80x15mm size fan that can be installed on the front (inside) to provide fresh air directly to the graphics card. There is an LED indicator on the corner facing the power button.
We can see connectivity options in the center. These are:
- 2x USB 3.0 Type-A
- 1x USB Type-C (Key-A)
- 1x Combo Audio
The lower half of the front cover is hard plastic without any perforation. Looking closely we can see that there is a cover under which a user can install 9.5mm slim ODD provided the user is going for SFX size PSU. This ODD is not possible with ATX size PSU.
The front of the case is made of Acrylic and plastic materials. It is finished in a mirror effect for a premium outlook. On the top right, we have a cover for a slim optical drive which is optional. The case supports one slim optical 12.7cm or 9.5mm drive. We have power and reset buttons on the base with two blue color LED indicators. There is a SilverStone branding on the right of the front panel.

The above picture shows that this case can be placed horizontally over the table.

The front cover can be removed by pressing the tabs from the inside of the PC Case that would release this panel and it will come off.

There is a circular large-size cutout on the right. This is where the 80x15mm fan can be installed as this fan faces the GPU Chamber of this case. There is an additional 2.5” drive caddy on the left side.

The caddy can be removed to easily install a 2.5” drive on it and then put it back on the main frame. SilverStone has wisely used this space to provide additional storage support. There is a large cutout facing the 2.5” drive bracket from where the SATA cables can be routed towards the PSU and motherboard.

Now we are looking at the front of this case from the inside. The 2.5” drive bay faces the PSU bracket. The opening for the 9.5mm slim ODD is beneath this 2.5” drive bracket. This slim ODD would slide down the PSU bracket and can be used only if using SFX size PSU.

One good design aspect of this case is its modularity in terms of the panel’s design. The left and right panels are easily swappable with each other.

The above picture shows the other side panel.

These panels have a dust filter that is washable as well.

Similarly, the top and bottom panels are swappable with each other. This is a bottom or base view of MILO 12 case.

These panels don’t have any dust filters.

The above picture shows a base view of this case. We can see a standard design that we have seen in many cases where the power cable is routed from the back of the case towards the front side for connection with the PSU unit. The same is the case with this PC Case.

The right side has an opening. This is where the PSU is installed and faced with its power port side. SilverStone has wisely used the leftover space on the other end and provided a 2.5” drive caddy. They have also offered a cutout in front of the caddy to route the cables.

The above picture shows a rear view of MILO 12. Up top, we can see a triple slot design with a bracket. These slots have vented and reusable covers. The lower section has a large size cutout on the right that would face the rear IO panel of the motherboard. There is also a vented area. The bottom has a power port. I wish brand start to provide the switch on/off button with this power port!

The above picture shows a top view of MILO 12 with panel removed. This is facing the GPU chamber.

We are taking a look at the backside first. We mentioned that this case is using a chamber design for optimal cooling and preventing heat from one chamber to go into the other chamber though we would need a fan effectively make this happen. The upper chamber has a space in which a graphics card can be installed. The graphics card’s limitation is 160mm in height and 345mm in length. This case supports a triple slot graphics card easily. In case placing a graphics card is difficult, a top beam can be removed as well before installation. We can see a slot for an 80mm fan on the front side. This is optional and the user can install an 80x15mm fan here depending on the length of the graphics card. If the length of a card is less than 25mm thick fan can also be installed. There is a cutout at the floor of this chamber from which the cables can be routed towards PSU.
The bottom section has a solid cover on the right side. This is where PSU is placed on the other end of the case. We have a large size cutout on the left side. The left end is the motherboard tray. SilverStone has managed to provide a large enough cutout for an easy installation of the CPU cooler while ensuring structural integrity. But it is off-center and this could prevent installing an M.2 SSD on the backside of the motherboard after the motherboard is installed.

The above picture illustrates that. There is and should not be an issue for the cooler’s backplate but we can’t install a full-length M.2 SSD after the motherboard is installed first. We can also see a gap between the motherboard and the tray which is coming from the height of the standoffs.

There is an adjustable graphics card holder in the upper chamber. This is where the graphics card is rested. Its width can be adjusted according to the width of the graphics card.

There is a cutout towards the floor or base of the upper chamber. This is where the bundled PCIe Riser 4.0 cable is installed.

SilverStone has provided a PCIe Riser 4.0 cable with a slot. This is not a flexible cable and it is designed to exactly match the space requirement in MILO 12.

The above picture shows that PCIe Riser 4.0 cable and slot are installed. The graphics card is installed in this PCIe slot. In case you are wondering about the motherboard connectivity.

The above picture shows the PCIe Riser 4.0 Cable installed on the motherboard and the slot screwed to the case’s frame.

The above picture shows the graphics card installed in MILO 12.

Thea above picture shows the top view of the installed graphics card.

The above picture shows another angle of the backside view in MILO 12.

Now we are coming to the main business which is the side where most of the components are installed. This is a side view of the MILO 12 case right after removing the side panel. The riser cable box is attached to the PSU bracket whereas the accessories are provided in a separate container.

We have 4x key areas here to discuss:
- PSU Bay
- Motherboard Bay
- 5” drives brackets
- 140mm fan place
We have numbered these areas in red color for ease of identification.

There is a mount provided for an optional installation of a 140mm size fan only. This would come in handy if the graphics card is an open design on the backplate side as this would provide more ventilation for the graphics card.

SilverStone has provided an ATX to SFX adapter bracket that is pre-installed in the case using 2x screws on the rear and 1x screw in the center towards the front. We can spot a gap between this bracket and the main frame of the case that has been used wisely by SilverStone by providing the option of installing a 9.5mm slim ODD in this area from the front of the case. In case you are going for a standard ATX size PSU, you would need to remove this bracket completely and in that case, ODD is not possible either.

We removed the bracket for the installation of SFX-L PSU.

We removed that bracket and installed the SilverStone SX1000 Platinum power supply which is SFX-L size PSU.

The above picture shows the PSU bracket installed in the case. I would suggest connecting the desired cables to the PSU out of the case. Maximum supported length is 160mm for the PSU.

The above picture shows the power cable connected to the power port of the PSU and the power switch turned on. Don’t forget to switch this button on otherwise you would need to access this side of the case after completing the system build just to switch it on.

There is a large size cut-out on the motherboard tray. This would make the installation of the CPU Cooler easier even after installing the motherboard in the case. We have mentioned above that this cutout is off-center so that is a limitation for the M.2 drive’s installation on the backside of the case. The standoffs have a bit of height from the floor of the case to provide good ventilation. A motherboard of only mini-ITX size can be installed in this case. The maximum height of the CPU cooler is 77mm meaning we are left with a low-profile cooler only for this case. There is a cutout on the right side of this tray on which the PCIe Riser 4.0 Cable is installed.

There are 2x brackets for 2.5” drives on the main frame of the upper chamber. This would make a total count of 4x such brackets in this case.

The system panel connectors include:
- Power LED
- Power
- Reset
- HDD LED

There are three more cables:
- USB 3.0 Type-A Connector
- USB Type-C (Key-A) Connector
- HD Audio Connector

SilverStone has provided another box in the main packing that has stand brackets in it.

The above picture shows these stand brackets. Each bracket has two arms having rubber padding on the ends that would meet with the PC Case and the table. The center of one of these stands has a hole whereas the other stand has a pin-style connecting mechanism that would go inside the hole and both brackets are installed in a cross pattern.

The above picture shows the brackets attached to each other.

The MILO 12 is standing on the brackets.
Installation
Now, that we have covered the design and included the build pictures, let us go through some other build pictures before moving on to the conclusion.
The test build configuration is as under:
- AMD Ryzen 7 7700X
- ASRock B650E-ITX PG WiFi
- Noctua NH-L9a-AM5 chromax.black
- Sabrent Rocket DDR5 32GB @ 4800MHz CAS 40
- Samsung SN850 500GB Black NVMe SSD
- GIGABYTE GeForce RTX 3060 VISION OC
- SilverStone SX1000 Platinum PSU

I started with the motherboard first though you should start with the PSU in my opinion. This is because the length of EPS connector could be factor to take into consideration when routing the cable. Having this cable and the 24-pin ATX cable installed on the motherboard before the installation could make your life easy. The RAM and cooler were installed out of the case. Next, the PSU was installed. I installed the PSU without the cables and ended up removing the PSU, attached the cables and then install the PSU.

The above picture shows the upside view of the components installed.

The cables are routed and connected. We took advantage of the space beneath the PSU bracket and tried tucking most of the cables there. The system panel connectors can also be problematic after the motherboard’s installation. You can connect them to the motherboard before installing the board.

The above picture shows the complete build ready for some action. I have skipped some parts as we have already shown the pictures and discussed above. This picture actually indicates the true design element of this case which is the dual chamber layout separating the graphics card from the CPU and motherboard.

The above picture shows the rear side of the assembled PC. The ports are easily available on the backside of the motherboard. The graphics card is a dual slot design hence third slot is unused.
Conclusion
We have got MILO 12 and SUGO 16 for review from SilverStone. In this article, we have taken a look at the relatively new and promising MILO 12 ITX case that is slim and compact in its layout. This is not the first ITX case we have tested from SilverStone. So far we have tested many ITX cases from SilverStone including:
- SUGO 14
- ML09
- ALTA-G1M
SUGO 16 is in the queue and it will soon be tested. I am in rehab after having a total hip replacement surgery which is my fourth surgery in 6 years and still following the precautions. I am resuming the work slowly and going through the queued items first.
The SilverStone MILO 12 is an SFF/HTPC PC Case that is aimed at a user who would want to save space on the table or set up an HTPC build for home use without compromising the performance and features. This case is made of plastic and steel materials. It has a dimension of 105x393x378mm (WxHxD). This case has a volume of 15.6 liters having a net weight of 4.89 kg.
This case supports motherboard of mini-ITX size motherboards only. It is based on a dual chamber layout separating the two main heat producers in any build i.e. CPU and graphics card. The upper chamber is used for the graphics card and it is separated from the lower chamber though there are a few openings that could transfer the heat from the lower chamber to the upper but overall it is a well-planned design. PSU and motherboard are installed in the lower chamber. The CPU Cooler height is only 77mm so we can use a low-profile cooler only in this case.
SilverStone has provided support for a standard PS2 ATX size PSU as well as for the SFX/SFX-L size PSU. There is a removable bracket installed in the case to house the SFX/SFX-L size PSU. SilverStone has wisely utilized the space beneath the PSU bracket to install (optional) 9.5mm slim ODD from the front side of the case. However, if you are going with an ATX-size PSU, then ODD can’t be installed. The maximum length of a PSU can be 160mm.
The graphics card of triple slot design having a length of 345mm and 160mm height can be installed in the chamber. SilverStone has provided a PCIe Riser 4.0 cable for that matter. This cable and bracket sit between the motherboard tray and the upper chamber providing a connection between the motherboard and the graphics card. This is a cut-to-size cable that is not flexible which is understandable since we are working in a space-constraint case and this cable has an exact size length to sit in the dedicated space. You can connect Gen5 graphics cards to this cable and set the PCIe interface to Gen4 or lower (as per requirement) in the UEFI/BIOS. Optionally, a user can install an 80x15mm fan on the front to push fresh air on the graphics card from the front side for which there is a mesh portion on the front panel. Optionally, the user can also install a 140mm fan on the upper chamber from the left side. This would be fruitful for the open-design graphics cards. However, the heat from the lower chamber can be pulled by this fan and pushed into the graphics card.
In terms of storage, this case can house up to 4x 2.5” drives. Two drive brackets are located on the side. One is on the front side and the last is on the base. There is no support for a 3.5″ drive and somewhat limited storage support is not supported by the price. The main panels have dust filters and both panels can be swapped with each other. The top and bottom panels can also be swapped with each other but they don’t have dust filtration.
In terms of connectivity, SilverStone has provided:
- 2x USB 3.0 Type-A
- 1x USB Type-C (Key-A)
- 1x Combo Audio
There is an LED indicator on the top right side. The IO panel is located in the middle. This case can be placed horizontally or vertically on the table. SilverStone has provided two stylish foot stands for this purpose. Placing this case vertically will save space.
There is a large size cutout on the motherboard tray that would make the CPU cooler’s installation convenient. This cutout is rectangular in design. They have not only managed to provide a large-size cutout but are also able to maintain the structural stability of this case. However, after installing our AMD motherboard, we were not able to install M.2 drive on the backside of the motherboard. This limitation could prevail for all models as long as the M.2 port is below the CPU socket. I did not face any issues during the installation. If installing a thick graphics card seems difficult, you can remove the top beam from the main frame. This would open the area of the graphics card. Don’t forget to put the beam back on after installing the card. The cable routing was easy and we tucked many cables beneath the PSU bracket to save clutter and provide a clean look where possible. I would suggest installing PSU with cables first and attaching EPS, 24-pin ATX, and system panel connectors to the motherboard before installation.
I have used AMD Ryzen 7 7700X (PBO 85°C) over ASRock B650E ITX motherboard and installed GIGABYTE GeForce RTX 3060 VISION OC graphics card. The MSI RTX 3090 was in use on another test build which is why a triple-slot graphics card was not used. The ambient temperature was 26°C. Under the Time Spy Extreme stress test, the graphics card reached 74°C whereas the CPU was operating at 85°C (this is how the new Ryzen platform works). However, the single-core boost frequency of 5.40GHz was maintained under CINEBENCH R23.2 single-core test. The minimum that I saw on the clocks under CPU Multi load was 4.70GHz. This is not a bad performance given that we were using a low-profile cooler.
The SilverStone MILO 12 has an MSRP of 189.99 at the time of this writing. This is quite a steep price for this case. I think SilverStone is offering a 1-year warranty depending on the region though I am still waiting to hear from them. This PC case has a form and function combined to deliver a good user experience and comes recommended by us.


