


GELID Solutions AMBER5 5-Channel RF Remote ARGB Controller Review
Introduction
The English word “Gelid” comes from the Latin word “gelid us” (very cold, icy). As the name indicates, the GELID Solutions are primarily focused on the thermal solutions as they design and manufacture CPU and VGA coolers, chassis fans, thermal compounds, accessories and other equipment for computers and electronic devices. The company also supplies a range of products for international OEM and ODM clients. They are based in Hong Kong and has multiple manufacturing facilities in Mainland China and Taiwan. The company believes in Quality, Reliability, and Efficiency as the main driving force behind the product ideas and execution.
GELID Solution has launched an RGB accessory Amber5. Amber5 is a 5-port ARGB and 5-port PWM fan hub which allows the user to connect up to 5x A-RGB fans to this hub hence the name Amber5. GELID has also provided an RF Remote Control to access 366 pre-programmed RGB modes. The user has also been given option to connect the hub to the motherboard’s 5V lighting header as well as to connecting the Chassis 2-pin cable (Reset) to the hub and control the light modes using the Reset or applicable buttons.
Product: Amber5
Manufacturer: GELID Solutions
Price: USD 14.99 / EUR 12.99 [MSRP]
Specifications

Packing and Unboxing
The cooler is shipped inside a paperboard box with colorful theme all around.

Salient features of the unit are printed here mentioning that this is a 5-port ARGB and PWM hub with manual/Auto RGB control. The included RF Remote control has 21 keys.

Specifications of the unit are printed here.

The unit is compatible with:
- ASUS AURA SYNC
- MSI MYSTIC LIGHT SYNC
- RGB FUSION 2.0
- ASRock POLYCHROME SYNC
- RAZER CHROMA RGB

There is a cardboard box container inside the main packing box having all the contents.
Following are provided in the box:
- 1x Hub
- 1x RF Remote Control
- 1x SATA Cable
- 1x PWM Cable
- 1x 3-pin ARGB Cable
- 1x Dual-sided Adhesive
- 1x User Guide
Closer Look
Let’s start with what GELID Solution is saying about the Amber5, “AMBER5 controls up to 5 fans, strips or other Addressable RGB (ARGB) devices and boasts 366 vivid lighting presets spanning a carefully selected collection of pre-programmed RGB modes and dynamic effects. The SATA power connectivity is utilized which delivers up to 85W maximum power output and supports ARGB devices with up to 120 LEDs onboard to lit up and control on each channel.AMBER5 also supports a pass-through ARGB Sync/Hub Mode via the 3-pin ARGB Sync Input while connected to compatible motherboards: ASUS, Gigabyte, MSI or ASRock. You are free to use the controller presets or switch to your own presets designed in your favorite RGB software. AMBER5 can be installed inside or outside your PC just in seconds thanks to the built-in magnet. Additionally, the adhesive Sticky Pad is also included to facilitate installation in aluminum-made or non-metallic PC chassis.”

The control unit has a dimension of 90.7×49.7×12.5mm. It has a black color plastic housing having a weight of 34.2g. The top left portion has a glossy finish hence it is a finger print magnet so keep that in mind when handling. There is a GELID branding on the bottom left side. Good aspect of the design is that each port is labeled which would be helpful for the user/installer. The total power draw of the control unit is 85W. Both types of ports (A-RGB and PWM) shared this total power draw. Each port regardless of the type is rated for 1A maximum. Keep that in mind when planning your ARGB devices/fans with the Amber5.

There are 5x 3-pin ARGB ports on the control unit. They are labeled with ARGB1 to ARGB5 in that order. They are following the +5V,D,,G pin format. The ARGB headers are rated for 5V and each port can have a maximum of 1A. Theoretically speaking the 5x ARGB ports have a total power specification of 25W which is calculated by multiplying the 5V with 1A rating per port giving us 5W per port. Since we have a total of 5x ARGB ports hence 5×5=25W in total for the ARGB ports. This leaves 60W power for the 5x PWM fan ports.

The control unit has 5x 4-pin PWM fan ports on the opposite side of the ARGB ports. Each port is rated for 1A maximum at 12V. Hence we have a total power draw of 12W per port (theoretical). Since there are 5x such ports hence we have 5×12=60W in total for the 5x PWM ports. The PWM1 port has a red color indicating that the PWM signal of the fan connected to this port will be read and reported in the PC software or UEFI/BIOS and that the other fans will be synced to the speed of the fan connected to this port. This implies that PWM is shared and we can’t control the speed of the individual fans.
As long as we are not overloading a single port above its rated current (A) limitation, we can daisy chain the devices to have more than 5x devices connected to 5x ports. This applies to all 10x ports (5x ARGB and 5x PWM).

The glossy end of the control unit has two ports. One is labeled as MB PWM. This is where the Motherboard PWM Sync cable is to be connected allowing the user to control the connected fans speed directly from their UEFI/BIOS or fan control software. The other port is labeled as SATA. This is where the bundled SATA cable is connected to power the control unit. Pease keep in mind that if you don’t connect the motherboard PWM Sync cable then the connected fans will run at their full speed or 100% PWM duty cycle.

The opposite side of the control unit also has two ports. One is labeled as Switch. It is a 2-pin port to which you can connect the PC Chassis Reset cable or any Vandal Switch cable. This would allow the user to switch the lighting modes (no control over brightness) using the connected button. The other port has MB ARGB labeled on it. One can connect the control unit to the motherboard’s 5V digital light header by using the bundled motherboard ARGB Sync cable.

The back side of the control unit has a plain surface without any branding or label. There is a magnet in the housing which allows for convenient installation of the control unit in the metal chassis. In case you chassis has Aluminum material then you can use the bundled dual sided self-adhesive tape to install the control unit in the chassis.

The above picture shows the provided dual-sided self-adhesive tape.

The above picture shows the bundled SATA cable. Connect the 4-pin connector to the SATA labeled port on the control unit and the SATA connector to the PSU.

The above picture shows the bundled PWM cable. Connect the small connector to the MB PWM labeled port of the control unit and the regular 4-pin PWM connector to the 4-pin PWM header of the motherboard. This way you will be able to control the speed of the connected fans from UEFI/BIOS or fan speed control software. Please, note that you can’t control the speed of the individual fans. The speed of the fan connected to the PWM1 port will be applied to all the other fans.

The above picture shows the ARGB Sync cable. We have a standard 3-pin ARGB connector on both ends as well GIGABYTE’s proprietary 3-pin connector (for older models). This cable is used to switch the control of the ARGB devices to the motherboard using the 5V digital light header of the motherboard.

GELID has provided a user guide with step by step illustration on how to setup and control the unit.

The above picture is for the illustration purpose on how to properly setup the control unit of the Amber5. The SATA cable is connected to the SATA port of the control box. The other end of the SATA cable needs to be connected to the PSU. The 4-pin PWM sync cable is connected to the MB PWM port on the control box. The other end needs to be connected to the motherboard’ 4-pin PWM header. The ARGB sync cable is connected to the MB ARGB labeled port on the control box. The other end needs to be connected to the 5V digital light header on the motherboard. Optionally, you can connect the 2-pin cable coming from your VANDAL switch or PC Chassis Reset cable to the port labeled as SWITCH.
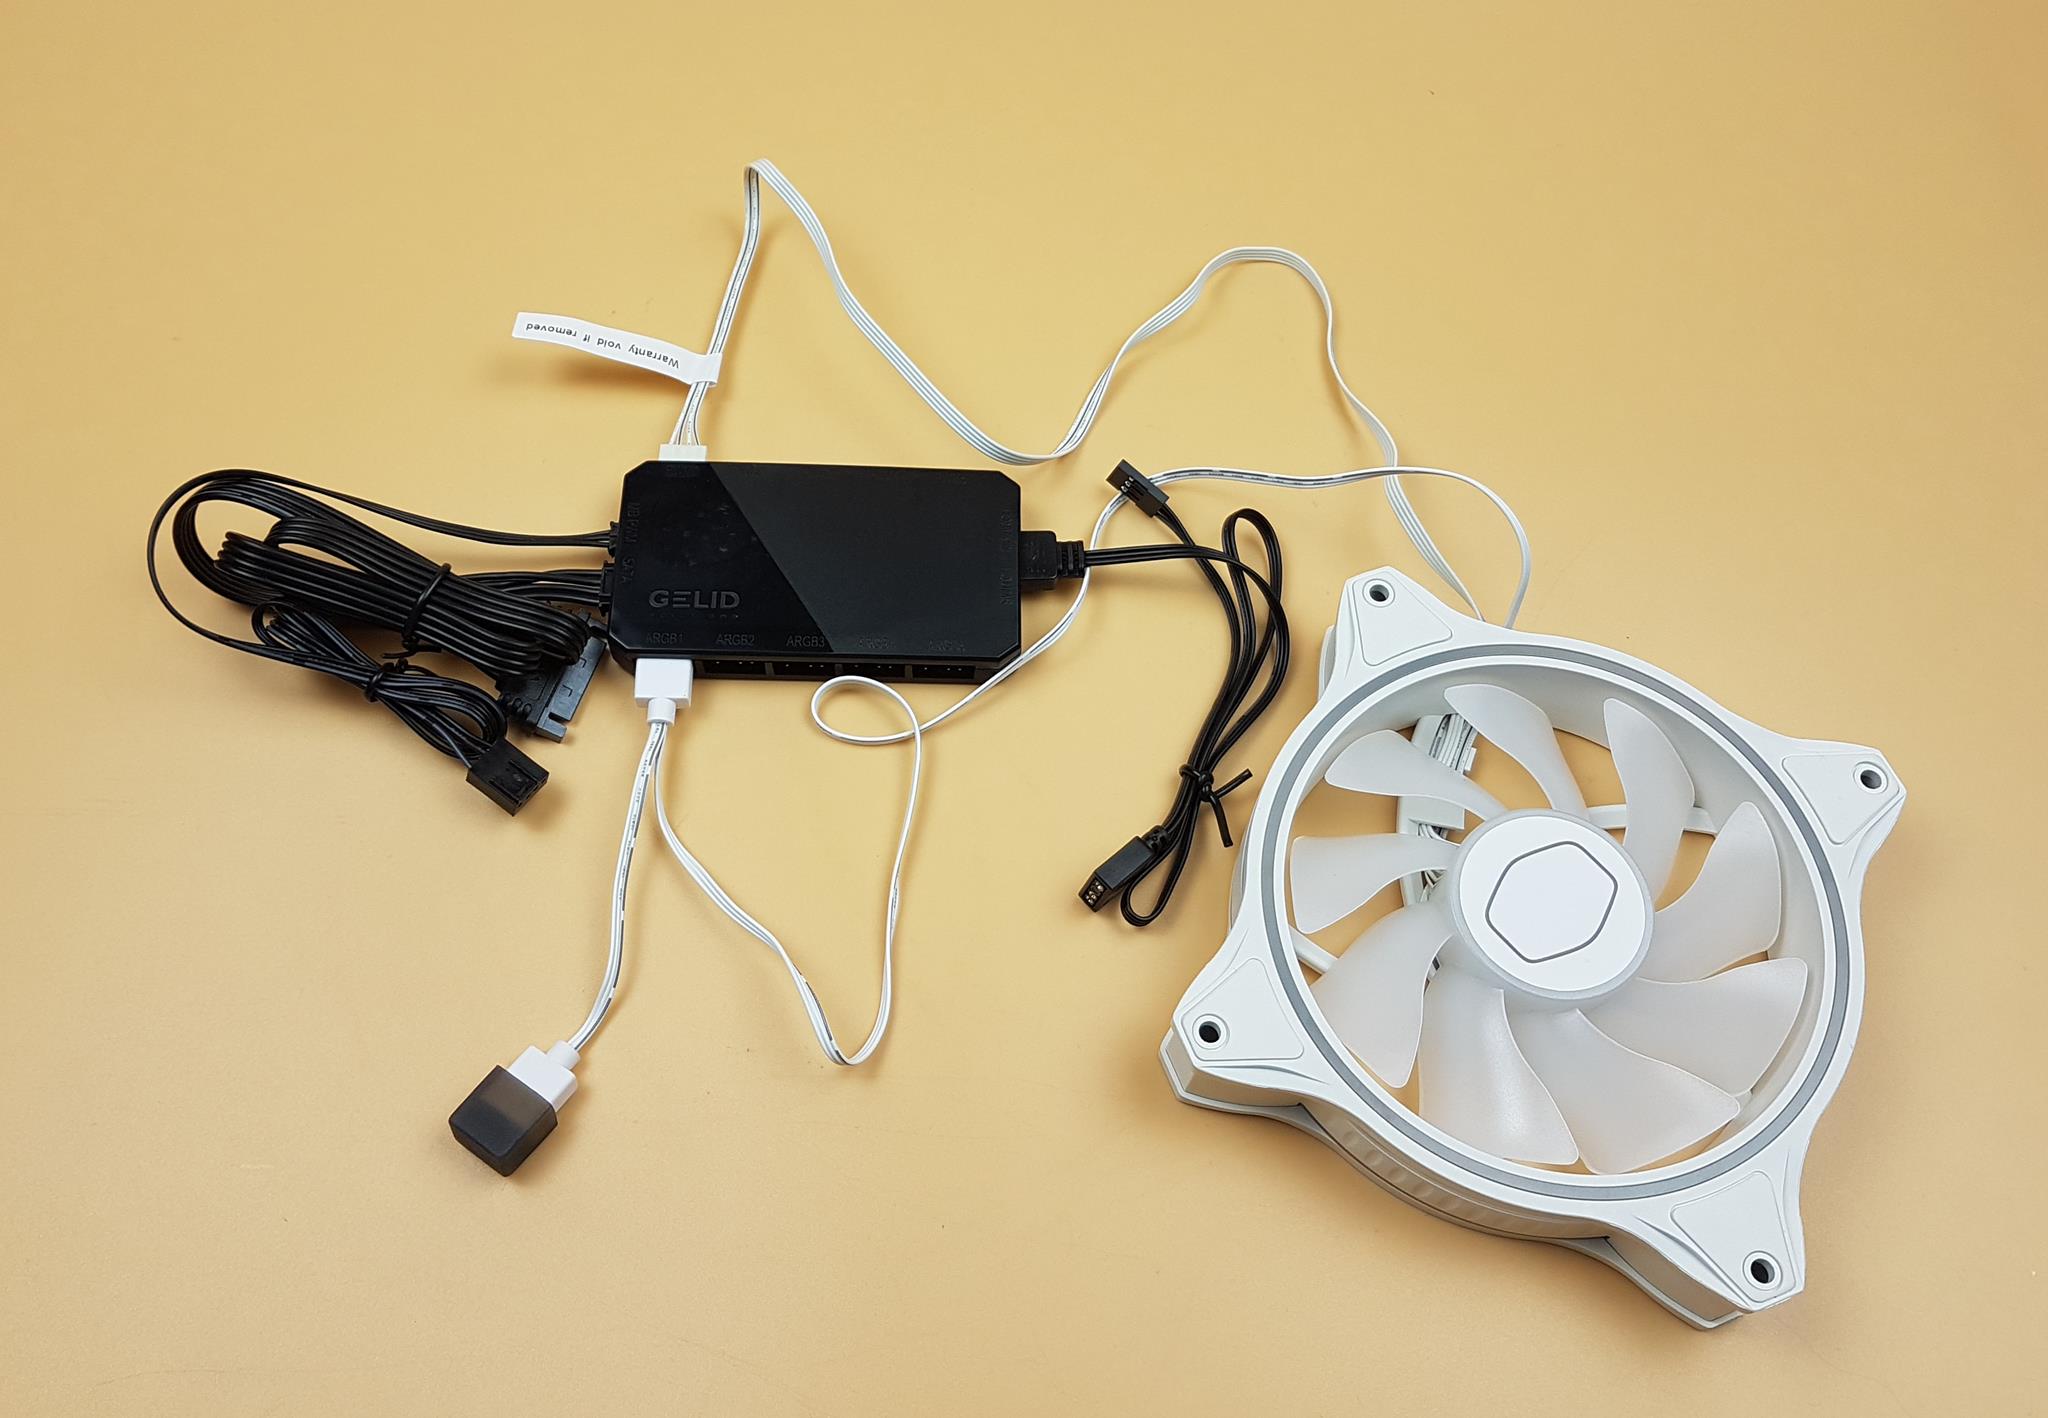
We connected the Cooler Master MF120 Halo White ARGB fan to the Amber5 for an illustration purpose. The ARGB cable of the fan is connected to the ARGB1 port of the control box and 4-pin PWM connector of the fan is connected to the PWM1 port of the control unit.

The above picture shows the connectivity options for the Amber5 control unit.

The GELID has provided an RF Remote Control in the box. It has a dimension of 86x40x7mm. It is using radio frequency of RF 433MHz and has 21 keys. The CR2025 battery needs to be purchased separately. GELID has pre-programmed some 366 RGB modes which can be accessed only from this RF Remote Control. The Remote control has an effective range of 8m. We have 8x Brightness levels and 8x Speed steps. Pressing the RC/MB would switch the control from the control unit to the motherboard and vice versa. We have two dedicated brightness control button, two speed control buttons and two modes change buttons. The Auto will cycle through all the modes.

The backside of the remote control is indicating that CR2025 battery is needed and that its + polarity side needs to be placed facing upward.

The above picture illustrates the functions associated with the buttons on the RF Remote Control.
RGB Lighting
We connected 5x SilverStone Air Blazer 120RW fans with the Amber5 for the testing purpose. The fans light up in the blue static color and they were rotating at the full speed. We were able to regulate the speed of the fans from the CPU_Fan header of the MSI MAG Z490 TOMAHWAK motherboard. The control unit responded well to the Remote Control functions and switching to the motherboard’s 5V digital light header as well.
The power rating of the AB 120RW fan is as under:
| Fan Current Rating | 0.32A |
| Fan Power | 3.84W |
| LED Current Rating | 0.26A |
| LED Power | 1.8W |
Now it is an easy math. We have a total of 60W available for the 5x PWM ports. The connected fans are drawing 19.2W combined. This leaves us with 40.8W capacity meaning we can add more fans. In other words we can connect up to 15x (total) SilverStone Air Blazer 120RW fans on the 4-pin PWM fan ports of the AMBER5.
The LEDs per fan are taking up to 1.8W per port. This means they are drawing 9W combined leaving us with 16W power available for more ARGB LED devices. In other words, we can add up to 13x (total) SilverStone Air Blazer 120RW fans on the 3-pin ARGB ports on the AMBER5.
Please keep in mind that the above figures are theoretical. Connecting more devices may over load the control unit and I am not sure about the safety features of the unit. Don’t cross the GELID Solution’s recommended optimal number of devices (mentioned below).


GELID has informed that they have tested the unit by connecting 6x ARGB fans (DC 12V, 0.19A) using splitter and they were working fine. However, when 10 of these fans were connected the lighting got dimmed. They are suggesting not more than 6 fans to be connected with the Amber5.
Conclusion
Amber5 is a 5-port ARGB/PWM Control box with RF Remote Control. It has two main units. One is the control box itself and the other is a remote control. The control unit has a dimension of 90.7×49.7×12.5mm with a weight of 34.2 gm. The remote control has a dimension of 86x40x7mm with a weight of 15gm. The control box has a plastic housing with magnetic as well as self-adhesive mounting provision. The total power output available for the ports is 85W using the SATA connector.
The control box has 5x standard 3-pin ARGB ports. Each port has a maximum current rating of 1A. The Amber5 has 5x 4-pin PWM fan ports with each port rated for 1A maximum current using 12V. The power is shared among the ports.
There are three ways in which the ARGB lighting can be controlled:
- Using RF Remote Control
- Using 5V digital light header of the motherboard
- Using PC Case Reset button or any switch with 2-pin connector
The Remote Control is using radio frequency 433MHz and has an effective range of 8m for the signal. We have 21 keys on the remote control and GELID has pre-programmed 366 RGB modes. The user can fine tune the speed of the dynamic modes in 8 steps and brightness control is also in 8 levels.
The unit is SATA powered. There is a 4-pin PWM Sync cable which connects the control unit to the motherboard’s 4-pin PWM fan header. This gives the user to control the speed of all the connected fans to the control unit using UEFI/BIOS or fan control software. We can’t control the speed of the fans individually. The speed of the fan connected on the red color port (PWM1) is used for the PWM signaling. All the fans will rotate based on the PWM1 port’s fan speed.
There is ARGB Sync cable as well which allows the user to switch the control from the control unit to the motherboard’s 5V digital light header and control the ARGB lighting of the connected devices to the control unit from the motherboard’s software. It is compatible with:
- ASUS AURA SYNC
- MSI MYSTIC LIGHT SYNC
- RGB FUSION 2.0
- ASRock POLYCHROME SYNC
- RAZER CHROMA RGB
The GELID AMBER5 is a complete solution for your RGB needs. It is listed at $14.99 MSRP which makes it quite a value offer from the manufacturer. GELID is offering two years warranty on the AMBER5. Given the features set of the AMBER5 and pocket friendly pricing, it comes recommended by us.
We are thankful to GELID Solutions for giving us the opportunity to review their AMBER5.


