


Noctua AM5 Offset Mounting Brackets – Are they worth it?
Noctua AM5 Offset Mounting Brackets Introduction
I thought that AMD AM5’s thermal behavior has been put to rest but I was wrong it is still in debate and many brands have released some sort of their solutions trying to tackle the 95°C temperature regardless of cooling solution. AMD has emphasized again and again that it is by design but people are not comfortable running their CPUs at such high temperatures. Believe it or not, Intel’s 13th generation is actually performing similarly due to high PL1, PL2, and Tau values. As soon as CPU hits that PL2 the temperature would easily peak into the upper 80s and lower 90s or even thermally throttling depending on the SKU. This is largely dependent on the type of load, thermal paste application, BIOS settings, Voltages, and ambient temperatures. I have seen many people complaining their 240mm AIOs not able to handle i5 13600k on default behavior. I always ask them to tell me about their room temperature first followed by BIOS configuration and type of loads. Anyhow, the majority are living in Intel’s golden era where the i7 was a four-core design, and on stock settings, it would still operate at a decent temperature level depending on the load. Things have changed and one needs to adjust accordingly.
Anyhow, AMD has employed a thick heat spreader on Ryzen 7000 series SKUs which has been mainly attributed towards contributing to the high thermals under use. Thermal Grizzly in collaboration with der8auer has released a delid tool for this platform along with many other products including a lapping tool, adapter and offset mounting kits, Direct Die Frame, and Heat spreader to name a few. Noctua has also released its offset mounting brackets for this platform. They have released a direct die-mounting kit in collaboration with der8auer. We are taking a look at these offset mounting brackets in this article.

We have received the following brackets:
All these brackets support different Noctua coolers so you better do good homework before pulling the trigger.

The above picture is taken from Noctua website. It shows the compatibility of these offset brackets with Noctua coolers. You would need NM-AMB12 for the king of the ring NH-D15/S. NM-AMB15 would be required for NH-U12A and NM-AMB13 would be needed for NH-U12/S coolers. These are among the most favorite coolers from Noctua hence I have mentioned the compatible offset mounting brackets.
What’s different in stock and offset brackets?
Why would you need an offset mounting bracket for Noctua coolers on the AM5 platform? Let’s take a look at the picture below to understand the concept.

We have taken the above picture from Noctua website. The hot spot on these SKUs is not directly in the center rather it is a bit below the center. Noctua has referred this to as “located towards the south side of the CPU”. As can be seen in the second and third diagrams above, the cooler traditionally is placed on CPU hoping to cover the center portion as it has been a trend that the die usually resides in the center. While this is true for Intel, it is not the same for AMD. As we can see those CCDs which are more heat-generating areas under the IHS, so the hot spot is not in the center of the PCB but lower than the center. Noctua’s AM5 offset mounting brackets provide a displacement of -7mm compared to the stock mounting bracket. This offset lowers the cooler’s base towards the south side of the CPU.

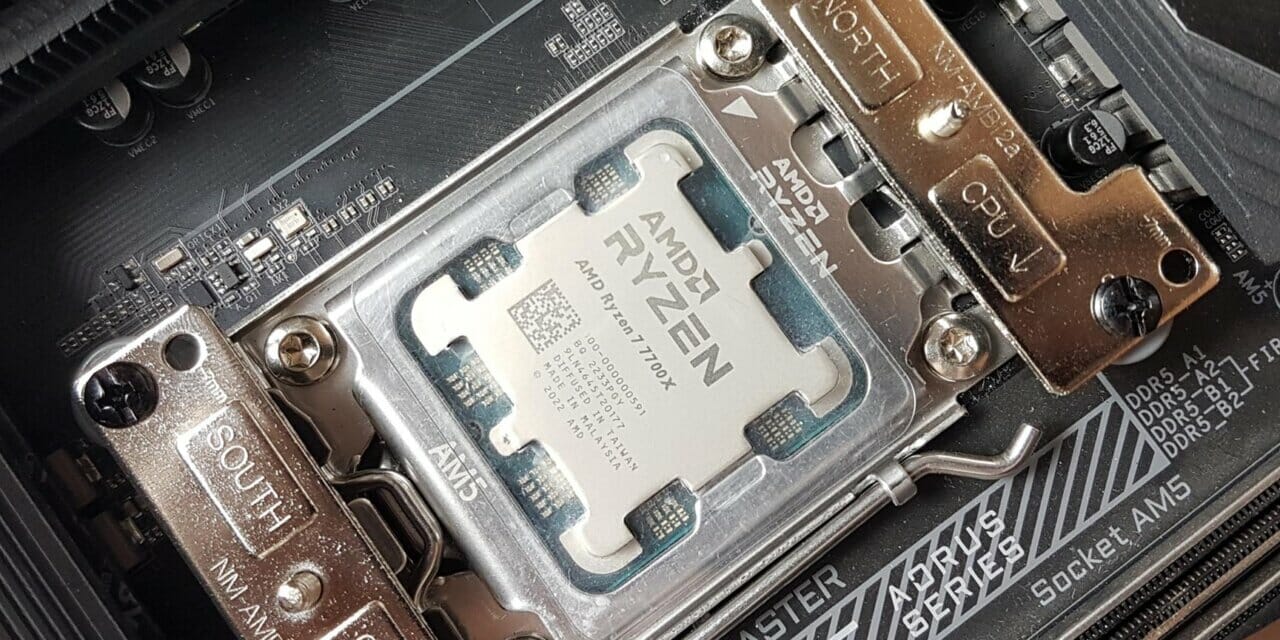
We have shown the North, South, East, and West sides near the CPU socket so that you can better understand it. North and South ends are of particular importance because literally every offset bracket from Noctua will move the cooler towards the south from the north. This way, we would get better coverage on the CCDs under the IHS. The -7mm offset is coming from North side towards South side regardless.

The above picture shows two main categories of these brackets. The NM-AMB12 and NM-AMB14 cover those coolers from Noctua that have 83mm and 78mm mounting pitch respectively and their mounting brackets are installed on top (North side only) and bottom (South side only). The NM-AMB13 and NM-AMB15 cover those coolers that have 83mm and 78mm mounting pitch but their bracket have a long length on the East and West sides of the socket area.

The above picture shows a stock mounting bracket from Noctua NH-D15 chromax.black. We can see that this bracket is placed on the north side and south side.

The above picture is for illustration purposes only. It shows the stock mounting bracket for NH-U12A installed on AM4 socket. For this type of coolers from Noctua, NM-AM13 and NM-AMB15 would be needed.

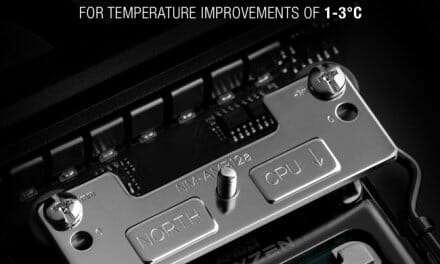
The above picture shows the NM-AMB12 mounting bracket. We are using NH-D15 chromax.black for this testing hence we will be focusing on this offset bracket only. The result from this bracket and cooler would give an idea of what to expect from other brackets. Each bracket is clearly labeled and you can’t go wrong with the installation of these brackets no matter what. The bracket shown on the top has SOUTH clearly labeled meaning this bracket will be installed on the bottom of the socket (SOUTH end). It has two types of mounting holes. One set is labeled 0 whereas the second set is labeled -7mm. the 0 labeled holes conform to the stock mounting bracket size. I think it is wise of Noctua to provide support for stock location or mounting as well as offset mounting holes labeled -7mm. There is an arrow indicator right after CPU label showing the direction in which this bracket must be placed on the socket. The lower bracket has two arms with mounting holes. This bracket is also labeled. This time it is NORTH meaning this bracket will be placed on top of the socket (North). In case you are wondering where the rest of the stuff is, there is not any because these brackets use spacers and screws from the cooler. Noctua has been clear and precise in the design. NM-AMB14 has the same design but it is compatible with different sets of coolers from Noctua.

Now we are showing NM-ABM13 offset mounting brackets. As we can see each bracket has an arm and the center has a standoff. WEST and EAST are clearly labeled on the brackets along with the arrow markers. These markers should face the CPU. That is why; I have mentioned that one can’t go wrong with the installation of these brackets. Noctua has made it easy. Each mounting arm has two holes labeled -7mm and 0. 0 marked holes conform to the size of stock mounting bracket whereas -7mm is the offset from the North side towards the South side providing better coverage of CCDs.
Thermal Testing
We have used the below-mentioned configuration for this testing:
- AMD Ryzen 7 7700X
- GIGABYTE X670E AORUS MASTER
- GIGABYTE GeForce RTX 3060 VISION OC [For Display]
- Sabrent Rocket 32GB DDR5 kit 4800MHz CAS 40
- Sabrent Rocket 4 Plus 1TB Gen4 NVMe SSD [For OS]
- Noctua NH-D15 chromax.black
- Be quiet! Straight Power 11 1000W Platinum PSU
- Open-air Testing


Here is the settings table:
| Clocks | Auto |
| VCore | Auto |
| PBO | Advanced |
| Efficiency Curve Adjustment | -30mV |
| PPT | 95W |
| Thermal Limit | 85°C |
| XMP/EXPO | Loaded where available |
| Thermal Paste | Alphacool Subzero |
| Thermal Paste Application | 5 dots |
| Fan Headers | CPU_FAN and CPU_OPT |
| Fan Control | 100% PWM cycle |
| Stress Tool | CINEBENCH R23.2 Multi |
| Monitoring Tool | HWInfo64 |
| Test Duration | 30 minutes |
| Idle Time | 5 Minutes |
| Ambient Temperature | 24.3°C ~ 24.7°C |
Motherboard was updated to the latest BIOS before this testing along with the chipset software. We did not use ECO Mode from GIGABYTE as they were not serving the purpose of this testing. These Eco modes are based on thermal limits and CPU will operate on the set limit anyway.

The above picture shows the available Eco Modes. There are 5 levels in each of thermal limit (70°C, 80°C, and 90°C). I tried 80°C with Level 5 and the system hung up. Then 80°C with Level 1 was tried and the CPU was operating at 80°C. There is no power target or power-based mode available. ASRock has done a fine job in this regard.

We left the PBO Enhancement disabled.

You can find PBO settings in Advanced CPU Settings in the BIOS. We have selected Advanced mode for manual customization.

We have set all cores to negative offset with a value of 30 on the curve optimizer. This is why we have the VCore on auto as well.

The PPT or socket power was set to 95W and the thermal limit was set to 85°C (shown 80°C in the picture).
Now, that we have given a run of the settings and BIOS configuration, let’s proceed with the testing. We needed to establish the baseline for reference. This was easy to do using stock mounting brackets from NH-D15 chromax.black. We ran a multi-core stress test using CINEBENCH R23.2 and recorded temperature using HWInfo64. We have finally managed controlled temperature for our thermal testing. The room temperature was 24.3°C to 24.6°C hence we are reporting absolute temperature in the graphs.

Next, we installed the NM-AMB12 using 0 labeled mounting holes, and the test was repeated.

In our next run of the test, the NM-AMB12 was installed in -7mm offset from North. Doing this may affect the graphics card clearance or even the bulky NVMe SSD covers. You would need to keep an eye on that.

We have enough clearance for the mounting bracket to be installed in an -7mm offset.

Using stock mounting bracket, there is no clearance issue from NVMe SSD cover and the Graphics Card. Yes, we had to adjust the height of the front fan which is not the topic at the moment since offset is between the North and South ends.

The above picture shows a relatively small area left for the graphics card after installing the bracket in -7mm offset.

Here we can see that there is still a space between the cooler and the graphics card even after using a -7mm offset.
Result

So, what is the outcome? We saw no difference in idle temperatures using either of these mounting brackets. Similarly, there was no difference in temperature using the stock brackets and NM-ABM12 with 0 offset. However, we saw an improvement of 1.6°C when the NM-AMB12 was installed in -7mm offset. According to Noctua from their internal testing, one can expect a difference between 1°C to 3°C. Our test result is sitting right in the middle of their numbers. During this test the socket power was 97W and clocks were operating in the range of 5250MHz to 5275MHz. We did not see a performance drop. When we ran the test on Stock and Auto settings in BIOS with PBO the CPU was operating at 5.1GHz with temperature sitting at 95°C. Using advanced PBO is beneficial as is evident from our testing and this can be further improved using Noctua NM-AMB12 bracket.
Conclusion
Where everyone is throwing ideas and products to lower the temperature on the new AMD AM5 platform, Noctua has provided an accessory called AM5 offset mounting brackets. These brackets are available on AMAZON and Noctua stores at USD/EURO 4.90 and 3.90 pricing respectively. Explaining in simple words, these brackets would lower the cooler’s base an exact measurement of -7mm from top (North) to the bottom (South). Why lower the cooler where we may run into graphics card and NVMe SSD bulky heatsink clearance issues? It is simple, unlike Intel platform where the die is located in the center of the PCB, Ryzen 7000 SKUs have CCDs located towards the lower side (South end). These CCDs are the main hot spot areas. Installing a cooler in a traditional manner would not fully cover these CCDs. A simple solution is offset mounting. We have seen ARCTIC doing it already with their latest version of Liquid Freezer II series of liquid coolers.
Noctua has presented the offset mounting brackets to enable the Noctua coolers’ installation in an offset manner to fully or properly cover the CCDs for efficient heat transfer. The available brackets include:
- NM-AMB12 83mm Mounting Pitch
- NM-AMB13 83mm Mounting Pitch
- NM-AMB14 78mm Mounting Pitch
- NM-AMB15 78mm Mounting Pitch
The NM-AMB12 and NM-AMB15 are also available in chromax.black versions. Each of these brackets supports different Noctua coolers. Click here to check this compatibility on the Noctua website. Each bracket has clear labeling showing the direction (North and South) for NM-AMB12 and NM-AMB14 & (East and West) for NM-AMB13 and NM-ABM15. There are arrow markings showing the direction that the bracket should face toward the CPU. Each bracket has two sets of mounting holes. One set is labeled 0 and it conforms to stock mounting bracket location. The other set has a label of -7mm. This set provides offset. These brackets are also compatible with AM4 sockets.
We have tested NM-AMB12 with NH-D15 chromax.black on GIGABYTE X670E AORUS MASTER motherboard with 7700X. There was no clearance issue using -7mm offset mounting. We have used Advanced PBO settings for this testing and locked the socket power at 95W with a thermal limit of 85°C. This offset mounting has provided a 1.6°C improvement compared to the stock mounting. Nothing wrong in spending a few bucks for a thermal improvement but I am leaving this to the user to decide if 1.6°C (not guaranteed as it would depend on a range of factors like CPU itself, thermal paste application, ambient temperature etc) improvement is sufficient enough for this expense.
Nauman signing out.


