Dark Base Pro 901 is a full-tower flagship PC Case from be quiet! It represents the epitome of a technology marvel. This case is available in white and black at a premium price tag of €319.90. It comes with a 3-year warranty. This price tag is justified with a plethora of features including wireless charging and provision of 420mm radiator support as well as an integrated fan control mechanism, that is unmatched and unrivaled. This case comes with 3x Silent Wings 4 140mm fans which are the latest generation of fans from be quiet!
Some of the key features are:
Interchangeable top cover and front panel for either maximum airflow or virtually inaudible operation
Fan and radiator brackets with integrated fan hub in front and top make installation a breeze
3 Silent Wings 4 PWM fans for a virtually inaudible operation and high performance
Touch-sensitive I/O panel for state-of-the-art operation
Generous dimensions ensure operation of E-ATX motherboards and radiators up to 420mm
Well-conceived system for an extremely user-friendly handling
Flexible motherboard tray for an inverted layout
Subtle ARGB lighting in the front and the PSU Shroud
Dark Base Pro 901 Specifications
Dimensions
Unboxing
be quiet! ships this case inside a brown color cardboard box. This box has a block diagram of this case showcasing its modularity. The specifications are also listed on the packing box. It is quite a heavy-weight box so take note of that.
The case is tucked between two white Styrofoam pads for protection from damage. The case is enclosed inside a black color cloth cover that has be quiet! branding. The user manual is supplied in a separate container. There are two accessory boxes since this PC Case is all about flexibility, modularity, interchangeable components, and flexibility to switch between noise-dampening configuration or airflow design.
Accessories
There is a large size accessory box that has many brackets that user can use as per requirement.
It includes:
1x Mesh Front Panel
Fan/Radiator Bracket
1x HDD Frame for Multi Mounting Panel
1x Airflow Cover for PSU Shroud
The part box was tucked inside the case using cable ties.
This box has many other accessories and parts/components for the user’s requirements.
The accessories include:
1x ODD Bracket
1x GPU Support Bracket with Cable routing
Various Screws
1x Box Container with Velcro Strips and other items
1x GPU Support Bracket for Inverted Layout
1x E-ATX Cable Management Cover
Be quiet! has provided a GPU support bracket for a non-inverted layout. This is a multi-bracket in the sense that it will hold your heavy graphics cards and prevent them from bending but also provides channels on which the PEG cables are routed from the graphics card to the PSU.
I am a bit surprised. If there is already a small container then why not placed all screws inside this container! Maybe they need to take a look at years old Evolv ATX PC Case from Phanteks with its screw box. Anyhow, this box has 7x Velcro Strips, anti-vibration pads, 4x M5x20 screws for front fans, 1x Thumb Screw for VGA Holder, and a few other screws and nuts.
There are 5 transparent containers containing:
1x Wrench for Motherboard Standoffs
3x Motherboard Standoffs
4x 6032 PSU Screws
11x 6-32 Screws for Motherboard
24x M3 Screws for ODD/SSD
Be quiet! has provided another GPU support bracket that would be required in an inverted layout.
Be quiet! has provided an ODD bracket for the front panel.
Be quiet! has provided a cable management cover that would be required if you are using an E-ATX-size motherboard.
Closer Look
Dark Base Pro 901 is a signature case from the manufacturer that is modular with good flexibility, airflow optimized as well as noise-reducing configuration making this case a versatile one. Though there are a few areas where I wish be quiet! has not done what they did. It is time to take a closer look at the chassis and see what it offers in this price range. The dimension of the case is 604x254x539mm excluding the stands. This dimension is 604x275x569mm with the stands.
The materials involved in the construction of this case are Aluminum Steel and tempered Glass. Though they have not mentioned but ABS material is also used. The case has a net weight of 17.8kg. Yes, it is quite heavy and tank-built.
Exterior View
Let’s start with an exterior view of the chassis.
The stock configuration of the front panel is a solid panel with soundproofing/insulation pads. There is a be quiet! branding towards the base where there is a 5.25” drive bay which was a surprise. I am not sure why be quiet! has opted for a 5.25” design. Anyhow, the front panel is modular and flexible meaning you can configure to house a mesh panel for airflow design.
I am showing the 5.25” bay area on the front in detail. The bottom panel is slide open to access this panel. You can spot a dust filter inside the area. The ODD bracket is not installed rather it is provided in the accessories. This is wise since a majority of the users may not be using 5.25” drives these days. But it is not dead yet and there are many 5.25” devices that provide more connectivity options. Take note of a diffuser running between the 5.25” bay area and rest of the panel body. There are 8+16 digital RGB LEDs (5V rated) that light up when the power button is pressed.
I am showing the inside of the front panel. The centerpiece that has a soundproofing/insulation pad is removable. You will have to press the tabs to release the center portion. It is easier than said. There are 3 contact pins on the left side (actually the right side) on a black PCB. This is for the control of ARGB LEDs. The contact pads are on the main housing.
I have removed the center portion from the front panel and shown both separately.
There is a magnetic dust filter in black covering the fan radiator bracket. You can see a glimpse of two 140mm fans. Now you can see that there is a separate dust filter covering the ODD port. The dust filter must be placed in a particular orientation otherwise the front panel will not fit. So, if you are facing issues attaching the front panel to the Case, check the dust filter.
I am showing the main dust filter. It has a fine mesh.
There is a PCB with 3 contact pads. The 3-pins on the front panel contact this pad. There is a cable coming out from the PCB and going towards the IO panel of the PC Case where there is an integrated ARGB controller.
Now, you can see that there are two Silent Wings 4 PWM 140mm fans pre-installed on the fan bracket. This fan/radiator bracket is removable. You can install up to 3x 120mm or 3x 140mm fans on this radiator with a maximum of 360mm or 420mm size radiator. Too good!
I have removed the front fan/radiator fan bracket and shown the backside. You can see that the fans are connected to the PWM fan hub on the top of this bracket. This is another key design in this case where there is a smart fan connection on a pre-routed control cable towards the fan controller located in the IO panel. Be quiet! was thinking ahead of the competition. However, fan control is still limited to 5-step speed control which is still better than the dark Base 701. The front fan/radiator bracket is interchangeable with the one on the top panel.
There is a 3-port fan hub installed on the top with 4 contact pins that connect with 4 pads PCB on the main housing. Each port has a 4-pin PWM header. This is a next-level design.
I have removed everything from the front side and shown an open-spaced area where you can see the internals.
I have installed a mesh panel on the front panel and put it back on. This is my go-to with configuration as I always prefer airflow over other forms. Take note that this will not disturb the ODD bay and its cover.
The IO panel is more to it than meets the eye. We have:
1x USB 3.2 Gen2 Type-C Port
4x USB 3.2 Type-A Ports
2x HD Audio Jacks
1x Power Button
A touch panel control for fan speed
A touch panel control for ARGB LED Lighting
By just pressing a Sync button the control will switch to the motherboard for which the provided connector cables need to be connected to the motherboard’s supported headers (fan header and ARGB header). You can control the speed of the fans by just touching the panel and controlling the digital RGB LEDs the same way. The IO panel is installed on the top above the front panel.
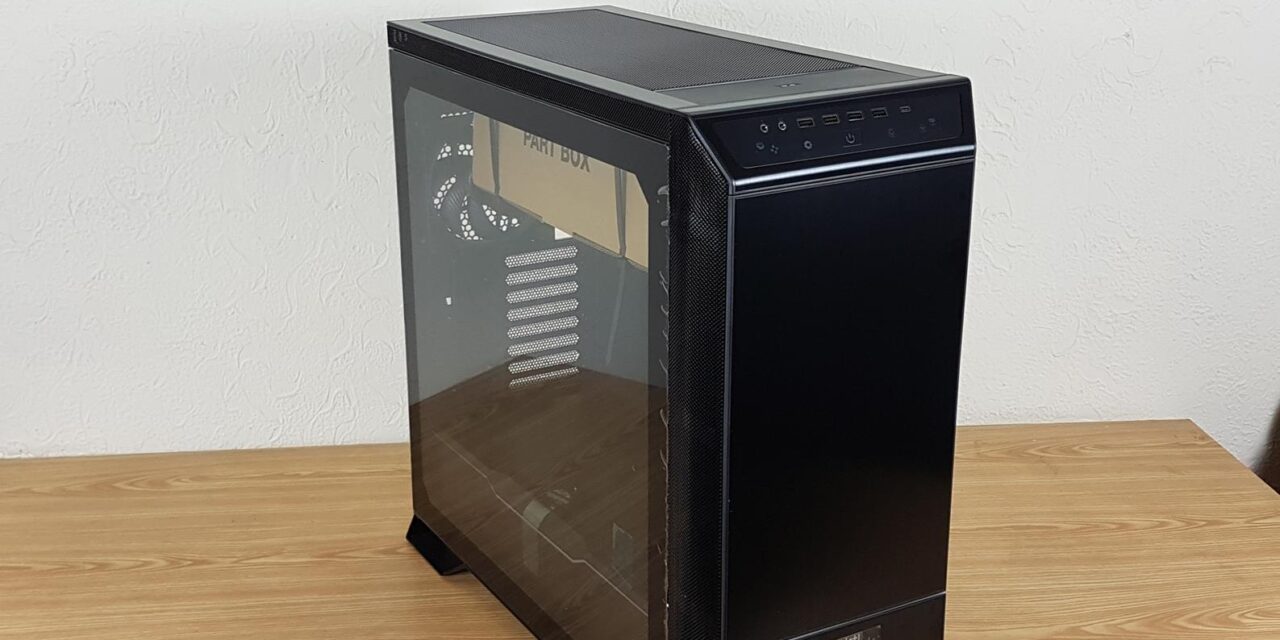
There is a light-tinted tempered glass panel on the side. I think the thickness of the glass panel is 4mm. It is quite heavy and you would need to take care while handling it. It sits flush with the main housing. This panel has a black border on the inside. You can see Part Box tucked to the top panel using two large-size cable ties. The angled sides on the front along with the top have vented mesh panels for ventilation. The panel is secured using two thumb screws and there is no hinge design.
Looking at the rear, you can a narrow vented portion up top for ventilation. There is a large gap between the fan slot and the top of the case. Both side panels are secured using thumb screws. The fan slot, IO cutout, and PCIe slot area are recessed. This is a design requirement because the motherboard tray is removable in this case hence these areas are not a part of the main housing and are implemented on the motherboard tray.
This case has 8x PCIe slots that have reusable vented covers. Take note of a side cover. You can take out the PCIe slot area completely and rotate it in a vertical layout.
I have rotated the PCIe slot area in a vertical orientation as can be seen. Now you can install your graphics card in any slot which gives you a good amount of flexibility in terms of where you want to place your graphics card i.e. near the motherboard or the glass panel for example.
At the bottom, there is a bracket for the PSU bay. You can install a standard ATX PSU in this case. The user can remove the cover and install it on the PSU then slide the PSU inside the bay and complete the installation by screwing the cover on the frame. With the time, I am drifting away from this design and would want to stick with a simple and standard PSU installation method. Anyhow, that is my opinion.
I am showing a top view of the Dark Base Pro 901 black. There is a single piece of mesh panel. However, there is another attraction item on the top. This case houses a wireless charger capable of 15W Qi charging. While it is appreciated and we can see that be quiet! is trying to retain some footprint of the predecessor but doing this has eliminated the possibility of having a 420mm radiator on the top. However, there is another catch, a 420mm radiator on top is not possible if there is a 420mm radiator on the front. This is due to a lack of space on the top for these two rads.
To remove the mesh panel, simply press it once on the front side from both ends and it will come loose. You can then simply take it off. I am showing the underside of this panel.
There are two insulation pad brackets over the fan/radiator brackets. These will absorb the sound. However, this would leave less space from where the air will exhaust from the top. That is why there are narrow meshing around the top on this case. However, you can simply remove these two brackets for a complete airflow design.
I am showing the paddings on these brackets.
Finally, we get to see the fan/radiator bracket. There is no fan installed on this bracket except the parts box. Cut the cable ties and remove this parts box. This bracket is secured using 4x captive thumb screws making its handling convenient. It is identical to the fan/radiator bracket on the front. Both can be interchanged.
Be quiet! is using a rail mount system on these brackets which makes life easier as you can adjust the position of the fans on the bracket. This bracket also has the same fan hub as on the front side bracket.
I have removed everything from the top area and now show the internals from the top.
Looking at the bottom of the case, there is a full-length dust filter in black. It can be removed from the front side of the case. However, there is a caveat. You would need to remove the front panel to remove this dust filter. Be quiet! could have done a better job! The dusty feet are due to dust on my table.
The above picture shows the underside area after removing the filter. You can see a spacious area for the PSU and cables. Also, there are mounts for a 120mm or 140mm fan inside the base chamber for fresh air intake. Be quiet! has provided a PSU Shroud vented or slotted fan cover in the accessories should a user be going this route. The dust filter uses a fine mesh.
The backside panel is a solid design in black.
Interior View
It is time to take a peek inside the case.
I am showing the corner of the glass panel. As you can see some hooks slide into the notches on the main housing. There is nothing fancy about installing the glass panel since it is not a hinged or latching design.
I have removed the glass panel and shown the internals. A picture might not be telling this but this is a full tower and has a ginormous size with a spacious layout to work around. The inner space has a length of 495mm and a height of 405mm. the motherboard tray is installed such as there is a gap on the backside of the tray and its top, leaving plenty of room for the user to flex the muscle and route the cables. Be quiet! has made the motherboard tray’s handling quite convenient. You need to remove 9x screws and take out the tray.
I have removed the motherboard tray. Take note that the complete rear panel also comes off which makes this a test bench setup. be quiet! is still sticking with its inverted layout signature in these cases. I like the idea that they have allowed user to stick with a non-inverted layout. Only those users who like an inverted layout can opt for this change.
The motherboard tray is made of steel and has a solid build quality. There is no flex as such in the tray. The markings are labeled for ease of identification for the installation of the motherboard. This case supports motherboards of up to E-ATX size. 9x standoffs are pre-installed. The centered standoff acts as a catcher to hold the motherboard in space. We have a large size CPU cut-out area for convenient installation of the coolers. There is a large gap above the motherboard tray between the top of the case. This is why there was no need for cable routing cutout there. There is a single large-size cutout on the right that has a cable cover over it. Please note that it is installed for ATX-size motherboards. You would need to replace it with an E-ATX size motherboard cable cover (from the parts box).
The top displacement is roughly 62mm which is quite good and provides a good room for the thick radiators. The bottom of the motherboard tray has a large single cutout or opening to pass the cables. You can see the fan hub of the top fan/radiator bracket.
Compatibility and Clearance
The following cooling provision is supported:
3x 120mm or 3x 140mm fans on the front [2x 140mm pre-installed]
3x 120mm or 3x 140mm fans on the top
1x 120mm or 1x 140mm fan on the rear [1x 140mm pre-installed]
3x 120mm fans on the optional side bracket
1x 120mm or 1x140mm fan on base
Up to 420mm radiator on the front
Up to 360mm radiator on the top
Up to 360mm radiator on the side
Up to 140mm radiator on the rear
CPU Cooler Height: 190mm
Graphics Card Length: Up to 370mm if drives are installed on the side frame. 495mm without Side mounted drives
PSU Length: 325mm
There is a single large-size PSU shroud that is made of plastic material. There is a Dark Base Pro text on the curvature above the RGB diffuser line.
The side frame of the PSU shroud is removable. Simply press it outward from the center and lift it off.
Now you have access to the side of the bottom chamber. You can see two HDD cages pre-installed. The PSU chamber is quite large. There is a flat cable connected to the removed cover. It is ARGB Lighting control.
There is a 5-pin proprietary header on the frame to which the above-mentioned cable is connected.
Now, I am showing the front area of the case from the inside. There are covers on the side of the motherboard tray. These are drive storage mounting area covers. You can simply press these from the sides and take them out. The drive caddy is routed from behind the PC Case. This design reminds me of Phanteks Evolv ATX case. This side frame is removable and there is a multi-purpose side bracket that can be installed in its place. That bracket can house up to 3x 120mm fans or up to 360mm radiator or pump/reservoir combo unit.
You can see a 2x Silent Wings 4 140mm PWM fan installed on the front. These are rated for up to 1900 RPM generating 78.4 CFM airflow at 2.36mmH₂O static pressure. Their sound rating is 29.3 dB(A). their input power rating is 4.8W.
You can also see a cover right in front of the fan radiator which sits over the 120/140mm fan mount on the base. If you decide to install a 120/140mm fan on the base then you would need to remove the HDD cage and install an Airflow Cover PSU Shroud that will replace the stock solid cover. This airflow cover will throw fresh air towards the graphics card.
Now, I am showing the rear internal view of the PC Case. You can see another 1x Silent Wings 3 140mm fan on the rear. There are 8 PCIe slots with reusable and vented covers. You can rotate the complete PCIe slot cover in a vertical layout.
The above picture shows the vertically mounted PCIe slot cover. This reminds me of the Thermaltake View 51 TG PC Case. That PC Case has the same function. The same is the case for the Thermaltake Core 6 TG. Please note that this case does not come with a vertical bracket. That needs to be bought separately.
There are two perforated areas towards the front sides of this case. In case you opt to use the case in stock configuration these would come in handy for some airflow because the stock configuration uses insulation pads on the front panel.
It is now time to look at the backside of the case.
The above picture shows the backside of the side panel. There is a roughly 1mm thick sound insulation material on the side panel. This is provided for soundproofing. The right is totally vented which makes sense since it faces the right frame where you can install a multi-purpose side bracket for fans and radiator.
The above picture shows the main view of the backside of the case. At first glance, it seems like there is not much going on in the background which might be true as well to some extent. There is a dual-chamber design. You can see two 2.5” drive caddies or brackets on the backside of the motherboard tray. There are two cable routing covers. One of these has the front panel’s cables routed. The side frame backside shows the catching mechanism of the covers.
There is a large PSU bay that can house up to 323mm long PSU. There are 4x raised surfaces with pads on which the PSU is rested. It is a spacious area in which PSU along with its cables can easily be placed inside.
The above picture shows the side frame which is removable and replaceable with the multi-purpose bracket. You can decide to install a radiator or fans on the side using that bracket or attach a pump/reservoir combo. However, if your need is multi-storage then stock configuration is for you where you can install 5x drives on the side frame and 2x drives in the HDD cage. I had a tough time with the multi-purpose bracket particularly its installation for the side intake fans. The user manual is not of help in this regard.
I have removed the HDD cage and shown the complete area of the bottom chamber. It is a spacious area. Also, you can install a 120mm or 140mm fan on the base where the HDD cage is. For that, you would need to remove the HDD cage and make sure that you install the fan during the PC assembling because the screws of the fans will go inside from the bottom of the case.
I am showing the two drive caddies and an HDD bracket in the above picture.
I have removed the side frame bracket.
I am showing the backside view with the side frame bracket removed.
I have installed the multi-purpose bracket. It can be installed in two configurations. In one configuration it has an offset that pushes it towards the back making more room on the front. In the second configuration, it will be installed with the frame side facing the glass side of the case.
The above picture shows the case after removing the motherboard tray.
There is a SATA cable for the Fast Wireless Charging.
There is a SATA cable for the front IO panel to power the fans and ARGB LEDs.
There are 2x USB 3.2 connectors.
There is an HD Audio connector.
The above picture shows the front panel connectors. There is no Reset button hence no connector is there in the picture.
A 4-pin PWM connector coming out from the hub that can be connected to the motherboard. The same goes for the standard 3-pin 5V ARGB connector. This way you can transfer the control from the hub to the motherboard to control fans and LEDs from motherboard software/BIOS.
There is a USB 3.2 Type-E connector.
Radiator Considerations
I have tried different radiator combinations in this case to determine the limitations.
The above picture shows an Alphacool HPE 360mm, 45mm thick radiator installed on the top. On the front, there is a 420mm 30mm thick radiator. The fans are on the front side showing a good clearance all around.
You can see that in this configuration, you can install a radiator and fans on the side bracket since the radiator alone does not leave enough room.
There is not much of a space between both radiators for tube run.
The far end or block of the top radiator is almost at the end of the PC Case.
The only way you can install a radiator on the side is if you use 27/30mm radiators on the front and the side and even then only 240mm would be a proper fit on the side. But wait is it?
The fan is bit protruding which may obstruct the side panel.
This is a picture of my ongoing build that has come to a halt due to my health. There are two 360mm, 45mm thick radiators on the front and top. I have installed 3x fans on the side as intake and a 140mm fan on the base as intake. I am going for an airflow build.
I have installed Airflow Cover PSU Shroud which is a tight fit due to 45mm thick radiator and 25mm thick fans. This goes to show that the front can house up to 70mm thick setup. However, this would affect the graphics card length.
Test Build
I have used following configuration for a test build in this case:
AMD Ryzen 7 7700X
ASUS ROG HERO CROSSHAIR X670E
Lexar ARES 32GB DDR5 @ 6000MHz CL26 Kit
Sabrent Rocket 4 Plus 2TB NVMe SSD
Sabrent Rocket 4 Plus 1TB NVMe SSD
ASUS ROG STRIX GeForce RTX 4070Ti 12G
be quiet! Silent Loop 2 360
be quiet! Straight Power 11 850W Platinum PSU
The overall building experience in this case was superb. I did not face any issue. The process started with motherboard’s installation followed by the PSU. There is ample space to easily route the cables for connectivity. The cooler comes next. The top rail mount is easy to work with. Then front panel cables were connected followed by the graphics card installation. I would give 9 out of 10 for this installation.
Conclusion
Dark Base Pro 901 is a flagship PC Case from be quiet! that truly represents the epitome of technology and be quiet! has harnessed the technology in quite full. This case is now available in white and black. This is a full tower PC Case that has many features that were almost unrivaled at the time of its launch last year. Versatility, flexibility, and modularity are its key aspects.
The dimension of the case is 604x254x539mm excluding the stands. This dimension is 604x275x569mm with the stands. The net weight is 17.8 Kg. This case is solidly built using Aluminum, steel, Tempered Glass, and ABS materials. The case is premium and its design and looks can only be truly appreciated when looking at it in person.
The fan support is:
3x 120mm or 3x 140mm fans on the front [2x 140mm fan pre-installed]
2x 120mm fans on the side
3x 120mm or 3x 140mm fans on the top
1x 120mm or 1x 140mm fan on the rear [1x 140mm fan pre-installed]
1x 120mm or 1x140mm fan on the base
The radiator support is:
120mm/140mm/240mm/280mm/360mm/420mm radiator on the front
120mm/240mm/360mm radiator on the side
120mm/140mm/240mm/280mm/360mm on the top
120mm/140mm radiator on the rear
Two 140mm fans on the front and one on the rear make more sense than what I saw on the Dark Base 701 White PC Case.
Clearance is:
CPU Cooler Height: 190mm
Graphics Card Length: Up to 370mm if drives are installed on the front side otherwise 495mm
PSU Length: 323mm
Storage provision is massive in this case
Up to 16x 2.5” drives
Up to 7x 3.5” drives
Up to 1x 5.25” drive
By default, you can install up to 6x 2.5” drives or 2x 3.5” drives and 1x 5.25” drives. You would need to buy more drive caddies to increase the storage capacity. This has a massive storage provision.
Dust Filtration:
1x mesh filter on the front
1x full-length mesh filter on the base
No dust filter over the top
The case can house motherboards up to the E-ATX form factor. There is a top displacement of roughly 62mm leaving a good enough room for the radiator with fans. The side-to-side displacement is roughly 60mm and this will come in handy for the RAM clearance. There are ABS brackets on the side of the motherboard tray where you can install up to 5x drives using caddies. Additionally, you can install two 2.5” drives on the backside of the motherboard tray and more in the HDD cage.
The PCIe slots are not a bridgeless design which in my opinion should have been as this provides more flexibility and compatibility with the majority of the vertical GPU brackets. You can remove, rotate, and install the complete PCIe slot cover or bracket in a vertical layout. But you would need to buy a riser cable separately. The maximum thickness of a radiator can be 45mm on the front in stock configuration. You can remove the cover over the cutout to make room for thicker radiators though this would affect the length of the graphics card. Also, you install an Airflow Cover PSU Shroud if you are installing a fan on the base. This bracket will throw fresh air towards the graphics card.
The PSU shroud has a full-length cover that is fixed on the top but the side part can be pulled to access the bottom chamber. This is the same as on the Dark Base 701. There is an RGB diffuser running on the entire length of the PSU shroud and the front side. Another feature is the provision of a 15W wireless (Qi) charger on the top. Some may see it as a welcoming addition and some may see it as a completely needless addition. However, if we take into consideration that installing two 420mm radiators would have left no space toward their heads, I think be quiet! has smartly utilized that space by restricting the maximum radiator support to 360mm on top.
Be Quiet! has provided powerful Silent Wings 4 140mm PWM fans with a top speed of 1900 RPM generating 78.4CFM with an air pressure of 2.34mmH₂O and a noise level of 29.3 dB(A) with input power of 4.8W.
Now I am coming to another key feature of this case. There are two fan/radiator brackets on the top and front. They are identical and hence swappable. They have integrated 3-port fan hubs. Each port on this hub has a 4-pin PWM header. Be quiet! has implemented contact pads with pins design which is a smart move. The hub has a 3-pin contact system where these pins make contact with pads on the housing. There is a cable from the pads PCB routed towards the front panel. All that you need to do is install fans and connect them to this hub and install the bracket in the case. That is it. The front panel has an integrated fan controller and LED controller. Another key feature is a touch panel on the front panel. You can touch the panel to control the speed of the fans and change the lighting effect. A single tap on the Sync button will switch the control to/from the motherboard. Don’t forget to connect the standard PWM and ARGB connector cables to the motherboard. Speaking of the IO panel there is a USB 3.2 Gen2 Type-C port and USB 3.2 Type-A ports. I would have loved to see a USB 3.2 Gen2x2 Type-C port instead.
Be quiet! has focused on insulation/dampening as well as airflow in one go. They have provided the case in noise dampening configuration but you can switch it to airflow by using the bundled brackets. There are cable routing covers and then there is a GPU support bracket that has cable routing built into it for a clean look.
You can remove the motherboard tray by undoing 9x screws. This would allow you to go for an inverted layout. Then there is a side frame that can house 5x storage drives. This can be replaced by a side bracket that can house up to a 360mm radiator or 3x 120mm fans or pump/reservoir unit. I had a hard time dealing with this bracket regarding its installation in two possible ways. The user manual is of no help.
Assembling in this case is literally a walk in park. I did not face any issue during the process. Speaking of the temperatures, the 7700X with PBO was doing 75C under full load and the graphics card did 70C under load. This case has an MSRP of €319.90 and comes with a 3-year warranty. This is a high price tag but I think it is justified given the feature set that this case offers. The warranty period is satisfactory. This case has a well-balanced feature set with ample cooling and storage provision while providing a spacious layout for any building requirement. It comes recommended by us.
With a passion for all things tech, Nauman has been an essential part of the Enos Tech team now for a number of years. He has a vast knowledge of PC Gaming hardware and loves to share his findings with all our readers.


 be quiet! ships this case inside a brown color cardboard box. This box has a block diagram of this case showcasing its modularity. The specifications are also listed on the packing box. It is quite a heavy-weight box so take note of that.
 The case is tucked between two white Styrofoam pads for protection from damage. The case is enclosed inside a black color cloth cover that has be quiet! branding. The user manual is supplied in a separate container. There are two accessory boxes since this PC Case is all about flexibility, modularity, interchangeable components, and flexibility to switch between noise-dampening configuration or airflow design.
 There is a large size accessory box that has many brackets that user can use as per requirement.
 It includes:
 The part box was tucked inside the case using cable ties.
 This box has many other accessories and parts/components for the user’s requirements.
 The accessories include:
 Be quiet! has provided a GPU support bracket for a non-inverted layout. This is a multi-bracket in the sense that it will hold your heavy graphics cards and prevent them from bending but also provides channels on which the PEG cables are routed from the graphics card to the PSU.
 I am a bit surprised. If there is already a small container then why not placed all screws inside this container! Maybe they need to take a look at years old Evolv ATX PC Case from Phanteks with its screw box. Anyhow, this box has 7x Velcro Strips, anti-vibration pads, 4x M5x20 screws for front fans, 1x Thumb Screw for VGA Holder, and a few other screws and nuts.
 There are 5 transparent containers containing:
 Be quiet! has provided another GPU support bracket that would be required in an inverted layout.
 Be quiet! has provided an ODD bracket for the front panel.
 Be quiet! has provided a cable management cover that would be required if you are using an E-ATX-size motherboard.

 The stock configuration of the front panel is a solid panel with soundproofing/insulation pads. There is a be quiet! branding towards the base where there is a 5.25” drive bay which was a surprise. I am not sure why be quiet! has opted for a 5.25” design. Anyhow, the front panel is modular and flexible meaning you can configure to house a mesh panel for airflow design.
 I am showing the 5.25” bay area on the front in detail. The bottom panel is slide open to access this panel. You can spot a dust filter inside the area. The ODD bracket is not installed rather it is provided in the accessories. This is wise since a majority of the users may not be using 5.25” drives these days. But it is not dead yet and there are many 5.25” devices that provide more connectivity options. Take note of a diffuser running between the 5.25” bay area and rest of the panel body. There are 8+16 digital RGB LEDs (5V rated) that light up when the power button is pressed.
 I am showing the inside of the front panel. The centerpiece that has a soundproofing/insulation pad is removable. You will have to press the tabs to release the center portion. It is easier than said. There are 3 contact pins on the left side (actually the right side) on a black PCB. This is for the control of ARGB LEDs. The contact pads are on the main housing.
 I have removed the center portion from the front panel and shown both separately.
 There is a magnetic dust filter in black covering the fan radiator bracket. You can see a glimpse of two 140mm fans. Now you can see that there is a separate dust filter covering the ODD port. The dust filter must be placed in a particular orientation otherwise the front panel will not fit. So, if you are facing issues attaching the front panel to the Case, check the dust filter.
 I am showing the main dust filter. It has a fine mesh.
 There is a PCB with 3 contact pads. The 3-pins on the front panel contact this pad. There is a cable coming out from the PCB and going towards the IO panel of the PC Case where there is an integrated ARGB controller.
 Now, you can see that there are two Silent Wings 4 PWM 140mm fans pre-installed on the fan bracket. This fan/radiator bracket is removable. You can install up to 3x 120mm or 3x 140mm fans on this radiator with a maximum of 360mm or 420mm size radiator. Too good!
 I have removed the front fan/radiator fan bracket and shown the backside. You can see that the fans are connected to the PWM fan hub on the top of this bracket. This is another key design in this case where there is a smart fan connection on a pre-routed control cable towards the fan controller located in the IO panel. Be quiet! was thinking ahead of the competition. However, fan control is still limited to 5-step speed control which is still better than the dark Base 701. The front fan/radiator bracket is interchangeable with the one on the top panel.
 There is a 3-port fan hub installed on the top with 4 contact pins that connect with 4 pads PCB on the main housing. Each port has a 4-pin PWM header. This is a next-level design.
 I have removed everything from the front side and shown an open-spaced area where you can see the internals.
 I have installed a mesh panel on the front panel and put it back on. This is my go-to with configuration as I always prefer airflow over other forms. Take note that this will not disturb the ODD bay and its cover.
 The IO panel is more to it than meets the eye. We have:
 There is a light-tinted tempered glass panel on the side. I think the thickness of the glass panel is 4mm. It is quite heavy and you would need to take care while handling it. It sits flush with the main housing. This panel has a black border on the inside. You can see Part Box tucked to the top panel using two large-size cable ties. The angled sides on the front along with the top have vented mesh panels for ventilation. The panel is secured using two thumb screws and there is no hinge design.
 Looking at the rear, you can a narrow vented portion up top for ventilation. There is a large gap between the fan slot and the top of the case. Both side panels are secured using thumb screws. The fan slot, IO cutout, and PCIe slot area are recessed. This is a design requirement because the motherboard tray is removable in this case hence these areas are not a part of the main housing and are implemented on the motherboard tray.
This case has 8x PCIe slots that have reusable vented covers. Take note of a side cover. You can take out the PCIe slot area completely and rotate it in a vertical layout.
Looking at the rear, you can a narrow vented portion up top for ventilation. There is a large gap between the fan slot and the top of the case. Both side panels are secured using thumb screws. The fan slot, IO cutout, and PCIe slot area are recessed. This is a design requirement because the motherboard tray is removable in this case hence these areas are not a part of the main housing and are implemented on the motherboard tray.
This case has 8x PCIe slots that have reusable vented covers. Take note of a side cover. You can take out the PCIe slot area completely and rotate it in a vertical layout.
 I have rotated the PCIe slot area in a vertical orientation as can be seen. Now you can install your graphics card in any slot which gives you a good amount of flexibility in terms of where you want to place your graphics card i.e. near the motherboard or the glass panel for example.
 At the bottom, there is a bracket for the PSU bay. You can install a standard ATX PSU in this case. The user can remove the cover and install it on the PSU then slide the PSU inside the bay and complete the installation by screwing the cover on the frame. With the time, I am drifting away from this design and would want to stick with a simple and standard PSU installation method. Anyhow, that is my opinion.
 I am showing a top view of the Dark Base Pro 901 black. There is a single piece of mesh panel. However, there is another attraction item on the top. This case houses a wireless charger capable of 15W Qi charging. While it is appreciated and we can see that be quiet! is trying to retain some footprint of the predecessor but doing this has eliminated the possibility of having a 420mm radiator on the top. However, there is another catch, a 420mm radiator on top is not possible if there is a 420mm radiator on the front. This is due to a lack of space on the top for these two rads.
 To remove the mesh panel, simply press it once on the front side from both ends and it will come loose. You can then simply take it off. I am showing the underside of this panel.
 There are two insulation pad brackets over the fan/radiator brackets. These will absorb the sound. However, this would leave less space from where the air will exhaust from the top. That is why there are narrow meshing around the top on this case. However, you can simply remove these two brackets for a complete airflow design.
 I am showing the paddings on these brackets.
 Finally, we get to see the fan/radiator bracket. There is no fan installed on this bracket except the parts box. Cut the cable ties and remove this parts box. This bracket is secured using 4x captive thumb screws making its handling convenient. It is identical to the fan/radiator bracket on the front. Both can be interchanged.
 Be quiet! is using a rail mount system on these brackets which makes life easier as you can adjust the position of the fans on the bracket. This bracket also has the same fan hub as on the front side bracket.
 I have removed everything from the top area and now show the internals from the top.
 Looking at the bottom of the case, there is a full-length dust filter in black. It can be removed from the front side of the case. However, there is a caveat. You would need to remove the front panel to remove this dust filter. Be quiet! could have done a better job! The dusty feet are due to dust on my table.
 The above picture shows the underside area after removing the filter. You can see a spacious area for the PSU and cables. Also, there are mounts for a 120mm or 140mm fan inside the base chamber for fresh air intake. Be quiet! has provided a PSU Shroud vented or slotted fan cover in the accessories should a user be going this route. The dust filter uses a fine mesh.
 The backside panel is a solid design in black.
 I am showing the corner of the glass panel. As you can see some hooks slide into the notches on the main housing. There is nothing fancy about installing the glass panel since it is not a hinged or latching design.
 I have removed the glass panel and shown the internals. A picture might not be telling this but this is a full tower and has a ginormous size with a spacious layout to work around. The inner space has a length of 495mm and a height of 405mm. the motherboard tray is installed such as there is a gap on the backside of the tray and its top, leaving plenty of room for the user to flex the muscle and route the cables. Be quiet! has made the motherboard tray’s handling quite convenient. You need to remove 9x screws and take out the tray.
 I have removed the motherboard tray. Take note that the complete rear panel also comes off which makes this a test bench setup. be quiet! is still sticking with its inverted layout signature in these cases. I like the idea that they have allowed user to stick with a non-inverted layout. Only those users who like an inverted layout can opt for this change.
 The motherboard tray is made of steel and has a solid build quality. There is no flex as such in the tray. The markings are labeled for ease of identification for the installation of the motherboard. This case supports motherboards of up to E-ATX size. 9x standoffs are pre-installed. The centered standoff acts as a catcher to hold the motherboard in space. We have a large size CPU cut-out area for convenient installation of the coolers. There is a large gap above the motherboard tray between the top of the case. This is why there was no need for cable routing cutout there. There is a single large-size cutout on the right that has a cable cover over it. Please note that it is installed for ATX-size motherboards. You would need to replace it with an E-ATX size motherboard cable cover (from the parts box).
The top displacement is roughly 62mm which is quite good and provides a good room for the thick radiators. The bottom of the motherboard tray has a large single cutout or opening to pass the cables. You can see the fan hub of the top fan/radiator bracket.
Compatibility and Clearance
The following cooling provision is supported:
The motherboard tray is made of steel and has a solid build quality. There is no flex as such in the tray. The markings are labeled for ease of identification for the installation of the motherboard. This case supports motherboards of up to E-ATX size. 9x standoffs are pre-installed. The centered standoff acts as a catcher to hold the motherboard in space. We have a large size CPU cut-out area for convenient installation of the coolers. There is a large gap above the motherboard tray between the top of the case. This is why there was no need for cable routing cutout there. There is a single large-size cutout on the right that has a cable cover over it. Please note that it is installed for ATX-size motherboards. You would need to replace it with an E-ATX size motherboard cable cover (from the parts box).
The top displacement is roughly 62mm which is quite good and provides a good room for the thick radiators. The bottom of the motherboard tray has a large single cutout or opening to pass the cables. You can see the fan hub of the top fan/radiator bracket.
Compatibility and Clearance
The following cooling provision is supported:
 There is a single large-size PSU shroud that is made of plastic material. There is a Dark Base Pro text on the curvature above the RGB diffuser line.
 The side frame of the PSU shroud is removable. Simply press it outward from the center and lift it off.
 Now you have access to the side of the bottom chamber. You can see two HDD cages pre-installed. The PSU chamber is quite large. There is a flat cable connected to the removed cover. It is ARGB Lighting control.
 There is a 5-pin proprietary header on the frame to which the above-mentioned cable is connected.
 Now, I am showing the front area of the case from the inside. There are covers on the side of the motherboard tray. These are drive storage mounting area covers. You can simply press these from the sides and take them out. The drive caddy is routed from behind the PC Case. This design reminds me of Phanteks Evolv ATX case. This side frame is removable and there is a multi-purpose side bracket that can be installed in its place. That bracket can house up to 3x 120mm fans or up to 360mm radiator or pump/reservoir combo unit.
You can see a 2x Silent Wings 4 140mm PWM fan installed on the front. These are rated for up to 1900 RPM generating 78.4 CFM airflow at 2.36mmH₂O static pressure. Their sound rating is 29.3 dB(A). their input power rating is 4.8W.
Now, I am showing the front area of the case from the inside. There are covers on the side of the motherboard tray. These are drive storage mounting area covers. You can simply press these from the sides and take them out. The drive caddy is routed from behind the PC Case. This design reminds me of Phanteks Evolv ATX case. This side frame is removable and there is a multi-purpose side bracket that can be installed in its place. That bracket can house up to 3x 120mm fans or up to 360mm radiator or pump/reservoir combo unit.
You can see a 2x Silent Wings 4 140mm PWM fan installed on the front. These are rated for up to 1900 RPM generating 78.4 CFM airflow at 2.36mmH₂O static pressure. Their sound rating is 29.3 dB(A). their input power rating is 4.8W.
 You can also see a cover right in front of the fan radiator which sits over the 120/140mm fan mount on the base. If you decide to install a 120/140mm fan on the base then you would need to remove the HDD cage and install an Airflow Cover PSU Shroud that will replace the stock solid cover. This airflow cover will throw fresh air towards the graphics card.
 Now, I am showing the rear internal view of the PC Case. You can see another 1x Silent Wings 3 140mm fan on the rear. There are 8 PCIe slots with reusable and vented covers. You can rotate the complete PCIe slot cover in a vertical layout.
 The above picture shows the vertically mounted PCIe slot cover. This reminds me of the Thermaltake View 51 TG PC Case. That PC Case has the same function. The same is the case for the Thermaltake Core 6 TG. Please note that this case does not come with a vertical bracket. That needs to be bought separately.
 There are two perforated areas towards the front sides of this case. In case you opt to use the case in stock configuration these would come in handy for some airflow because the stock configuration uses insulation pads on the front panel.
It is now time to look at the backside of the case.
There are two perforated areas towards the front sides of this case. In case you opt to use the case in stock configuration these would come in handy for some airflow because the stock configuration uses insulation pads on the front panel.
It is now time to look at the backside of the case.
 The above picture shows the backside of the side panel. There is a roughly 1mm thick sound insulation material on the side panel. This is provided for soundproofing. The right is totally vented which makes sense since it faces the right frame where you can install a multi-purpose side bracket for fans and radiator.
 The above picture shows the main view of the backside of the case. At first glance, it seems like there is not much going on in the background which might be true as well to some extent. There is a dual-chamber design. You can see two 2.5” drive caddies or brackets on the backside of the motherboard tray. There are two cable routing covers. One of these has the front panel’s cables routed. The side frame backside shows the catching mechanism of the covers.
 There is a large PSU bay that can house up to 323mm long PSU. There are 4x raised surfaces with pads on which the PSU is rested. It is a spacious area in which PSU along with its cables can easily be placed inside.
 The above picture shows the side frame which is removable and replaceable with the multi-purpose bracket. You can decide to install a radiator or fans on the side using that bracket or attach a pump/reservoir combo. However, if your need is multi-storage then stock configuration is for you where you can install 5x drives on the side frame and 2x drives in the HDD cage. I had a tough time with the multi-purpose bracket particularly its installation for the side intake fans. The user manual is not of help in this regard.
 I have removed the HDD cage and shown the complete area of the bottom chamber. It is a spacious area. Also, you can install a 120mm or 140mm fan on the base where the HDD cage is. For that, you would need to remove the HDD cage and make sure that you install the fan during the PC assembling because the screws of the fans will go inside from the bottom of the case.
 I am showing the two drive caddies and an HDD bracket in the above picture.
 I have removed the side frame bracket.
 I am showing the backside view with the side frame bracket removed.
 I have installed the multi-purpose bracket. It can be installed in two configurations. In one configuration it has an offset that pushes it towards the back making more room on the front. In the second configuration, it will be installed with the frame side facing the glass side of the case.
 The above picture shows the case after removing the motherboard tray.
 There is a SATA cable for the Fast Wireless Charging.
 There is a SATA cable for the front IO panel to power the fans and ARGB LEDs.
 There are 2x USB 3.2 connectors.
 There is an HD Audio connector.
 The above picture shows the front panel connectors. There is no Reset button hence no connector is there in the picture.
 A 4-pin PWM connector coming out from the hub that can be connected to the motherboard. The same goes for the standard 3-pin 5V ARGB connector. This way you can transfer the control from the hub to the motherboard to control fans and LEDs from motherboard software/BIOS.
 There is a USB 3.2 Type-E connector.
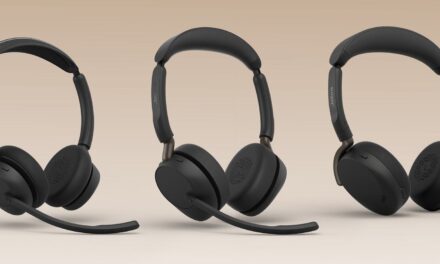
 The above picture shows an Alphacool HPE 360mm, 45mm thick radiator installed on the top. On the front, there is a 420mm 30mm thick radiator. The fans are on the front side showing a good clearance all around.
 You can see that in this configuration, you can install a radiator and fans on the side bracket since the radiator alone does not leave enough room.
 There is not much of a space between both radiators for tube run.
 The far end or block of the top radiator is almost at the end of the PC Case.
 The only way you can install a radiator on the side is if you use 27/30mm radiators on the front and the side and even then only 240mm would be a proper fit on the side. But wait is it?
 The fan is bit protruding which may obstruct the side panel.
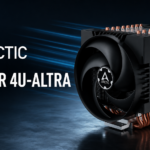
 This is a picture of my ongoing build that has come to a halt due to my health. There are two 360mm, 45mm thick radiators on the front and top. I have installed 3x fans on the side as intake and a 140mm fan on the base as intake. I am going for an airflow build.
 I have installed Airflow Cover PSU Shroud which is a tight fit due to 45mm thick radiator and 25mm thick fans. This goes to show that the front can house up to 70mm thick setup. However, this would affect the graphics card length.


