


Alphacool Core Distro Plate 240 and 360 with VPP Apex Pump Overview
Introduction
We earlier tested Rise Flat Reservoir D5 unit from Alphacool. This is a 120mm size distro plate for space-constrained PC Cases. Afterward, Alphacool released regular distro plates named Alphacool Core Distro Plates. These are available in the following configurations:
- Alphacool Core Distro Plate 240mm without pump [Left, Right]
- Alphacool Core Distro Plate 240mm with VPP Pump [Left, Right]
- Alphacool Core Distro Plate 360mm without pump [Left, Right]
- Alphacool Core Distro Plate 360mm with VPP Pump [Left, Right]
These plates can be installed in a PC Case or on the radiators in 120mm size. Their salient feature is recessed chrome-plated G1/4” ports. Their design is as such that installing fittings on these ports would not affect the acrylic body.
The Alphacool Core Distro Plate 240 Right with VPP Apex pump has a price tag of €199.98 whereas the Alphacool Core Distro Plate 360 Left with VPP Apex pump has a price tag of €249.98. Both distro plates have a 3-year warranty.
Specifications
The specs of Core Distro Plate 240 with pump are:

The specs of Core Distro Plate 360 with pump are:

Unboxing

These distro plates come inside brown color cardboard boxes. Alphacool has shown the dimensions of various items on the printed block diagrams. There are large-size stickers that list the product name, product code, and the part list of the box.

Opening the box will show a black container with a distro plate inside. There is a black color small accessory box as well.
Accessories

The following are provided:
- 1x M4 Allen Key
- 3x Screw Plugs
- 6x Core Push Mount Set

There is an ARGB Adapter cable to connect the ARGB LED strip of the block to the enabled motherboard.

There is a printed user guide provided as well.
Closer Look

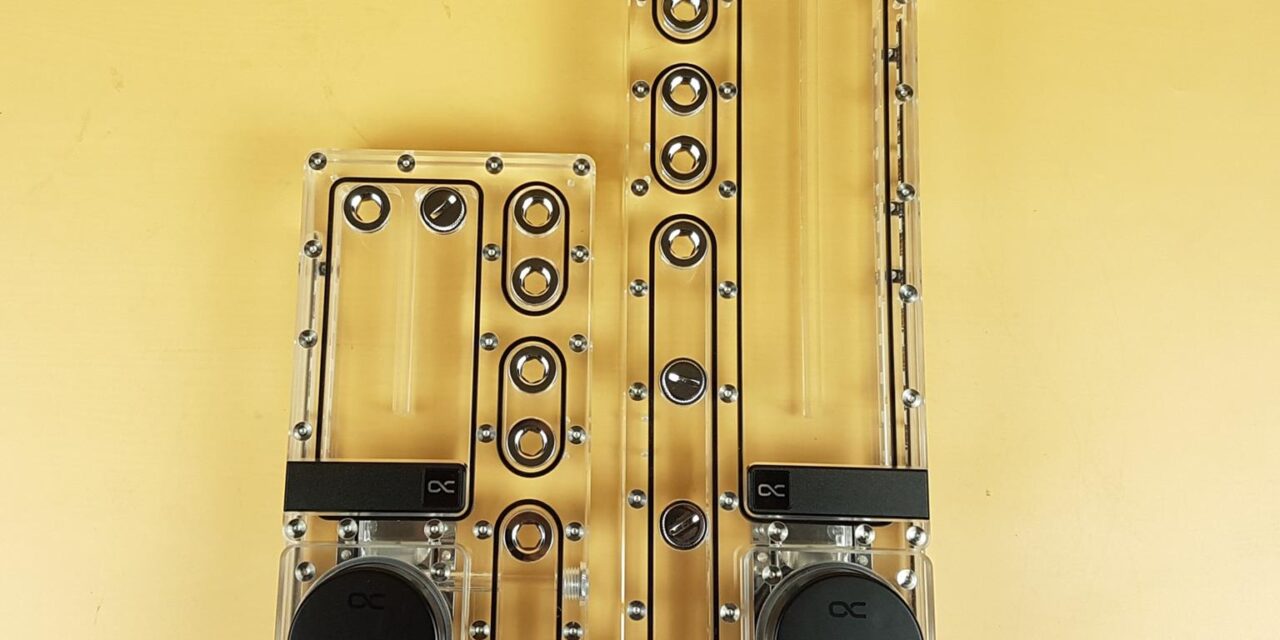
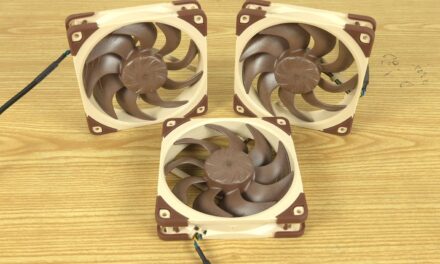
The above picture shows both distro plates together. Since both are the same except for their sizes, I will focus on the 240mm variant in the rest of this article. The dimension of the 360mm distro plate is 359.95x125x61mm (LxWxH). After installation, its dimensions will be 359.95x125x88.80mm. The dimension of the 240mm distro plate is 240x125x61mm (LxWxH). The dimension with the Core Push mounting is 240x125x88.80mm.
The Core Distro Plate 360mm has a volume of 309ml whereas the volume of 240 Core Distro Plate is 164ml. the 360mm Core Distro Plate has 10 G1/4” inner thread ports and a drain port whereas the 240mm Core Distro Plate has 8 G1/4” inner thread ports and a drain port.
The weight of 360mm Core Distro Plate with pump is 2116gm whereas the 240mm Distro Plate weights 1536gm with the pump.

I am showing a front view of the 240mm Core Distro Plate with pump. The main body is made of Clear Acrylic. You can count a total of 8 ports. These are G1/4” inner threaded ports that have two parts having O-Ring and counter each other when installed in the Acrylic body.
This is a wise design as you will not be screwing the fittings in the Acrylic body which can crack the threads in the acrylic body resulting in leakages. Instead, you will install fittings directly in two-part chrome-plated ports. This will provide longevity and durability.
The maximum operating temperature is 60ᵒC and the tested pressure is 0.8 bar. The 240mm Distro Plate has 12 ARGB LEDs whereas the 360mm Distro Plate has 18 ARGB LEDs. These LEDs are 5V rated.
Distro’s internal layout is simple. We have a main reservoir above the pump. The return chamber and refill chamber have a partition in the center. I am not sure why this is done as it could be un-necessary but Alphacool knows better. The coolant flows from reservoir to the pump housing. On the right side, we have groups of smaller reservoirs or blocks. These are not interconnected. The bottom group receives coolant from pump. Since these groups are not interconnected, you would need to setup the loop so that coolant goes from bottom group to the relevant device. The coolant coming from that device will need to be connected to the middle or upper group as per the requirement. In other words, one device sitting between two groups. This is important and if you get to understand that, it will be easier planning your loop.
Ports Identifications
Starting from the top left, there is a Radiator In port. There is a refill port in the center and radiator out port on the far right. The Radiator Out port fills the return chamber.
Now, you can see three groups of two ports each on the right side. Starting from the top side, the topmost port is Radiator In port. The next port is CPU Out. Below group has a CPU In port. The next port is GPU Out. The next port is Single GPU In. The word “Single” here means that this block also supports SLI configuration for which there is a dedicated port at the bottom right.
Alphacool needs to simplify the user manual for clear and better illustration. Your best chance of understanding it is to follow the arrow markers on the manual.
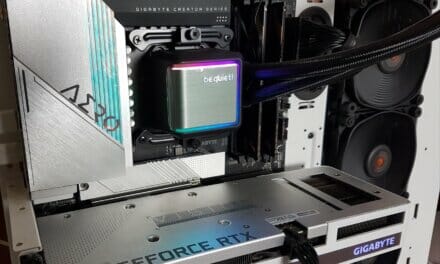
You can see an installed pump at the base of the Acrylic body.

I am showing the backside of the Core Distro Plate. This side faces the PC Case or the radiator on which the distro plate is installed. There is a chrome-plated backplate which is holding the pump body. Here you can see a fine threading job done by the manufacturer. You can see another port with threading in the Acrylic body towards the left. I will cover that shortly. You can see a divider between the two ports on the main body. These are refill and Radiator In ports.

I am showing a side view of the main body. This picture better shows the two-part design of the ports inside the main acrylic body. There is a plug covering a dedicated drain port. It is also a G1/4” port but it has threads in the acrylic body. Now, you can see that these three groups are not inter-connected.
Now I am showing the side view of the main housing where there is an integrated ARGB LED Strip that would illuminate the clear acrylic body of the distro plate.

The above picture shows a top view of the acrylic housing. You can see 4 threaded ports with screws.

The above picture shows an integrated ARGB LED strip inside the 360mm Distro Plate.
Cables

Alphacool uses a proprietary 3-pin ARGB connector (JST) and socket on the ARGB Cable. This would work fine within the Alphacool’s ecosystem. However, the lack of a standard connector on this cable would mean you need an adapter cable to connect with the enabled motherboards.

Now I am showing the bottom view where there is a VPP Apex PWM pump pre-installed. I have already covered this pump in multiple articles. I am giving links below:
Alphacool Core 100 AURORA Reservoir with Pump
Alphacool Rise Flat Reservoir with Pump
Alphacool Core 200 AURORA Reservoir with Pump
At present, VPP Apex is a flagship PWM pump from the manufacturer. These pumps are made of synthetic materials and use ceramics axle. The pump cover is made of aluminum material. These pumps are rated for 2500 to 4500 RPM. The operating voltage rating is 8-13VDC taking 14W power. Starting voltage is 12VDC. Maximum head rating is 4.25m. The maximum flow rate is 340 L/H. Maximum operating temperature is 60°C. The pump alone weighs 276gm and has a black color body.

Alphacool has provided a 4-pin PWM cable along with a SATA connector to power the pump. Thankfully, these pumps don’t use Molex connectors. If you would only use the SATA connector, the pump will run at its full speed. A PWM connector would be needed for PWM regulation.
Core Push Mounting
Alphacool has introduced a new mounting mechanism with these distro plates. This mounting is named Core Push mounting. Each set has 6x black color spacers, 6x studs with threaded sides, 6x nuts, an Allen key, and Philips screws.
Installation on radiator is a bit different than installing in the PC Case. You would need to install the black color spacers with the radiator using provided Philips screws. Install the studs on the Core Distro Plates with the thread side facing the distro plate and push the distro plate in the black spacers. This is it.
However, the mechanism reverses when installed in the Case.

This time install the black spacers on the distro plates in dedicated mounting holes.


Install the studs on the fan bracket using studs and nuts. Push the black spacers into the main stud body and the distro plate is installed.
Conclusion
Alphacool has entered the world of distro plates with its Core Distro Plate series of products in multiple configurations. These plates are available in 240mm and 360mm sizes. They are available with and without pump. A naming nomenclature uses the words “Right” and “Left”. This implies the placement of pump socket on the distro plate. You need to pay attention to this when buying these plates as per your build configuration.
These plates use clear acrylic material for the main body. The G1/4” ports are not threaded in the acrylic body. Instead, these ports use two-part mounting with an O-ring in the middle of two counterparts and these are recessed in the main body. That way, Alphacool has addressed the leaking issue associated with threads in the acrylic that are prone to cracking.
The 360mm Core Distro Plate has a size of 359.95x125x61mm (LxWxH) with a pump. After installation, its dimensions will be 359.95x125x88.80mm using Core Push mounting mechanism. The dimension of 240mm distro plate is 240x125x61mm (LxWxH). The dimension with the Core Push mounting is 240x125x88.80mm.
The 360mm Core Distro Plate has 10 ports and 240mm version has 8 ports. Both have a dedicated drain port on the opposite side of the pump socket. the 360mm version has a volume of 309ml whereas the 240mm has a volume of 164ml. Both are tested for 0.8 pressure head and the maximum operating temperature is 60ᵒC (coolant temperature).
There is a dedicated refill port on the main body. There are two dedicated ports for the radiator, two ports for the CPU, and three ports for the graphics card including SLI configuration. The 360mm version comes with 5 chrome plugs and 240mm has 3 chrome plugs. However, there is an issue that Alphacool did not take into account. If a user is not using a graphics card block in the build, then there is a need for one more chrome plug which is not provided.
The groups of ports on these distro plates are not interconnected. If you can understand this concept then you can easily define your own routing and planning the loop. The starting point in determining the flow of coolant is that the bottom two ports next to the pump housing are actually pushing the coolant out of the disto. Next, you can decide which group to use using which port. These plates are designed for parallel cooling of components or blocks. You need to provide a circuit in which the coolant flow through the distro to the block to the distro to the radiator and back.
Both distro plates have integrated ARGB LED strips powered by 3-pin JST connectors. The 240mm version has 12 LEDs and 360mm version has 18 LEDs. There is an adapter cable provided in the accessories for connection with enabled motherboard.
Both versions have VPP Apex PWM pump that uses ceramic bearings. This pump is rated for 2500 to 4500 RPM using 14W power with an operating voltage range of 8 to 13VDC. Alphacool has wisely used a SATA connector in addition to a standard 4-pin PWM connector to power this pump. Thanks to them for ditching the Molex.
Alphacool uses Core Push Mounting mechanism which is new in the town or at least for me. The installation is still convenient. Use the guide for the installation process as installation on 120mm size radiator is different than installing in the PC Case. Also there is a limitation that these plates can only be installed on 120mm size radiator or fan bracket. Alphacool needs to come out with offset mounting kits for the 140mm size fan bracket/radiator.
I could not put these plates to testing due to my poor health but a build is planned in which I will try to use a 240mm distro plate provided my health permits me to undertake a custom loop build. The Core Distro Plate 240 Right with Pump is listed at €199.98. The 360mm version with pump is listed at €249.98. Alphacool is giving a 3-year warranty on these plates.
These are handy dandy products within Alpahcool Ecosystem that would uplift the look of the custom loop builds and at the same time provide a better and convenient tube routing. These come recommended by us.


