


NZXT Kraken X73 360mm All In One Liquid Cooler Review
Introduction
Manufacturer: NZXT
Product Page: NZXT Kraken X73
Purchase: $179.99 over at NZXT.com
Today is an exciting day here at Enos Tech and for myself. I have long awaited the opportunity to add NZXT to my list of All In One Liquid Coolers to my list of tested units. The Kraken X73 is NZXT’s newest edition to the X series of AIOs including the X63 and X53. This time the refreshed 360mm cooler comes with 3 of NZXT’s Aer P120 aRGB fans to go along with the flashy mirrored aRGB pump head adding even more lighting bling to the RGB enthusiast’s build. Coming in at 121 x 394 x 27mm, with a variable flow rate pump running between 800 – 2800rpm, a tube length of 400mm with Nylon Braided Ultra-low Evaporation Rubber Tubes and the list can go on this is promising to be one not only very good looking but also performing All In One Liquid Cooler. So let us dive in and take a look at what is on offer here from NZXT this time around.
Specifications

Closer Look
The top of the box displays a really nice image of the NZXT Kraken X73 sporting the signature Purple of the company. Other than that the top of the box is pretty bare and minimal which is what NZXT is well known for in their products including their H Series of cases.
On the back/bottom of the box, you will find some more information about the LEDs used in the unit as well as some information about CAM NZXT’s in my opinion and the way I use it excellent software suite to help control all of your digital NZXT devices all from one convenient control panel.
Pulling the interior packaging out of the box shows how much NZXT cares about the state of your product upon arrival. Everything is not only neatly tucked away but also individually wrapped including the Radiator itself in a little cardboard sleeve.
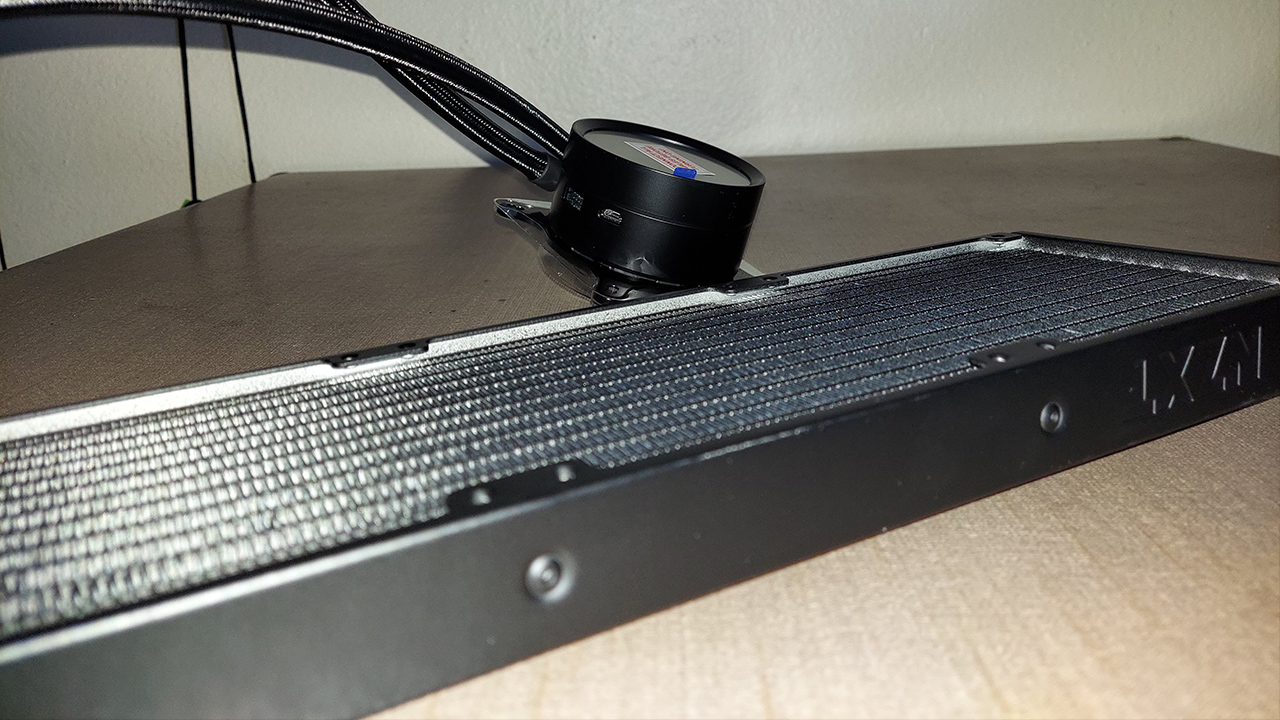
Laying the radiator out you can see the massive size of the fin array, the Kraken X73 should be able to dissipate a lot of heat out of whatever CPU or GPU you are cooling with it.
A closer look at the cold plate (sorry for the glare) here we can see NZXT has pre-applied thermal paste for you. It is perfectly fine to use this as-is out of the box, but for my testing, I clean all included paste off of the unit. Choosing to rather test every cooler with the same ARCTIC MX-4 Thermal Compound so that I can reduce as many variables in testing as possible.
Here on the side of the pump head you will see two ports, these are for your power cables, and USB cables for the full control of your Kraken X73. It is a good idea to keep in mind your orientation of these and the pump hoses more than anything on the X Series of coolers. They all come with a swivel capable pump head so you can install the unit in the most optimal orientation for your build and then just turn the head of the pump with your hand to realign the logo as you would like.
Here are the 3 AER P120 fans included with the Kraken X73. The AER P120 fans are 120 x 120 x 26mm so they are a bit thicker than most 120mm fans which are generally 25mm thick. The AER P120 fans run at 500 – 2000rpm with an airflow of 18.28 – 73.11CFP and an Air Pressure of 0.18 – 2.93mm – H2O. They are designed with Fluid Dynamic Bearings with a life of 60,000hrs / 6 years. As well as being 4pin connector or PWM fans.
Here on the side of each fan is a daisy chain of aRGB connectors, each fan will link to the next in a series.
Installation and RGB Software
Here is all of the included hardware for the Kraken X73, there are 12 longer screws and 12 shorter ones for attaching the radiator and fans. Depending on the installation method you might need both sets or just the longer ones. For the orientation I would install this specific AIO into the NZXT H710i is in the top of the case with the radiator sitting on top of the radiator bracket. I then attached the fans using the 12 long screws to secure both the radiator and fans to the case radiator bracket. This can be set aside until you have the backplate and standoffs for the AIO Pump head ready.
Here using your original AM4 Backplate included with every AMD AM4 platform, you will want to use the 4 AM4 standoffs to secure your backplate to the motherboard and give the Kraken X73 pump head a place to securely attach to with the 4 included thumbscrews.
Here you can see how things look after you get your 4 included thumbscrews attached to the pump head and mounting assembly. After that, you need to wire your two included cables to the head of the X73 as in the photo. These cables are your USB connection which allows you to control the Pump and Fan speeds as well as change the aRGB elements on the cooler. The other cable is going to be your SATA power and various other connection options if you do not use the NZXT Smart Device and CAM software. You will also need to connect the 3pin fan cable that runs off the same cable as the SATA power and other RGB connections to a fan header on your motherboard.
Here are all of the included cables you will need with the Kraken X73. Included are the required pump head connections, the daisy chain of aRGB connectors that help your fans communicate together like in a chain. NZXT also includes a 3way fan splitter so you can control all 3 of the AER P120 fans as one.
NZXT CAM Beta
Here is NZXT CAM Beta, in here we can see anything and everything NZXT that is plugged into your system via the Smart Device v2 and or your motherboard. This software suite allows full control over your RGB, Fans, and AIO Pump speed as well as having a few more features tucked away inside. We have covered most of what this suite does and honestly, at this point, NZXT CAM warrants a review all on its own.
As I stated above you can control your fan and pump speeds directly from CAM and the Kraken X and Z series of coolers all have variable pumps which allow you to slow the liquid flow rate down or speed it up with a simple percentage and thermal slider so you can customize for maximum cooling or silence.
In the lighting tab, you can customize the Kraken X73 pump head. There is a single RGB light for the logo and 8 individual lights around the pump head and these are all capable of sharing effects with the rest of your build if you are using NZXT CAM for your RGB.
Here is a new feature tucked away into CAM called Mini Mode, this is a rather nice and simple overlay that allows you to see a whole lot of information about your current system.
What I think is the most exciting feature for gamers or enthusiasts alike is the new Profile Sync which allows NZXT CAM to change profiles with any number of your NZXT devices when you launch a specific software or game that you have set a profile up for. Gone are the days of worrying if you have the right profile set or not, you can just kick your favorite game or software on and go knowing you have already preset all of your cooling needs ahead of time.
Test System and Methodology
Test System
- OS: Windows 10 Current
- CPU: Ryzen R7 1700 @ 3.8Ghz 1.25v
- Mobo: Gigabyte X470 AORUS ULTRA GAMING
- RAM: G.Skill Trident Z RGB 4x8GB DDR4 CL16 3000MHz
- PSU: NZXT E850
- Case: NZXT H710i (note this is with filters in for a more realistic use case test, not on an open-air bench)
Methodology
For my current testing, Prime95 is used to max all of our CPU cores out at 100% for 30min with 100% fan speed on all fans. We then monitor and take note of the max core temperature. We then subtract this number from the ambient temperature to get the temperature delta. Also letting the computer sit idle for 15 minutes before each run to stabilize the min results.
Software
Thermal Performance

Final Thoughts
Performance
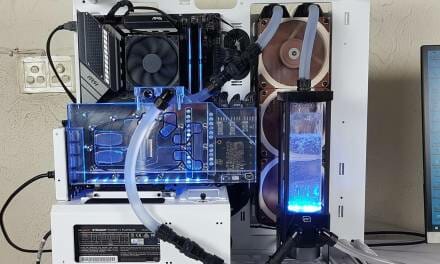
The NZXT Kraken turned out to be as solid a performer as I thought it would be, it is a very robust All In One Liquid Cooler with the capabilities to keep my Ryzen R7 1700 overclocked to 3.8Ghz plenty cool with room to spare. As hard as I have tried I have not been able to get the liquid temperature of the unit to rise beyond 41c (it is going to take a much more powerful CPU to do this). And then there is the bonus of being able to attach the Kraken X73 to an NZXT G12 Bracket for GPU cooling opens even more doors for cooling and performance in your build. Be sure to keep an eye out for our article where we will be testing a Kraken X53 on my Gigabyte GTX 980 Ti Windforce.
Design
I expected nothing less than a really well designed and built cooling system from NZXT. The hoses are very nice and flexible as well as being sleeved. The rotatable fittings do not feel stiff and hard to turn to get your hoses ran where you need them to. If I was to pick one thing out to nitpick about here with the Kraken X73 that might be the hose length. There is room to be desired here, with no real issues installing the X73 in the top of the H710i case I used, but the second you try to front mount the AIO you are left with the hoses up above the radiator pump and head. This isn’t game-ending and generally won’t cause any issues, but after a year or two of use, permeation might start allowing just enough air into the AIO to allow the hated trickling water sound that can happen when installed this way. I would stick to top mounting an AIO like the X73 in your case if possible.
Other than the slightly short hose length I have no gripes or concerns about the design of the Kraken X73 everything from the hoses to the fans, radiator, and wiring is solid and does not feel cheap in any way. The RGB is very clean across the board as well.
Value
Coming in at $179.99 this particular AIO is not intended for your average user. It’s not cheap and other AIOs of the same size can be had for much cheaper. But what the other AIOs are lacking are things enthusiasts are looking for. Things like the CAM software suite and its whole new level of flexibility are next to none as far as I have gotten to test. To this day I aim to keep my main build as centered on the NZXT CAM ecosystem as I can. NZXT has really started to turn CAM and the compatible products into a really cohesive ecosystem with so much flexibility it is becoming silly and all I want in my personal builds.
Outside the higher cost, this is one very solid performing All In One Liquid Cooling solution that checks several boxes off most any enthusiast PC builders list when they are trying to tie their piece of desk art together. It has the performance and looks as well as flexibility with variable flow rate pumps and fans right from the CAM software suite. If you are looking for that extra part that might clean your build up inside while making it look like what I would imagine a performance race car would look like inside if it were a PC, then this is the cooler for you. Not once while installed in the top of the case with another AIO dumping the heat from my GTX 980 Ti has my CPU become overheated. Not even close, in fact, the NZXT X73 performed so well that I had more thermal headroom to OC if I had a better motherboard and more wiggle room in my comfort zone of long term voltage for my CPU.


I want to thank NZXT for sending the Kraken X73 sample over for review.


