


SilverStone ML09 HTPC Case Review
SilverStone ML09 HTPC Introduction
We are taking a look at the HTPC case from SilverStone named ML09. As the name suggests, this is an SFF case ideal for HTPC users and users who would want to have a low profile, compact, space-saving case suitable to their particular requirements. Here are some salient features:
- Super small at only 7 liters
- Premium styling front panel with mirror finish
- Includes one 120mm fan and support up to two 80mm fans
- Multipurpose 4-in-1 bracket
- Supports Mini-ITX motherboard and SFX power supply
- Support dual slot low-profile graphics or expansion card
- Support four 2.5″ HDD/SSD
Item: SST-ML09 HTPC
Price: The listed price of ML09-B on Amazon is USD 101 at the time of the review.
Specification

Dimension

Closer Look

The chassis is shipped inside a cardboard box brown color which is a standard for chassis shipping.

SilverStone has provided:
- 1x slim optical drive Bracket cover
- Zip Ties
- Various Screws
- 4x feet
- 2x self-adhesive tapes
- A user guide
It is time to take a look at the chassis and see all the features. ML09 is based on ML06 but the internal tooling is different. Compared to ML06, the ML09 has the second expansion slot making it a dual-slot design though it can only allow a low profile graphics card due to height limitations. The case is made of 0.8mm steel. The front façade is made of Acrylic and plastic and finished in a mirror effect to give a premium look. The dimension of the case is 350 x 99 x 205mm (WxHxD). We have a total of 7 liters of internal volume. The dimension of the case with the feet is 350 x 109 x 250mm (WxHxD). The net weight of the case is 2.70kg.
Exterior
Let’s start by taking a look at the exterior of the chassis.

The front of the case is made of Acrylic and plastic materials. It is finished in a mirror effect for a premium outlook. On the top right, we have a cover for a slim optical drive which is optional. The case supports one slim optical 12.7cm or 9.5mm drive. We have power and reset buttons on the base with two blue colors LED indicators. There is a SilverStone branding on the right of the front panel.

We have a solid steep panel on the top. There are two perforated areas on this panel. The area with a large perforation is covering the motherboard tray whereas the area with a small perforation is covering the PSU bay. Please keep in mind that this case supports only SFX PSU. It would be better if the fan side of the PSU is kept upward to draw fresh air from the top perforation and exhaust on the rear.

SilverStone has made a smart move as they have provided a totally perforated area on the side. The user can install 2x 80mm fans inside the case for some airflow. This is the side that is facing the motherboard tray area and the graphics card. In the case of dual-slot, low-profile graphics card, slim design 80mm fans would do. We also have:
- 2x USB 3.0 ports
- 1x Audio Jack
- 1x Mic
The opposite side of the case is solid and there is no perforation on it.

Taking a look at the rear of the case, we can spot 2x low-profile PCIe slots on the right. There is a cutout on the base where the Rear IO shield is placed. Looking closely, we have a utility expansion slot on the top above the IO cover. This is a smart design allowing the user to install an add-in card in the case but keep in mind that this card along with the supporting cables would take up a considerable space above the motherboard and may limit the CPU Cooler or RAM selection. We also have a Kensington lock. The very left side has a cutout for SFX PSU.

The base of the case has a solid structure. There are circular areas on the corners. This is where you can attach the self-adhesive rubber feet. These feet are provided separately in the box. We are showing the feet attached to the case in the above picture.
Interior
It is time to take a look at the inside of the chassis.

The first thing you will see after removing the top panel is the 4-in multi-bracket pre-installed in the case. It has FRONT labeled on the side. Make sure that this side always faces towards the front of the case. It is secured using 4x screws.
There is also a support bracket between both sides which is secured using 2x screws. The cage visible on the left side is the 3.5” SDD/HDD cage. The unpopulated area on the left is where the SX PSU would be placed. The user can orient the SFX PSU in two directions but for the SilverStone SFX PSU, it is recommended to place it with the fan facing up.

SilverStone has provided a 120mm fan pre-installed in an intake position on the multi-bracket. The user can optionally install a 2.5” SSD or a 3.5” drive a slot-loading slim optical drive on this bracket. By default, we have a 120mm fan installed on it which is rated for 1500 RPM and has a 3-pin connector.

The above picture shows the internal of the ML09 after removing the multi-bracket. The motherboard is installed right below the multi-bracket for which 4x stand-offs are installed.

The above picture shows the internal of the ML09 after we have removed the support brace/bracket and the multi-bracket. We have to be up to the challenge when it comes to handling the cables in this case due to their compact size.

The provided storage cage can house up to 4x 2.5” SSD/HDD at a time. There is no support for a 3.5” drive which is understandable.

The above picture shows the system panel cables coming from the side of the case which has USB ports and audio ports.

The above picture shows the internal view of the front panel with the Power and Reset buttons along with the LED indicator.

The above picture shows the internal view of the case with everything removed. As can be seen, we have limited space particularly with respect to the cables to work around. There are two rubber feet on the lower left side. This is where the PSU will be placed.

SilverStone has provided 4x rubber feet which allow the case to be placed horizontally on the surface with some gap in between. In addition, they have also provided two plastic-made feet which are stretchable. This allows the user to place the case in a standing or vertical layout.

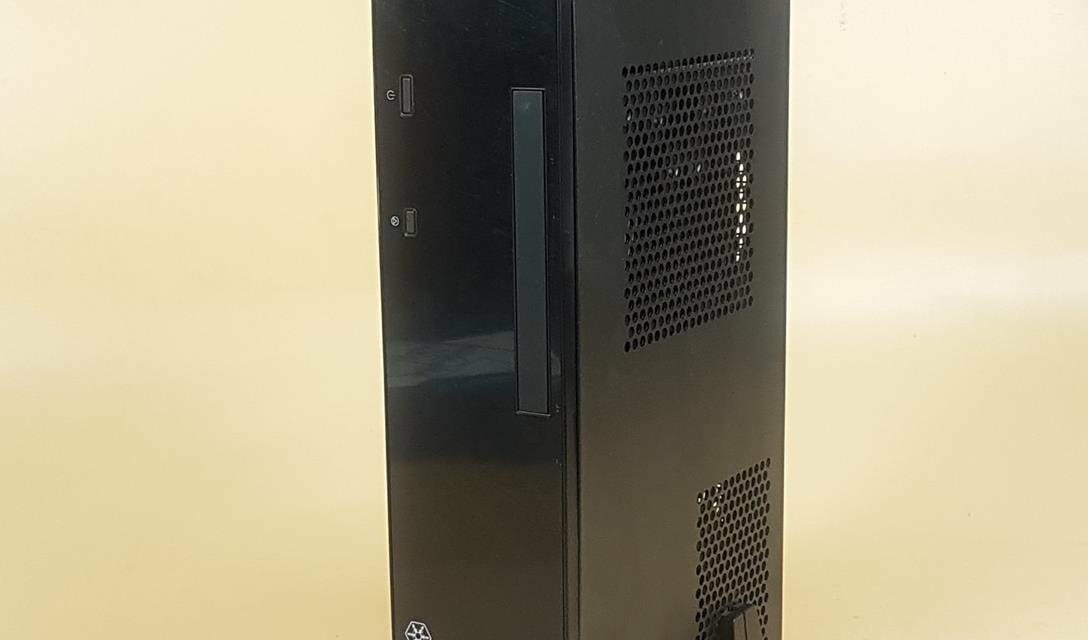
The above picture shows the ML09 in a vertical standing position using two feet.

SilverStone has also provided a magnetic dust filter that can optionally be placed on the extended perforated area of the top panel.

The above picture shows the USB 3.0 and HD Audio front panel connectors.

The above picture shows the system panel connectors.
Test Build
The following configuration is used:
- Intel i9 9900k
- Asus ROG Strix B360-I
- Noctua NH-L9i
- XPG Spectrix D41 8GB @ 2667MHz
- XPG SX950U 250GB SSD
- SilverStone SX500-G PSU

The motherboard was installed at first. The cooler was installed outside of the case which is totally up to the user. The RAM was installed right after. Everything went smoothly.

The SilverStone PSU was installed next as shown in the picture.

Now, is a good time to decide on cable management since we are having tight spacing around.

The above picture is showing the HD Audio connector connected to the motherboard. This would not have been this way if we were installing the low-profile graphics card.

The above picture shows the USB 3.0 connector on the motherboard.

The above picture shows the front panel connectors on the motherboard.

The above picture shows the EPS connector connected to the motherboard.

The above picture shows what we have to deal with for cable management. It was a simple process since we were not using a graphics card.

The above picture shows the build with all cables placed and connected.

The above picture shows everything assembled and ready for test boot.

A quick glimpse at the rear of the case.
Limitations/Clearance
- The maximum allowed CPU Air cooler height is 30~70mm depending upon the multi-bracket use.
- Single or Dual Slot Low Profile Expansion Card up to 175mm length and width of 74mm.
- SFX PSU
- Mini-ITX or Mini-DTX motherboard.
Conclusion
The SilverStone ML09 is an HTPC PC case built upon the footprint of ML06 but with fine refinements. We still have the 7 liters of volume in the ML09 but the internals has been re-arranged which has allowed the SilverStone to provide support for dual-slot, low profile expansion card. This case does not support a full-size graphics card so keep that in mind. Some of the striking features are:
- Mini-ITX and Mini-DTX compatible.
- Supports dual-slot, low profile expansion card
- Standard SFX PSU
- 4-in-1 Multi-Bracket
- Stylish Acrylic and Plastic made a front panel with mirror effect
Storage Options:
- Up to 4x 2.5” drives
- A single 3.5” drive on the multi-bracket which is optional
Cooling Provision:
- 1x 120mm fan on the multi-bracket [Pre-Installed]
- 2x 80mm fans on the side for air intake directly on the graphics card and the motherboard. [Optional]
The dimension of the case is 350 x 99 x 205mm (WxHxD). We have a total of 7 liters of internal volume. The dimension of the case with the feet is 350 x 109 x 250mm (WxHxD). The net weight of the case is 2.70kg. the CPU cooler’s height is within the range of 37~70mm depending upon the top-mounted multi-bracket. The cable management is challenging if we are using a graphics card and storage drives cage as well. The maximum length of the graphics card is 175mm with a width of 74mm.
There is also a provision to install an add-in card on top of the motherboard on the multi-bracket for which the slot is provided in the case from the rear. Keep in mind that this would limit the selection of the CPU cooler and the RAM. SilverStone has provided a magnetic dust filter to be used optionally on the extended perforated area on the top panel. The user can also install a slim optical drive in the case for which necessary mounting hardware is provided.
Since we have used a simple configuration for the test build, we did not face any issues and were able to set up the build in the least possible time with minimal effort. The SilverStone ML09B is listed at $101 at the time of the review. During our thermal testing, the i9 9900k peeked at 91°C under the Cinebench R23 Multi CPU run of 30 minutes. The ambient was 33°C. This is not a bad performance at all from this compact form factor build. In this price range, this is a good starting point for the HTPC users who would wish to build a configuration in a console/DVR-like form factor to game or for multimedia content recording in particular and comes recommended by us.
We are thankful to SilverStone for providing a review sample of ML09.


