


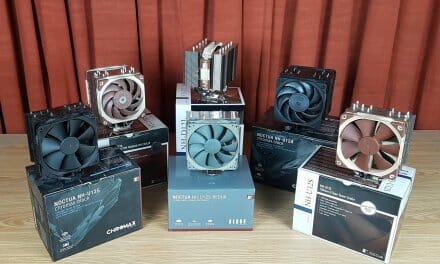
Noctua NM-MM1 MP78 and MP83 Mounting Kits Overview
Introduction
Noctua has recently released its new SecuFirm 2+ multi-socket upgrade mounting kits. The salient highlight of these kits is that they use Torx-based mounting instead of Philips-based mounting. While many may not realize the potential benefit of going Torx over Philips, it is a good step from Noctua, particularly for the power users, system builders, or testers like myself who frequently switch or change the coolers. The Philips-based screws get wear and tear quickly damaging the tip of the screwdriver (depending on its build quality) and the screw head itself as well. This is not the case with Torx-based mounting given its better cam-out design.
Noctua has released 4x kits in total whereas you may only need one of these four. The basic kits are two using regular silver color mounting hardware whereas the other two are black versions of regular kits. These are named as:
These kits come with an MSRP of:
- Noctua NM-M1-MP83 USD 21.90
- Noctua NM-M1-MP78 USD 21.90
- Noctua NM-M1-MP83 chromax.black USD 24.90
- Noctua NM-M1-MP78 chromax.black USD 24.90
Noctua NM-MM1 MP78 and MP83 Mounting Kits Specifications

I am showing the specifications of NM-MM1-MP78 above.
 I am showing the specifications of NM-MM1-MP83 above.
Closer Look
Let’s take a look at these kits.

I am showing packing boxes for all four kits. You can see that the MP78 and MP83 regular edition come inside Noctua’s standard color packing boxes whereas the chromax.black edition comes inside black color boxes.

I am showing the inside view of NM-MM1-MP78 and NM-MM1-MP83 chromax.black. As you can see the regular edition comes in a standard silver color whereas the chromax edition is all black.
Noctua is good at the presentation of its products and the packaging of these kits is no exception.

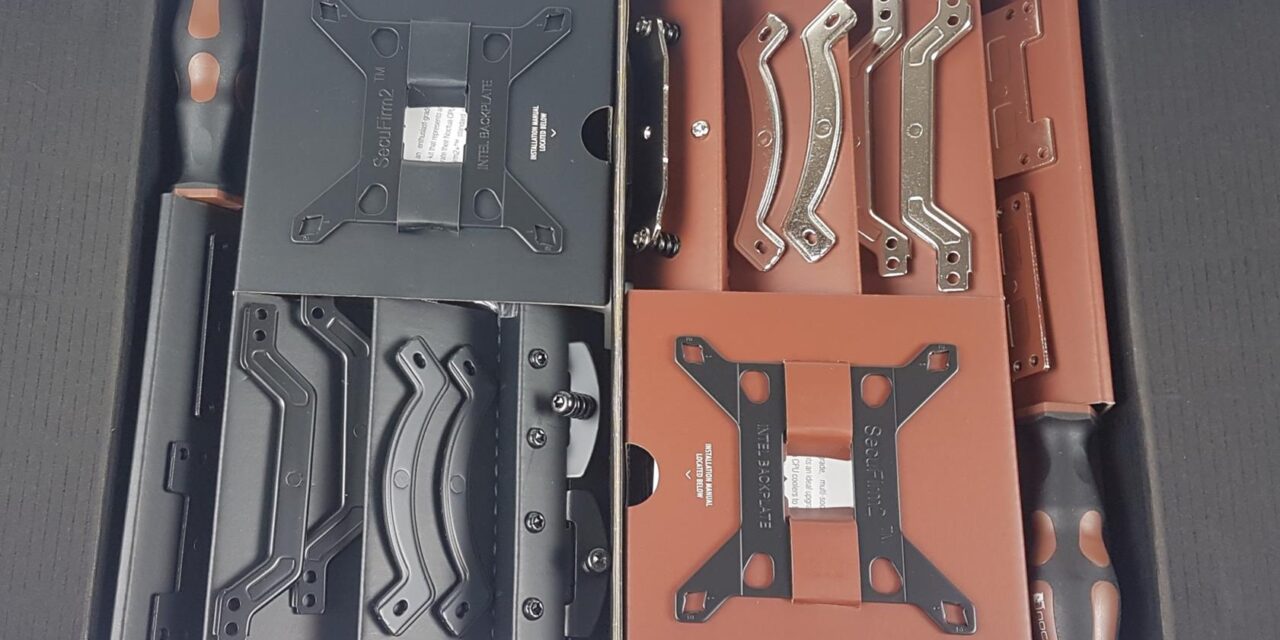
I am showing common parts of all kits. These include:
- 4x NM-IBT5 Bolts
- 4x NM-IPS1 Black Spacers for Intel LGA115x/1200
- 4x NM-IPS3 Blue Spacers for Intel LGA1700
- 4x NM-ICS1 Clip-On Spacers
- 4x NM-STS1-TX Thumb Screws
- 4x NM-APS4 Gray Spacers for AMD
- 4x NM-ALS1-TX Long Screws for AMD
- 1x User Guide for Intel and AMD
These are standard parts that I have seen on their latest coolers. These new kits make most of Noctua coolers compatible with the latest socket without having to change the cooler. You can grab just one kit supported for your Noctua cooler and call it a day.

I am showing the mounting hardware for the Noctua NM-MM1-MP78 regular edition Torx-based mounting kit in the above picture. It includes:
- 2x NM-IMB3 v4 [Intel Mounting Brackets]
- 2x NM-AMB15a [AMD Offset Mounting Bracket]
- 2x NM-AMB14b [AMD Offset Mounting Bracket]
- 1x NM-SFB4 [Mounting Plate/Crossbar]
- 1x Multi-Socket Intel Backplate
Noctua has provided a complete kit supporting all sockets including Intel LGA115x/1200/1700 and AMD AM4/AM5 sockets. These kits are not compatible with Intel LGA20xx which makes sense this socket has no future upgrade path. These kits are also compatible with the Intel LGA1851 socket which will come in the coming time.

Now, I am showing the chromax.black edition of the NM-MM1-MP83 kit in the above picture. It includes:
- 2x NM-IMB2 v3 [Intel Mounting Brackets]
- 2x NM-AMB13a [AMD Offset Mounting Brackets]
- 2x NM-AMB12a [AMD Offset Mounting Brackets]
- 2x NM-SFB2x-TX [Fastening Brackets]
- 4x NM-SSC1-TX Short Screws
- 1x Intel Multi-Socket Backplate
Which kit is for which cooler?
I am sure you will be spinning head on which kit to get for which Noctua cooler. Let me make it easier for you.

Noctua uses the words Mounting Pitch which means the distance between two spring-loaded screws on the crossbar or mounting plate or fastening bracket(s) however you name it. Noctua has two categories in this regard:
- 78mm Mounting Pitch
- 83mm Mounting Pitch
No need to take out the measuring tape to measure the distance. It is easy actually. If your Noctua cooler has a single-piece crossbar then it is a 78mm mounting pitch design and if your cooler has two spring-loaded fastening brackets that look like clips then you have an 83mm mounting pitch cooler.

The above picture tells you which cooler is a 78mm mounting pitch and which cooler is an 83mm mounting pitch.

Noctua has included an NM-SD1 Torx T20 screwdriver with each kit. The grip handle of this screwdriver has the same Noctua brown/beige color scheme. It has a 150mm long shaft that would make life easy during installation/removal. I wish Noctua came out with 300mm long shaft screwdrivers for the NM-SD1 Torx and Philips PH2 screwdriver since we are not only handling ITX cases but full-size towers as well.

I am showing the tip of the NM-SD1 screwdriver. It is magnetic and has a Torx-based design for easier handling and firm grip.

It is not the ideal way of showing, but the above picture shows a firm grip that both screwdrivers have when contacted with Torx-based screws. They just don’t fall off on their own which many Philips-based screwdrivers do. Also, there is no risk of slipping the screwdriver accidentally during the installation. This is common with Philips-based screwdrivers, they tend to slip easily depending on the size of the screw head and the tip of the screwdriver. Torx-based mounting is a better solution overall.

The Torx-based screws have 6 corners that provide more contact points hence the cam-out is way better on these compared to the Philips-based mounting. The screwdriver almost gets fixed on this design for a firm grip and handling.

I have recently tested one flagship air cooler for which I needed to test the Noctua NH-D15 as well for the comparison. I have used a Torx-based mounting kit with an 83mm mounting pitch. The above picture shows the installed mounting hardware over the Intel LGA1700 socket. It was a better experience installing a cooler using Torx-based mounting.
Final Words
Noctua has breathed fresh air for its inventory of CPU air coolers using new SecuFirm2+ Torx mounting kits. These kits are a complete single-package solution allowing the users of old coolers to install their coolers on new sockets and future-ready sockets from Intel using a single kit without having to change the complete cooler. Let me make one thing clear. If you have recently bought a Noctua cooler, it would have come with Intel LGA1700 and AMD AM5 mounting hardware. The new SecuFirm2+ kits don’t imply that previous SecuFirm2 kits are bad in any way. No, it is not like that and you are fine with SecuFirm2.
These kits are called NM-MM1 and they are available in two sets. One set has a regular industrial finish (silver color) on the hardware whereas the other set is a black version of the regular set. There are:
- NM-MM1-MP78
- NM-MM1-MP83
- NM-MM1-MP78 chromax.black
- NM-MM1-MP83 chromax.black
The MP78 and its chromax version are for the Noctua coolers that use a 78mm mounting pitch (distance between the spring-loaded screws on the crossbar or fastening brackets). Similarly, MP83 and its chromax edition are for coolers that use 83mm mounting pitch.
Using the Torx-based mounting provides a better grip, anti-slip, a better cam-out, and less wear and tear on the screw compared to Philips mounting. This would come in handy for users like myself who are regularly switching the coolers for testing and test builds. The Philips is a standard when it comes to screws and installation but Torx has the advantage mentioned above over the Philips. In other words, you are still getting the Gold Standard of mounting regardless of the mounting type.
Each kit comes with AMD offset mounting brackets that could provide a 1-3ᵒC difference over the standard AMD brackets from Noctua. This data is from Noctua. As per my testing, I saw a difference of nearly 1.6ᵒC using the offset brackets over the regular brackets. You can read my take on those offset mounting kits for AM5 by clicking here. Noctua has even included the crossbar or fastening brackets in the package and there is an NM-SD1 Torx screwdriver as well. You would need anything else except the thermal paste. Noctua should have added the NT-H1 in the kits in my opinion and I wish Noctua also plan some 200m long shaft version of these Philips and Torx screwdrivers as well.
A single SecuFirm2+ kit can survive for some good more years and this is exactly what Noctua has done here. If you have a Noctua cooler purchased like in 2005 or onward then you would probably need an upgrade kit for the latest sockets. Noctua has given you an ultimate solution in which you will get to keep your cooler and even make it future-proof with just one kit. It can’t be better than this! The standard version kit has an MSRP of USD 21.90 whereas the chromax version has an MSRP of 24.90 which is worth buying a new cooler.


