


SilverStone SETA H1 Mid-Tower PC Case Review
Introduction
SilverStone has introduced multiple new products recently including their mid-range to high-end PC Cases. We are taking a look at the SETA H1. This case has mixed features set with 2x 160mm Shark Force series fans on the front and a single 140mm fan on the rear. The motherboard up to SSI-EEB is supported and there are multi-function brackets that can be configured for three different configurations. The case has ample room for the build. There is an ARGB LED strip on the front panel with standard 3-pin 5V connectors.
Here are some of the features:
- Perforated full mesh front panel with embedded ARGB lighting strip achieving vibrant aesthetics with completely unobstructed airflow performance
- Ample interior space with a highly versatile layout, setting no boundaries for creativity and inventiveness
- Extensive air and water cooling support
- Supports up to SSI-EEB motherboards
- I/O ports include USB Type-C x 1, USB 3.0 x 2 and combo audio x 1
- Superior dust prevention with removable dust filters on the top and bottom
Product: SETA H1
Price: $179.99 [At the time of the Review]
Specifications

Dimensions

Closer Look
The chassis is shipped inside a white and blue color cardboard box.

SilverStone is marketing this case as High Air Flow tower with tremendous compatibility and durability. These are the things that we will be taking a closer look at.

The features and salient specifications are printed over here.

It is time to take a closer look at the chassis and see what it offers in this price range. The case stands at 494mm in Height with a depth of 232mm and a length of 480mm. It is made of Plastic, Glass, and Steel materials. The case has a net weight of 9.67kg. In terms of volume, this case stands at 55.01 liters.
Exterior View
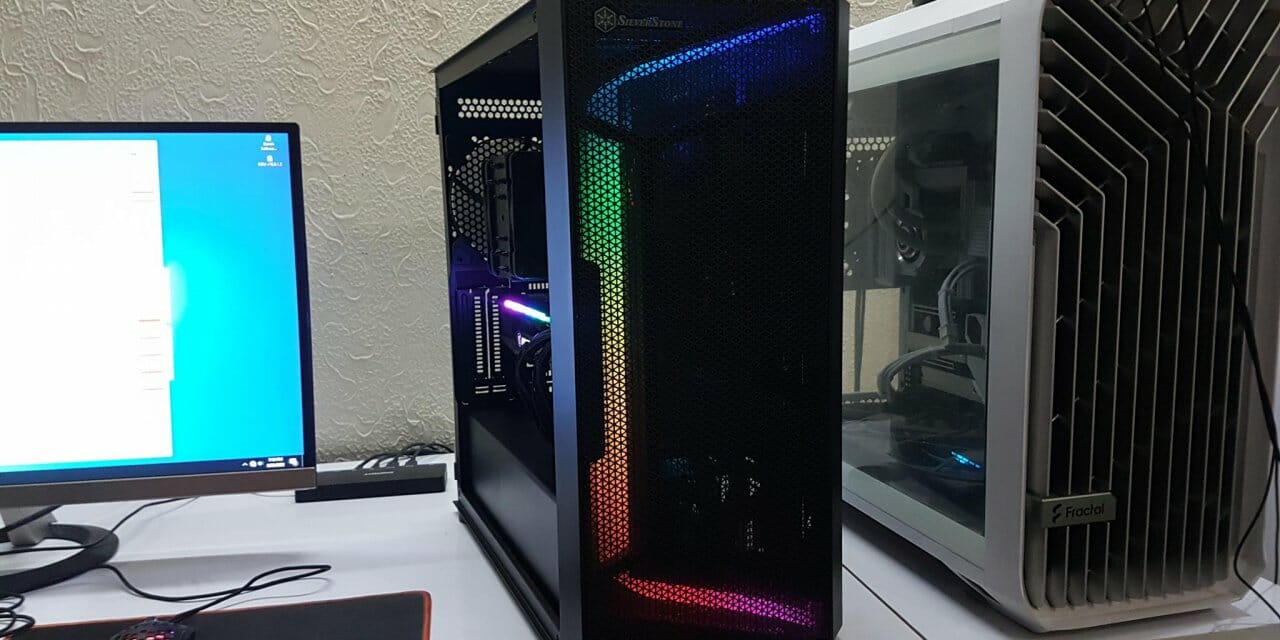
Let’s start with an exterior view of the chassis.

The front has a total perforated panel finished in a dark black color. There is SilverStone branding on the top area. The panel has a slope side on the right bezel. We have a tighter hole pattern all around which could restrict the airflow up to some extent. The thermal testing would provide further insight.

The panel can be removed by placing a hand under the base of the panel and pulling it out gently. SilverStone has used standard plastic tabs to install the panel on the frame. We can see a black color mesh filter that does not cover the entire run of the panel as the base portion is exposed. There is an A-RGB strip comprising 20 LEDs. The thick diffuser is placed next to the strip for even and vivid color diffusion. They are removable.

We can see that the A-RGB LEDs can be powered using the standard 3-pin, 5V male/female connectors. I appreciate the standard connectivity provision.

The above picture shows the front view after removing the panel. There are 2x 160mm fans pre-installed on the backside of the fan bracket. The fan bracket is removable and it can be installed with the groove side facing outward. This would make more room for the 120mm fans and front radiator. There are 3x cutouts on the right frame from which the cables can be passed but in the current configuration, it is not feasible to pass the fans cables through these cutouts.

The fan bracket is secured using 4x Philips screws. The above picture shows one of these screws.

The above picture shows the bracket from its default position. The user can install:
- Up to 3x 120mm fans
- Up to 3x 140mm fans
- Up to 2x 160mm fans (with 140mm mounts) (only in the stock position of the fan bracket)

The above picture shows the bracket from the opposite side. The build quality of the bracket is quite solid and there is no flex in it.

The above picture shows the fan bracket installed in another position. Please note that the 160mm fans can’t be installed in this configuration.

The above picture shows the 160mm SF series fans. These fans have 140mm fan mounting hence they can be installed in the location meeting two criteria:
- The provision of 140mm mounts
- The extra clearance (20mm) in the surrounding area of the 140mm mount
Both fans have a 3-pin connector and they spin over 1200 RPM. At full speed, they are loud. These fans have a dimension of 16x25x160mm. This is SilverStone’s in-house design catering for the applications designed for the 140mm fans but providing enhanced cooling capability with more surface area by widening the overall structure of the frame and the blades.

Looking at the side panel, we have a dark-tempered glass panel. There is no handle with a care sticker on the protective sheet on the glass panel. The side panel fully flushes with the frame of the chassis. The panel is hinged and to make it even better, it is magnetic and has a raiser to easily open and close it. We can also see that the sides of the front panel are solid and don’t have a vented design.

The rounded shape object is the magnet. There are two magnets on the side that catch the side panel.

The above picture gives a closer look at the hook of the handle that can be used to open or close the side panel.

The rear side of the chassis has a standard layout. There is a vented portion on the top. This hints at the clearance or displacement from the top of the case to the motherboard. Up top, we have a cutout for the motherboard rear I/O plate followed by the mesh-designed fan mount. 1x 140mm fan is pre-installed and we can’t adjust its height but the height of the 120mm fan is adjustable.
In the middle section, we have 7 PCIe slot covers. There are two PCIe slot covers in a vertical layout. All covers are reusable. One good design aspect is these 7 covers are bridgeless. At the bottom, we have a provision for a standard ATX PSU. The solid steel side panel is secured using two thumb screws that are not captive. The glass panel is hinged.

The above picture shows the vertical bracket removed in front of the PCIe slots.

The 2x PCIe slots are secured using standard Philips screws, not the thumb screws.

The above picture shows the top hinge on which the glass panel is installed.

The other side of the chassis has a solid steel panel.

The top side of the chassis has a magnetic dust filter. There is a vented portion with the fan mount in the rail layout. This gives flexibility in adjusting the position of the fans/radiators. The front IO panel is implemented on the top frame of the chassis towards the back panel.

The connectivity options on the IO panel are:
- Power Button
- Reset Button
- 5mm Combined Audio Jack
- 2x USB 3.0 Ports
- 1x USB Type C port
- 1x LED Indicator

On the bottom side of the SETA H1, we have a non-magnetic removable dust filter covering the PSU bay only. There is a cutout on the bottom section of the front panel. This is where one has to grab the front panel and pull it over to take it out. One look at the PSU area is enough to tell that this case can house longer unit(s).

We have 4 black color feet on the corners of the chassis giving it approximately 16mm in height from the surface.

These feet are removable.
Interior View
It is about time to take a peek at the inner side of the chassis.

Let’s take an inside view of the chassis. If I remember correctly, the basic tooling is the same as we have seen in the SETA A1. However, the other design elements are quite different. The layout is spacious and can house the hardware without trouble within the specs. The two 160mm fans are taking 25mm space over the front cutout. The inner area is 415mm in length and 370m in height.
Side tray
The motherboard tray is made of steel and has a solid build quality. There is no flex as such in the tray. The markings are labeled for ease of identification for the installation of the motherboard. This case supports:
- SSI-EEB
- SSI-CEB
- E-ATX
- Standard ATX
- Micro ATX
- Mini ITX
The top displacement is 62mm which is quite good. This is coming from the 232mm depth of the case and the offset top rail design. The maximum thickness for the radiator and fans is 53mm to not cover the motherboard. If it covers the motherboard, the distance between 120mm fans with the motherboard is 41mm, which will be 21mm for the 140mm fans.
Only 6x standoffs are installed. The user will have to install the remaining 3 for the standard ATX motherboard. I am glad that SilverStone has provided a wrench so that the user can easily install the remaining standoffs or remove them.
We have three cutouts on the top for the CPU power cable and other cables routing. We have two large-size vertical cutouts on the side for 24-pin ATX and other side-mounted cable routing. There are two multi-function brackets on the right side. Take note that the top bracket is covering the 24-pin pass-through cutout.

The above picture shows the clearance and compatibility of hardware inside the SETA H1. The PSU length support is up to 250mm.

The above picture shows the cooling system provided in the SETA H1.

The PSU cover is not vented which implies we can only install the PSU with the fan side down. There are a total of 4 cutouts on the PSU tray. I was expecting rubber grommets on these cutouts in this price range! The cutout closer to the side panel is for the vertically placed graphics card.

The above picture shows the backside of the front-mounted 160mm fans. If we move the HDD cage back then we have 52mm of clearance for the radiator and the fans on the front which otherwise is 26mm.

There is a black color 140mm fan on the rear which is powered by a 3-pin connector cable. It was running near to 1150 RPM mark at full speed and was silent.

The above picture shows the PCIe slot covers. This is a bridgeless design.

Take a look at the top right section of the case from the inside. Typically, this is where the front or top IO panel’s PCB and connectors can be found. This is not the case in SETA H1. We have a clear area. That is because the IO panel is on the back side of the case.

The above picture shows the motherboard tray with the multi-function brackets removed. The user can remove the bracket is they are not required.

The above picture shows the multi-function brackets. These can be used for:
- Housing the reservoir tube if doing a custom loop
- Housing the 2.5” drives
- Covering the cables on the side of the motherboard like a 24-pin ATX cable

These standoffs are required if the top multi-function bracket is to be used to cover the 24-pin ATX cable.

The above picture shows the top bracket prepped to hide or cover the side cables.

Now, it is time to take a look at the backside of the motherboard tray area. We have a dual chamber design. The layout is standard and we have 17x cable tie points. There are two 2.5” drive brackets on the back of the motherboard tray. They don’t have captive thumb screws. We have roughly 16mm of space behind the motherboard tray for cable management. The top right side shows the IO panel’s cable connectors.

The above picture shows the close-up of the 2.5” drive brackets.

The above picture shows the bottom chamber layout. We have an HDD cage on the left and a good enough cleared area on the right for the PSU.

The above picture shows the HDD cage in its default position. It can be adjusted in two positions which would have an impact on the PSU and front fans/radiator clearance. In the default position, we have 249mm total clearance giving room for up to 220mm for the PSU and 52mm for the front fans/radiator.

In the above picture, the HDD cage is moved towards the left which leaves roughly 26mm of room for the front fans and radiator but gives more room to the PSU and its cables (279mm).

The above picture shows the PSU bay. The feet have anti-vibration pads on which the PSU is rested.

The drive cage is not toolless. I was expecting the toolless design in this price range.

The above picture shows the platform on which the drive cage is installed. It is riveted and can’t be removed.
Speaking of the storage, the following is the storage provision in SETA A1:
- 2x 3.5” drives
- 2x 2.5” drives

We have:
- USB 3.0 Connector
- USB Type C Connector
- HD Audio Connector

We have front panel system connectors.

The above picture shows a closer view from the backside of the case. The screws are holding the multi-function brackets on the opposite side. There are plastic covers that can be removed. This would be required when installing the 2.5” drives on the multi-function brackets. The cables would pass through these cutouts.

The accessories are provided in a box.

The above picture shows the contents of the accessory box.

SilverStone has provided 2x GPU Support brackets. These brackets can only be used with the GeForce RTX series graphics cards above the RTX 3080 or so as these cards have dual hole support brackets on the front side of the card. The SST bracket is first installed on these holes and then secured with the case.

There is an A-RGB hub provided in the box as well. It is magnetic which makes the installation convenient. The A1 and A2 labeled areas have standard 3-pin ports to which the user can connect the A-RGB elements. PSU ARGB port is where the SATA cable is connected to. SW port is where the motherboard sync cable is connected to. This controller provides the flexibility to add two or more A-RGB elements in a daisy-chain configuration. It still needs to be connected to the motherboard.

The above picture shows the SATA and A-RGB cables provided for the hub.

The SilverStone is providing a year warranty on this product which would vary from region to region.
There is no user guide provided with the case. The user is required to visit the web page of the product and download the manual from there (150MB size).
Installation
Following is the configuration used to test the thermal performance of the SETA H1:
- Intel i7 10700k
- MSI MAG Z490 TOMAHAWK
- Noctua NH-U12A Chromax.Black
- T-Force NightHawk RGB 16GB @ 3200MHz
- MSI GeForce RTX 3090 Gaming X Trio 24G
- addlink S70 256GB NVMe SSD
- Thermaltake iRGB Plus 1250W Platinum PSU

The installation started with 3 leftover standoffs. The RAM and cooler were installed outside of the box. The motherboard was placed over the standoffs and it was installed without any hassle. Next, the PSU was installed.

In the next step, the graphics card was installed.

The cables were routed and connected to the motherboard and the graphics card. I don’t have any specific issue here other than the somewhat convenient installation of the GPU support bracket.

The bracket was installed on the graphics card outside of the case. Doing so is guesswork. The convenient way is to install the bracket after installing the graphics card but it is not possible without removing the top 160mm fan.

The EPS connector was installed conveniently.

The 24-pin ATX cable was an easy installation so is the USB Type-C connector.

The A-RGB connector was routed under the motherboard and was an easy installation.

The above picture shows the bottom connectivity on the motherboard. Ignore the dust. It was cleaned subsequently. The front panel connectors were installed easily.

The above picture shows the backside of the chassis with minimal cable management done. The side panel is easily closed with this management.
Here are some pictures of the chassis:


Testing
The following configurations were used to test the thermal performance:
- Thermal testing with front panel installed [Stock Configuration]
- Thermal testing with the front panel removed.
The chassis was tested with all fans including the air cooler’s fans at their full speed. The MSI graphics card’s fans were set to run at 65% of the speed all the time.
Each testing session was of 30 minutes using the FPU and GPU in AIDA64 Extreme 6.30. The maximum temperature of the graphics card is reported in the graph. The average of the core temperature of Intel i7 10700k is reported. Absolute temperature is in the graph. Between the testing sessions, the system was put idle for a minimum of 30 minutes.
Result

The idle temperature of the CPU and the graphics card are near to the ambient temperature of roughly 33.5°C to 33.7°C.

We can see that removing the front panel does not affect the thermals as such which tells us that the case does not have restricted airflow. The front fans are generating a good amount of airflow but they are noisy.
Conclusion
We have tested the SilverStone SETA H1. This is a mid-tower PC case available in black color. Unlike the SETA A1, this case has more space in it and comes with more features. The dimension of the case is 232x494x480mm (WxHxD). Compared to the dimension of the SETA A1 225x470x432mm (WxHxD), the SETA H1 is more spacious particularly has more depth which gives good enough clearance from the top. The chassis is made of steel, plastic, and tempered glass. The net weight of the chassis is 9.67KG with 55.01 liters volume.
Cooling Provision is:
- Up to 3x 120mm or 3x 140mm or 2x 160mm fans on the front [2x160mm fans are pre-installed]
- Up to 3x120mm or 2x 140mm fans on the top
- 1x 120mm or 1x 140mm fan on the rear [1x 140mm fan is pre-installed]
- 120/140/240/280/360mm radiator on the front
- 120/240/360mm radiator on the top
- 1x 120mm radiator on the rear
Clearance:
- Up to 182mm height for the CPU cooler
- Up to 374mm length for the graphics card with 182mm width
- Up to 250mm in length for the Standard ATX PSU
Storage:
- 2x 3.5″ HDD
- 2x 2.5″ SSD [2x more using multi-functional brackets]
Here are the key highlights of the design:
- A-RGB LED lighting on the front panel
- Fully perforated mesh front panel
- 2x 160mm Shark Force series fans on the front
- 1x 140mm fan on the rear
- Removable front fan bracket (configurable in two layouts)
- GPU Support bracket for GeForce RTX 30xx series
- Rubber grommets on the main cutouts
- 2x PCIe vertical slots
- Hinged tempered glass panel with magnetic handling and door handle
- A magnetic SATA-powered A-RGB Hub
- Multi-function brackets
- The magnetic dust filter on top
- USB Type-C port on the front panel
The case can house motherboards up to the SSI-EEB form factor. The PSU shroud is not vented hence the {SU can only be installed with the fan facing down. SilverStone is using standard 3-pin ARGB connectors for the front ARGB LED strip which is a wise implementation. The user can connect up to 2x ARGB devices to the hub. There is roughly 16mm spacing behind the motherboard tray.
The key feature is the multi-function brackets. These can be configured to house a reservoir tube if going for the custom loop or they can house the 2.5 drives. The top bracket can be prepped to cover the 24-pin ATX cable by using the bundled standoffs which would increase the height of the bracket. The GPU support brackets are only compatible with RTX 30xx series and even in that these are compatible with the cards which have 2x holes on the front side.
The front 160mm fans are spinning above 1200 RPM whereas the rear fan is near the 1150 mark. All three fans have 3-pin connectors. The front two fans under full speed are noisy. The PSU up to 220mm is supported with a default position of the HDD cage, which can be extended to 250mm by shifting the drive cage closer to the front. This will impact the consideration of the front fans and radiator placement. There is a clearance of 52mm for the fans and radiator on the front with the HDD cage in the default position. This clearance reduces to 26mm if the cage is moved to the second position.
The SilverStone SETA H1 is listed at $179.99 at the time of the review. This is a steep price for this case. The overall build quality is very good. The overall building experience, in this case, is good though it would vary from configuration to configuration. The case comes with a good feature set. Our thermal testing has shown that the case has unrestricted airflow.
We are thankful to SilverStone for giving us the opportunity to review SETA H1.


![Deal – FIREBAT FD2 Mini PC [2026]](https://www.enostech.com/wp-content/uploads/2026/06/image-63-150x150.png)