


Thermal Grizzly CPU Contact Contact Frame for 12th Gen. Is it worth it!
Introduction
Intel Alder Lake platform or 12th gen as most commonly pronounced provides high-performance SKUs for gamers, enthusiasts, content creators, etc. However, there were reports of CPU warping that could result in uneven contact with the cooler. Then a few reports surfaced in which a broken substrate was shown as part of this issue and sometimes later motherboard backplate bending possibility surfaced as well. This issue stems from the very design of ILM (Independent Loading Mechanism) that Intel is using on these platforms. Typically speaking, the ILM on Intel 12th generation is using a two-point pressure much like how they have been implementing in the past except for the X99 and X299. Now, the issue is these latest CPUs have more length compared to the previous generation, and using a two-point mount might not be sufficient. This warping that we mentioned above typically manifests with top and bottom edges coming up pressing the midsection inward. This happens because the uneven pressure causes the IHS (Integrated Heatspreader) to somewhat have a concave curve that could further make uneven or improper contact with the cooler. The result would be the center portion of the CPU not being covered properly and resulting in high temperatures. Plus this uneven pressure from the cooler’s contact could also result in bending.
One simple solution would be to implement X99 ILM on this platform. That particular ILM uses a four-point pressure contact with the socket and CPU using two latches. However, Intel – after a long silence – stated that these CPUs and ILM are operating within the specifications and using third-party ILM or any other mod could be out of warranty terms. Anyhow, cutting it short, the issue is there and it needed a resolution. Many users suggested using 1mm rubber washers between the ILM and motherboard. It was followed by a few brands releasing their solution in the form of new ILM or contact frames. Keep in mind that installing these frames using washers would void the warranty of these CPUs which is clear from their statement.
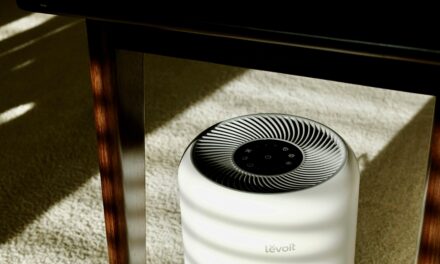
Thermal Grizzly in collaboration with der8auer come up with a CPU Contact Frame for Intel 12th Gen CPUs. We are testing this product this time. According to Thermal Grizzly, “The Intel 12th Gen CPU Contact Frame has a special inner contour to shift the contact pressure from the center of the CPU to the edges during assembly. This avoids the concave curvature of the IHS. This means that the CPU cooler rests better on the processor and a larger contact surface is created to dissipate the waste heat of the CPU.”
CPU Contact Contact Frame Specifications

Pack Contents

The above picture shows what is provided in the pouch.
Closer Look

The contact frame is shipped inside a pouch container that is black in color.

There is a multi-lingual description of the product along with its benefits printed here.

Thermal Grizzly has provided an Allen Key, a Hex Wrench tool (T20 wrench), and 4x screws. These screws are actually intended for Intel 13th generation platform where there is more distance between the ILM and the backplate depending on the motherboard model. It is not applicable to all motherboards. How to tell if you need these screws or the standard ILM screws? It is simple. Try ILM screws first. If they don’t snuggle then use the black screws. The provided tools are right-angled making it easy to use a single hand for the screws installation.

The frame is made of aluminum material (EN-AW 7075). It is anodized making it safe to use directly on the PCB. Thermal Grizzly has emphasized that this product is 100% made in Germany. This and anodized aluminum with lower production are the main factors behind steep prices. The contact frame is black in color. It is 6mm thick and has a length of 71mm. The width is 51mm. We can see Thermal Grizzly branding in white color on top. CPU Contact Frame for Intel 12th Gen is printed at the bottom in white color. More importantly, there are markings on each mounting corner which are there for the specific purpose of providing aid to the user during the installation. Because installation is a bit tricky and Thermal Grizzly’s way of mentioning to tighten these screws to 0.3 to 0.6 Nm (Newton meter) is something that not all users can do because they don’t have specialized tools for that. They could have made it simple than that! Anyhow, coming back to the markings, these are your reference guide when installing this contact frame.

Looking at the backside of the contact frame, we can see a fine and précised CNC machining job. There are contours that would shift the pressure from the center to the edges.
Installation

Now coming to the tricky part of installation itself, place the motherboard on an even and anti-static surface. Leave the CPU on the socket and open the ILM lock.

Use bundled T20 wrench to remove the Intel ILM screws.

Take off the two parts ILM from the motherboard. Make sure the backplate is intact. That is why we mentioned placing the motherboard on a hard and even surface. Clean the thermal paste and its residue.

Place the Thermal Grizzly CPU Contact frame on the socket. It can only be placed in one direction as shown in the picture.

I tried the der8auer method first. You need to mark the ILM screws using some marker. This mark and the markers on the mounting corners of the contact frame are now your reference points. Start giving these screws torques in a diagonal method. Stop as soon as you feel resistance. After that, you need to give each screw a quarter rotation and you are good to go. If this sounds difficult, you can try this. Tighten these screws without over-tightening them. Once done, give each screw a 90-degree anti-clockwise rotation. I have used both methods and both are working with the same result.

Optionally, you can put thermal paste over the CPU for an even spread. I have used Thermal Grizzly Kryonaut Extreme for testing.
Testing
The following configurations were used:
- Intel i7 13700k
- EK Nucleus AIO CR360 Lux D-RGB
- GIGABYTE Z790 AORUS ELITE AX
- GIGABYTE GeForce RTX 3060 VISION OC
- Kingston Fury Renegade DDR5 32GB @ 6400MT/s CAS 32 kit
- Sabrent Rocket 4 Plsu 2TB NVMe SSD
- Be quiet! Straight Power 11 1000W Platinum PSU
- Thermaltake Core P6 TG Snow Edition in an open frame layout
- Intel core i7 12700k
- EK Nucleus AIO CR360 Lux D-RGB
- GIGABYTE Z690 AERO G D5
- Sabrent Rocket 32GB DDR5 Kit @ 4800MHz CAS 40
- GIGABYTE GeForce RTX 3060 VISION OC
- Sabrent Rocket Q 500GB NVMe SSD [For OS]
- Be quiet! Straight Power 11 1000W Platinum PSU
- Thermaltake Core P6 TG Snow Edition in an open frame layout
Test table for Intel core i7 13700k is:
| Clocks | Auto, Stock |
| Voltage | Auto, Stock |
| Power Limits | Removed |
| C-States | Disabled |
| Speed Step | Disabled |
| Rest of settings | Stock, Auto |
| XMP | XMP Loaded where available |
| Thermal Paste | Thermal Grizzly Kryonaut Extreme |
| Thermal Paste Application | Even Spread |
| Headers | CPU_FAN, CPU_OPT, and PUMP Headers |
| Stress Software | CINEBENCH R23.2 |
| Stress Run Time | 30 minutes |
| PC Idle Time | 5 minutes |
| Monitoring Software | HWInfo64 |
| OC Tool | Intel XTU |

Test table for Intel core i7 12700k is:
| Clocks | P-Cores 4.9GHz
E-Core 3.8GHz |
| Voltage | 1.320V |
| C-States | Disabled |
| Speed Step | Disabled |
| Rest of settings | Stock, Auto |
| XMP | XMP Loaded where available |
| Thermal Paste | Thermal Grizzly Kryonaut Extreme |
| Thermal Paste Application | Even Spread |
| Headers | CPU_FAN, CPU_OPT, and PUMP Headers |
| Stress Software | CINEBENCH R23.2 |
| Stress Run Time | 30 minutes |
| PC Idle Time | 5 minutes |
| Monitoring Software | HWInfo64 |
| OC Tool | Intel XTU |

A bit of note about the new platforms. We have seen AMD AM5 and Intel Alder Lake S CPUs taking more power and this time both sides have aimed at reaching the maximum clocks regardless of thermal limit. In fact, the AM5 SKUs will run into thermal limits right away depending on the cooling solution and the clocks being used. This has made testing of CPU coolers challenging because viewers/readers are not used to a new nomenclature which is what clocks are sustained under a given load using a particular cooler. That is if the cooler is capable of providing enough cooling head to sustain the high frequencies. Traditionally we are used to going the other way around that is which cooler is better in terms of thermal capacity. Despite this, we are using temperatures as a base for measuring this unit. Among other reasons is the high thermal density of these new CPUs.
The ambient temperature was in the range of 25°C to 25.5°C. Since the variation in the ambient temperature is within 1°C, we are reporting absolute temperatures in the graph. The testing is done on an open-air bench system. Once inside the chassis, the temperatures are expected to rise and would largely depend upon the optimal airflow inside the chassis.
Disclaimer: Every silicon is different hence no two same SKUs are likely to take same voltage to yield same performance at same thermals per se but margin would be close. Not every stress test run may yield the same result which could be due to various reasons like thermal paste application, ambient temperature variation, mounting pressure of the cooler, etc. This is very why we have listed our variables and their settings. Let’s take a look at the results.
Result

In our testing, we only saw a thermal improvement of 1°C. We then decided to use this contact frame on Z690 platform. Earlier it was not a part of this testing but since we did not see any fruitful result except adding stability to the CPU on Z790.

When tested on Z690, we saw a drop of 2°C in idle temperature and 4°C under load.
Conclusion
The market is continuously being flooded with third-party alternatives for Intel stock ILM on 12th and 13th-gen platforms due to the mounting issues as mentioned in the introduction of this article. Thermal Grizzly in collaboration with der8auer released their solution called CPU Contact Frame for Intel 12th Gen. This contact frame is made of aluminum material (EN-AW 7075). It is anodized making it safe for use on PCB. This contact frame replaces the Intel stock ILM but still uses the stock backplate. It has a dimension of 71x51x6mm (LxWxH). Its overall height is 6mm. Each mounting corner has markings that are important during the installation.
Thermal Grizzly in their user guide has mentioned torquing the ILM screws during the installation of this contact frame using 0.3 to 0.6 Nm force (Newton meter). Not all users have specialized tools to follow this guideline. Even I don’t have a tool to ensure this precise application. Thermal Grizzly should consider making it more convenient in their user guide. They have provided 4x screws, 1x Allen key, and 1x T20 wrench as well. These screws are intended for use on Intel 13th generation depending on the motherboard. Not all motherboards would need these screws. These are not needed on Intel 12th generation. The overall build quality of this contact frame is up to the mark of Thermal Grizzly and speaking of this, we have to mention the pricing of this contact frame as well. It is listed as USD 35.45 on AMAZON at the time of this writing. This is a steep price for sure. Thermal Grizzly has mentioned that this product is designed and manufactured in Germany, not in China. This along with specialized milling and cutting of aluminum and anodizing are the main reason behind the high price.
We are not going into this debate since the internet is filled with it. People are debating about Thermalright solution when compared with Thermal Grizzly solution. We would rather leave it to the users to decide. Thermal Grizzly has mentioned some benefits of using this contact frame:
- Lower CPU temperatures
- Easy construction
- High compatibility
- Anodized aluminum
- Compatible with Intel 13th Generation
In my naked eye, I am more interested in providing my CPUs stability for more than anything and this is where these contact frames come in handy. The installation of this contact frame is somewhat tricky but not difficult. You can watch der8auer video about the installation. We have tested the CPU Contact Frame on Z690 and Z790 motherboards. Both motherboards are from GIGABYTE. We wanted to use at least one different brand in this testing but it was not possible. We have seen a temperature reduction of up to 4°C on Z690 platform and only a 1°C on Z790 platform. One thing that I have observed is that this contact frame is easy to install on Z690 but on Z790 there was more resistance to it. I am not sure if it is tolerance playing its role or something else. Anyhow, this CPU Contact Frame provides stability to your CPU and motherboard and can bring the temperature down as well.
We were asked what could go wrong with these contact frames when we informed our readers that we are testing this contact frame. The worst that could go wrong is voiding your warranty. But there is no knowing if ILM was removed ;). You have been hinted. The worst that could go is that your PC may not boot or your RAM may not work as intended. This is because if the frame is too tightened, it would press on those memory channel paths. In fact, we have tried producing that effect. Though PC booted, the XMP could not be loaded and on next start, PC engaged in boot loop during POST with debug LEDs continuously switching between RAM and CPU. No, this contact from Thermal Grizzly will not damage your hardware in a nutshell.


