


ZALMAN CNPS20X CPU Air Cooler Review
Introduction
ZALMAN has made a good comeback with their new coolers and fans in style and performance. We tried to get our hands on their CNPS20X when we did a round-up content of high-end air coolers but COVID-19 lockdown and other factors restricted us. Now, as we are doing the second part of our latest round-up content of 240mm AIO coolers, we got our hands on the ZALMAN CNPS20X for that content. In this article, we will take a look at the design elements of the coolers and their thermal performance. We are hyped to see if this cooler is giving tough competition in the market.
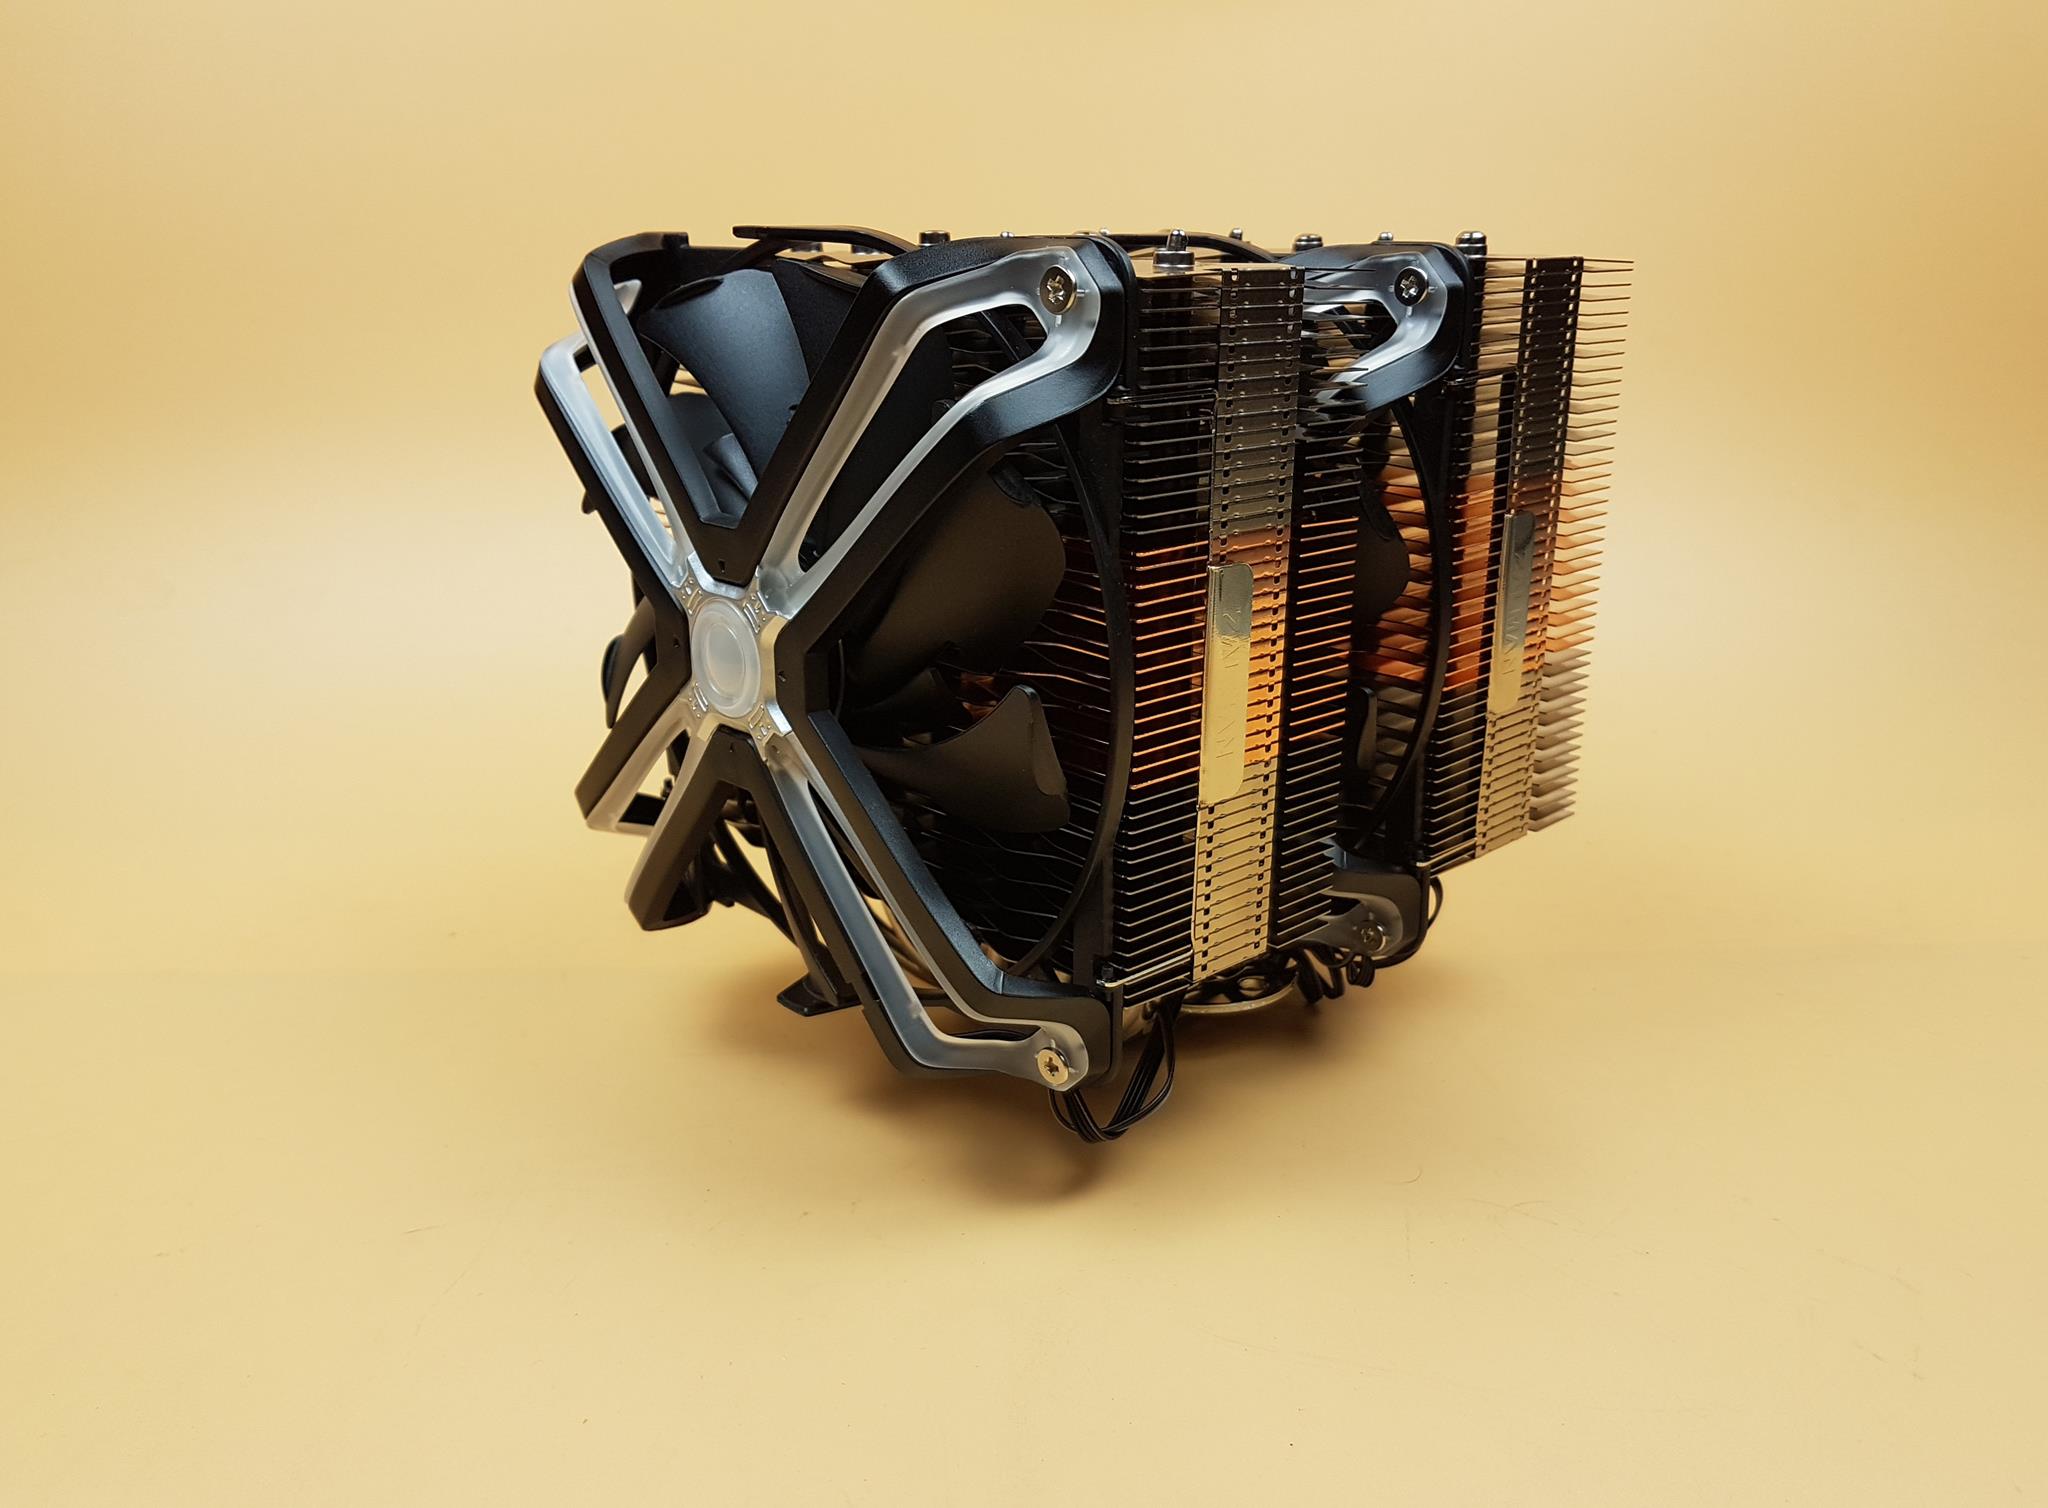
The ZALMAN CNPS20X is a dual tower configuration cooler with 2x 140mm fans. The ZALMAN marketing literature has some unheard before design elements like 4D Stereoscopic corrugated fins, 350 individual airflow channels, Reverse Direct Touch Heatpipe, Interactive Heat pipe Transfer Design, Dual-Blade spider design fans with ZALMAN patent ARGB lighting. The 4D design is a new term. I think we have not heard of 3D yet in the market least the stereoscopic aspect and spider design! Putting behind these marketing terminologies, our focus would be on the thermal performance and noise as these are key factors in evaluating the given thermal solution at hand combined with the pricing and warranty. The ZALMAN CNPS20X is compatible with AMD AM4, AM3+, AM3, and Intel 115X, 2066, 2011 V3, 2011, and 1200 sockets. Key features are:-
- Improved cooling performance by increasing the heat dissipation area 15% with the 4D stereoscopic corrugated cooling fin
- 350 individual airflow passages are formed to improve the straightness of the airflow
- Application of RDTH(Reverse Direct Touch Heatpipe), IHD(Interactive Heatpipe transfer Design) for excellent performance with minimum heat resistance
- 140mm Dual-Blade spider fans provide maximum cooling performance with unique RGB effect(ZALMAN Patent), Supports motherboard addressable RGB sync(3-Pin, 5V)
Product: CNPS20X
Manufacturer: ZALMAN
Price:
| Listed Price | Buying Links |
| US $99.99 | NewEgg |
| £79.99 | Overclockers UK |
At the time of the review.
Specifications

Dimension

Packing and Unboxing
The cooler is shipped inside cardboard-based packing material. I love the presentation aspect of the cooler when it comes to the packing.

“The World’s Best CPU Air Cooler” is a catchy phrase and we really need to test if that is truly a case with this cooler as we found this rather a bold claim. The ARGB lighting is compatible with:
- RAZER Chroma RGB
- ZALMAN Z-Sync
Since the fan guides or frames are using the standard 3-pin ARGB connectors, I am assuming that these are compatible with any standard ARGB header or interface. There is a picture of a fan with ARGB illumination on the fan guide.

The RAM clearance notes are printed here along with the picture of the cooler with dimensions and clearance data. The heat sink is mentioned to be supporting RAM height of up to 47mm. With the front mount fan the RAM clearance is 33mm though we can adjust the height of the fan to make room for tall RAM that would increase the overall height of the cooler which could have considerations with respect to the PC case. ZALMAN has mentioned that if the fan’s height is increased then a case with over 200mm clearance would be needed. The standard height of the cooler is 165mm.

The features are printed in 6 languages. The specifications are printed on the bottom.

Opening the main packing box will show cardboard made cover with the model of the cooler printed in the center.

There are 4x boxes and the user guide nicely placed inside the main packing box.
Contents
Let’s take a look at what is bundled in the box.

The user guide is comprehensive and I must say, read the user guide thoroughly before even starting the installation process. It is mentioned in the guide to wear gloves before handling the heat sink as the corners of the fin stack are quite sharp and might cut your fingers. My thumb got scratched during the installation so there is that.

We have a white color accessory box with the mounting hardware in it.

There is a container inside the accessory box containing the hardware. So far, ZALMAN is winning me over the presentation.

We have a single backplate for all the sockets be it AMD or Intel. This is where it gets a bit complicated as in their attempt to use a single backplate, one needs to be dead sure which mounting corner is to be used for which type of socket and the orientation of the backplate. I don’t have to complain about this design because many others are also doing the same but ZALMAN should take a note from Noctua when it comes to the mounting hardware and user-friendly installation. We have two Intel mounting brackets and two AMD mounting brackets.

We have:
- 4x Nuts
- 4x Clamps
- 4x Washers
- 4x Thumbscrews
- 4x Intel/AMD standoffs
- 4x Intel LGA20xx standoffs
- 2x Spring Loaded Screws

ZALMAN has provided two black color loading blocks (paddings) for Intel and AMD. They form a seal between the PCB of the motherboard and the backplate. These are compulsory.

ZALMAN has provided a small box inside the accessory box with its ZM-STC8 thermal paste. Some of the features are:
- Particle Size Control Technology Ready
- Filler Surface Treatment Technology Ready
- Optimized Bond Line Thickness

The thermal conductivity is rated at 8.3 W/m.K with a viscosity of up to 480 Pa.s. The TIM is made of Silicone Dioxide, Aluminium Oxide, and Zinc Oxide.

ZALMAN has provided a 1.5g tube of the thermal paste.

ZALMAN has provided a 3-pin ARGB (male) to 3-pin VDG format cable to support the ARGB lighting on the older model of the GIGABYTE motherboards.

There is a 2 way ARGB splitter cable named ZM-ADC80 using standard ARGB connectors.

There is a 2 way PWM splitter cable named ZM-PDC80.

The heat sink is placed insider another cardboard box with CNPS20X printed on the top cover.

Opening the box will show the heatsink nicely placed inside. There is a white color thick Styrofoam placed inside a protective cover.
Closer Look
The ZALMAN CNPS20X is a dual-tower configuration using 140mm size fans. The ZALMAN is stating this cooler to be the world’s best air cooler using 4D Stereoscopic Corrugated fins design combined with the Reverse Direct Touch Heat pipe and Interactive Heat Pipe Transfer Design. It is time to take a look at the heat sink.
Heatsink
The dimension of the cooler is 140x170x165mm (LxWxH) where 165mm is the overall height of the cooler. The fan dimension is 140x140x26mm where 26mm is the thickness of the fan. The height of the cooler with respect to the PCB is 173mm. The weight of the cooler is 1300gm. The cooler is compatible with Intel LGA115x/1200/20xx and AMD AM4/AM3+/AM3 sockets. The cooler is rated to handle the TDP of up to 300W. The heatsink comprises aluminum fins with a middle section having electroplating resulting in the copper-like color.

The top fin is silver in color. We have 6 heat pipes terminating in an alternative fashion. The heat pipes are in a single line covering the maximum heat sink area for effective dissipation. There is no branding on the top fins. Also, take note of the immediately trailing fin. The fins are placed in such a manner that every alternate fin makes a wave format. Both towers have the same layout. The pipes are soldered with the fin stack which is an effective design for the durability of the cooling solution without compromising the cooling performance.

Both towers are identical in layout. The layout of the fins is unlike what we have seen so far in other air coolers. The distance between the two fins is considerably large forming an easy channel for the air to flow through. Each fin is in a wave pattern. We have a total of 45 fins per tower. The top 15 fins are in silver color. The middle 15 fins are electroplated in copper color whereas the lower 15 fins are in silver color. Each aluminum fin seems to be 0.4mm thick. There is no V shape notch design on the heat sink.

The above picture is taken from the ZALMAN website. It highlights the 4D Stereoscopic Corrugated fin design. According to ZALMAN, this design gives 15% more surface area for heat dissipation. There are 350 individual passages for straight airflow.

The above picture shows the displacement of the heat pipes in the fin stack in an even spread.

The left and the right sides of the towers are identical. This is where the fins are joined together in the middle. There are insets on both sides of the middle area. This is where the clip of the fans are inserted to install the fans on the heat sink. The build quality is top-notch.

The above picture shows the cross-section view of the heatsink. The edges of the cooler are sharp and one needs to be careful when handling it. The overall layout is very well synced and follows symmetry.

The above picture would better show the design of the fins which the ZALMAN is terming as a 4D Stereoscopic Corrugated design. We have much larger channels across the entire surface of the fin stack for high and straight airflow.

Looking at the base of the heatsink from the top side, we can spot a cross-bar or mounting plate pre-installed on the base. It has a ZALMAN branding in the center. There are two mounting holes through which the spring-loaded screws are passed. ZALMAN should have used the pre-installed spring-loaded design for convenient installation.

The ZALMAN CNPS20X features 6x nickel-plated copper heat pipes each of 6mm thick. The cooler is not using the Continuous Direct Contact method. The heat pipes are making contact with the nickel-plated copper base. The heat pipes are evenly distributed inside the fin stack for maximum heat sink coverage. That should help with effective heat dissipation.

As mentioned above, the ZALMAN is using RDTH and IHD technologies in the CNPS20X cooler. They have reversed the Direct Touch Heat pipe technology allowing a larger dissipation area and minimizing the heat resistance. IHD increases the dual transfer of heat to increase the cooling performance. In my opinion, these are just the marketing names of what the majority of the air coolers are already using.

There is a protective sticker pasted on the base of the cooler with a warning note to peel this sticker off before the installation. The base measures 44x43mm approximately. The mounting plate is installed using 4x Philips screws and is removable.

I thought the cooler would be using a mirror finish which is not the case. The surface on the base seems rough.
FANS
The ZALMAN has provided two 140mm size fans with their CNPS20X cooler.

Both fans are placed inside a paperboard box. These are SF140 fans.

There is a transparent container inside each fan’s packing box.

Each fan comes with 4s screws and 2x clips. These are not standard fan clips that we are used to. Their installation is different.

Each clip has a hole at one end and another hole on the other end. The idea is simple. The fan clips are attached to the fan guides by inserting these clips on the hooks of the fan guides.

There is a single fan guide or plastic-made bracket provided with each SF140. These brackets have 4x rubber washers on the mounting corners. The frame has a ring and 4x mounting corners. This is the side that would face the rear of the fan. In other words, the fan is installed on the fan guide from this angle.

This side of the fan guide would face the heatsink which is why we can spot 4x anti-vibration pads on the top and bottom of the frame.

The ZALMAN has provided two SF140 fans which are open-frame designs and reminds me of DeepCool MF120 and MF120S fans. The SF140 has a dual-blade design. There is a 4-arm style bracket on the top of the fan. Each arm has a diffuser lining running across the entire length on both sides. The center of the bracket somehow reminds me of the Terminator series movies. The center house ARGB LEDs and when powered, the whole transparent lining is lit giving one heck of an AURA of colors and look.

The ZALMAN has mentioned that they are using biomimetic technology with the motif of spider legs. The housing leg structure of 4×2 (single leg has two sides though joined at the tip!) absorbs the noise and vibration from the impeller.

Looking at the back of the fan, we have 9 large size blades. These blades have cutouts on the lower trailing edges. We have 9x small size blades which almost cover the cutouts on the large size blades.

ZALMAN has mentioned that using the dual blade structure increases the airflow by pulling the wing from the outside to the inside.

There are two flat cables per fan. One is a 4-pin PWM cable to power the motor of the fan and the other is the standard 3-pin ARGB cable for the ARGB lighting.
Here are the specifications of the Fan:
| Dimension | 140x140x26mm |
| Speed | 800 ~ 1500 RPM ±10% |
| Max Air Flow | 61 CFM |
| Max Air Pressure | 1.1 mmH₂O |
| Noise Level | 29dBA ±10% |
| Fan Current | 0.18A |
| Fan Rated Voltage | 12VDC |
| Fan Power | 3.36W |
| Fan Power Connector | 4-Pin |
| LED Current | 0.3A |
| LED Voltage | 5V |
| LED Power | 1.5W |
| Bearing | Fluid Dynamic Bearing |
Installation
We have recently upgraded our Intel testbed and are now on the Intel LGA1200 socket. Installation is as follow:

Prepare the backplate by passing the nuts through the designated mounting hole per socket requirement. Make sure to read the manual beforehand.

Secure the nuts using plastic clamps. You will hear a nice click when the clamp sits. Peel off the protective cover from the back of the provided black color base cover and paste it on the center of the backplate on the designated area.

Place the backplate on the motherboard such as the nuts align with the mounting holes of the socket area. Place the 4x red color washers on the mounting holes of the socket area.

Secure the backplate using the 4x standoffs.

Above is a picture of the backplate fully installed. Note the ZALMAN text on the opposite sides of the center of the backplate for proper orientation.

Place the Intel mounting brackets by aligning the mounting holes of the brackets with the threaded portion of the standoffs.

Use the thumb nuts to secure the brackets.

Apply the thermal paste on the CPU. Peel off the protective cover from the base of the cooler. Place the heat sink on the CPU by aligning the holes on the mounting plate (preinstalled on the base) with the holes on the mounting brackets. You would need a large size Philips screwdriver preferably with a magnetic tip to place the spring-loaded screws on the holes. Too bad, ZALMAN did not cover this end by providing screwdriver with the box. They may take a note from Noctua, DeepCool, and bequiet!. This last part is tricky and may take some time to secure the heat sink with the mounting hardware properly.

Take out the fans and their fan guide/brackets from their boxes. Place the fan on the fan guide/bracket by aligning the mounting holes. Use the provided screws to attach the fan guide/bracket to the fans.

Attach the fan clips to the fan guide/brackets as shown in the picture.

The above is a picture of the fully assembled fan.
Place the fans on the front side of each tower and secure them using the fan clips. I like this idea of fan clips where we can simply push/pull the center latch of the clip to install or remove the fan easily. Connect the fans’ power cables to a single fan header on the motherboard using a splitter cable and similarly connect the fan’s ARGB cables to the 5V header on the motherboard using an ARGB splitter cable. There is no dedicated controller provided with this cooler.
Clearance
This cooler has clearance considerations being a high-end dual tower configuration. The dimension of the cooler is 145x172x165mm in default configuration with the fans.


The height of the cooler itself is 165mm. Once installed on the motherboard, the total height would be 173mm. The heatsink has a clearance of up to 47mm for the RAM without a front fan. When the fan is installed, this clearance reduces to 33mm. We can adjust the height of the front fan but this would increase the overall height of the cooler. Make sure your chassis has enough room for this cooler.

Since the T-Force Nighthawk RGB DDR4 RAM has more height on the ends, the front fan had to be raised during the installation by some 25mm. Now, the overall height of the cooler stands at 198mm.

We did not spot any clearance issue for the first PCIe X16 slot on the MSI MAG Z490 TOMAHAWK motherboard.

We did not spot any clearance issue with regard to the top of the motherboard either.
Here are a few of the pictures with fans installed on the heat sink.


ARGB Lighting
The ARGB lighting on these fans is something different that we have not seen yet. This may not be a taste for the all but still, the ARGB lighting looks good personally. They are subtle and not overly done. We have used the MSI MYSTIC LIGHT SYNC application to control the lighting and found these to be working flawlessly.


Testing
We have upgraded our Intel testbed recently. A few coolers have been tested on this setup. More will be added after the testing in the coming time.
Following test benches have been used: –
- Intel i7 10700k
- MSI MAG Z490 TOMAHAWK
- T-Force NightHawk RGB 16GB @ 3200MHz
- Nvidia GeForce GTX 1080 FE
- addlink S70 256GB NVMe SSD
- bequiet! Straight Power 11 850W Platinum PSU
- Open-air test bench
Here is the settings table for testing:
| Clock (MHz) | 3800 All Cores |
| Voltage (V) | 1.025 |
| Clock (MHz) | 4700 All Cores |
| Voltage (V) | 1.255 |
| Clock (MHz) | 5100 All Cores |
| Voltage (V) | 1.345 |
| Turbo Boost | Disabled |
| C-States | Disabled |
| Speed Step | Disabled |
| Thermal Paste | Noctua NT-H1 |
| Thermal Paste Application | Dot Method in the center. |
| Test Run Time | 30 minutes |
| Idling Time | 10 minutes |
| Fan Speed | 100% PWM Duty Cycle and Auto PWM |
| Header | CPU_Fan header for the fans |
| Software | AIDA64 6.3 Extreme [FPU] |
We are using Noctua NT-H1 thermal paste for coolers testing. Using the same thermal paste for all coolers would ensure standardization. Delta temperatures are reported on the graphs. The testing is done on an open-air bench system. Once inside the chassis, the temperatures are expected to rise and would largely depend upon the optimal airflow inside the chassis.
Not every run of the stress test may yield the same result. This could well be due to many factors like mounting pressure, thermal paste application, varying ambient temperature. Not to mention the silicon differences even among the same category of the chips. Hence, it is pertinent to mention the testing methodology along with the specifics.

The coolers are also tested using the Auto PWM function. MSI is using Smart Fan mode in the UEFI/BIOS which is not pure Auto PWM but it is what is available to us. The above picture shows the MSI default fan curve for the Smart Fan mode. Since all the coolers will be tested using the same configuration and settings, the same margin of error applies to all.
We have tested the Noctua NH-D15 as well for comparison. Let’s take a look at the results.
3.8GHz All Cores

There is a difference of 1.2°C between both air coolers (we have only two air coolers in the graph) with Noctua sitting on the second spot in the graph.
4.7GHz All Cores

The difference has increased to 2.2°C between both air coolers. Noctua again has the upper hand here.
4.7GHz All Cores [Auto PWM]

The difference is 1.1°C between both air coolers which goes to show that PWM regulation is good on ZALMAN SF140 fans as they were able to reduce the thermal difference on the Auto PWM settings.
Fans’ Speed on Auto PWM

The above graph shows the maximum speed attained by the fans on the Auto PWM. For comparison, we have included the rated speed of the fans to have a reference in determining the Auto PWM range. The ZALMAN SF140s were operating at 1355 RPM as compared to the 1055 RPM on the Noctua fans.
5.1GHz All Cores

Now coming to the ultimate challenge of handling the CPU with all cores set to run at 5.1GHz using 1.345V, the ZALMAN CNPS20X is doing 58.7°C delta. Noctua NH-D15 still has the upper hand with a difference of 2.7°C.
Noise
The maximum recorded noise level on the PCCOOLER GI-CX360 was 51 dBA in an ambient noise level of 33 dBA.
Conclusion
The ZALMAN CNPS20X is their enthusiast air cooling solution coming in the shape of a dual-tower configuration with two SF140 fans. The dimension of the cooler is 148x170x165mm (LxWxH). The height of the cooler with a fan is 165mm. The cooler weighs around 1300gm with the fans. The cooler is compatible is with Intel LGA115x/1200/20xx and AMD AM4/AM3+/AM3 sockets. The ZALMAN CNPS20X features 45 fins per tower with the middle 15 fins having electroplating giving them copper color. They are still aluminum fins! The cooler comes with 6x 6mm thick nickel-plated copper heat pipes.
The fin stack is not dense as compared to the standard or what we can say traditional heat sink layout. Each fin is in the wave design and interleaving fin stacking creates what the ZALMAN is referring to as 4D Stereoscopic Corrugated design. 4D seems more of an illusion! This design has resulted in 350 individual channels for high and straight airflow. ZALMAN has also mentioned being using RDTH design (Reverse Direct Touch Heat pipe) in which the heat pipes are making contact with the upper surface of the block. This is combined with the IHD (Interactive Heat Pipe Transfer Design) which allows tow way heat transfer. The base of the cooler roughly measures 36x30mm. It is nickel-plated but not in mirror finish. The mounting plate is pre-installed using 4x screws and is removable. The complete assembly is soldered.
ZALMAN has provided their SF140 fans. These are open-frame designs reminding me of the DeepCool MF120/S fans. These are dual blade design which according to ZALMAN is specifically made to increase the directed airflow. ZALMAN has mentioned that they are using biomimetic technology to motif the spider legs by having 2×4 legs structure on the fans. This is done to achieve noise and vibration absorption from the impeller. Each of these legs feature a transparent lining with ARGB LEDs housed in the hub. The ARGB lighting spreads evenly to the legs to create something new here. ZALMAN has patented this ARGB implementation. What is more interesting is the fan guide or the bracket which has been provided. The fans are installed on these brackets so that the assembly can be installed on the heat sink. The fan clips are different than what we are accustomed to.
These fans are using Fluid Dynamic Bearing. They have a speed rating of up to 1500 RPM ±10% at a mediocre static pressure of 1.1 mmH₂O. The fans have a life span of 100,000 hours. The fan motor needs 3.36W per fan and 1.5W for LEDs per fan. The noise rating is 29.0 dBA ±10%. There was a strange humming noise from the fans during the testing. Speaking of the mounting hardware, one would need to use 26 components to install the cooler. The installation though is tricky but if we compare it with non-Noctua coolers then it is not that different. What I have loved to see is the spring-loaded mounting plate and a long screwdriver to make it convenient for the user. The overall installation experience was not convenient.
The ZALMAN CNPS20X has an MSRP of US $99.99/£79.99 at the time of the review. We have recently updated the Intel test bench hence we don’t have enough coolers for the reference but for this content, we tested the Noctua NH-D15. The thermal performance of the ZALMAN CNPS20X is decent but the pricing is steep. ZALMAN is giving one year warranty which should have been a minimum 2-3 years to remain competitive. This cooler with its magnitude and stunning yet distinct ARGB lighting can handle the given work load.


