
Introduction
Manufacturer: NZXT
Product Page: H400i
Purchase: £144.95 At the time of review
NZXT is a well-known PC case manufacturer and while the offer some other products, PC cases have been their bread and butter for years. NZXT has always pushed the boundaries of innovation and continues to do so to this day. Not being afraid to shy from the norm has worked well for NZXT over the years and they have some of the most sought after cases for PC gamers and enthusiasts alike. From their Phantom range of cases which were there first to catch my eye, up to their newer H440 and S340 all the way to today’s offer, the H400i, NZXT has an extensive catalogue of cases! If for some odd reason you’ve never really checked them out, I would suggest you go have a look at what they offer. While not everything is for everyone, NZXT cases offer great functionality alongside unique looks and innovative technology.
Today I am looking the H400i which is designed for M-ATX motherboards. The H400i features a tempered glass side panel and on first look, it seems similar to the S340 cases though there are some notable differences, even in the image on the packaging. Alongside tempered glass, the H400i also feature RGB LEDs which are currently all the rage. Even though this case is not monstrous, it still has plenty of room for an AIO and some pretty impressive hardware! There is plenty of room for longer graphics cards up to 411mm in length, enough room for CPU coolers up to 164mm tall and plenty more stuff!
The packaging is what we would expect to see from NZXT. The overall look is very clean, the main side shows an image of the case with a warning that is features tempered glass. Along with this, we also have the NZXT logo, H400i product number and some text to let us know it is a Micro-ATX Case.

On one of the sides you will find all the information you should need to decide if this is the case for you or not. Here we can see a list of features, specifications, clearance and more. This will allow you to assess whether or not all the hardware you have or plan to get will fit inside the H400i.

Inside the case is a small accessory box that comes loaded with some goodies. Inside we can find loads of different sized screws, standoffs, zip ties and even an extra LED strip!

Closer Look
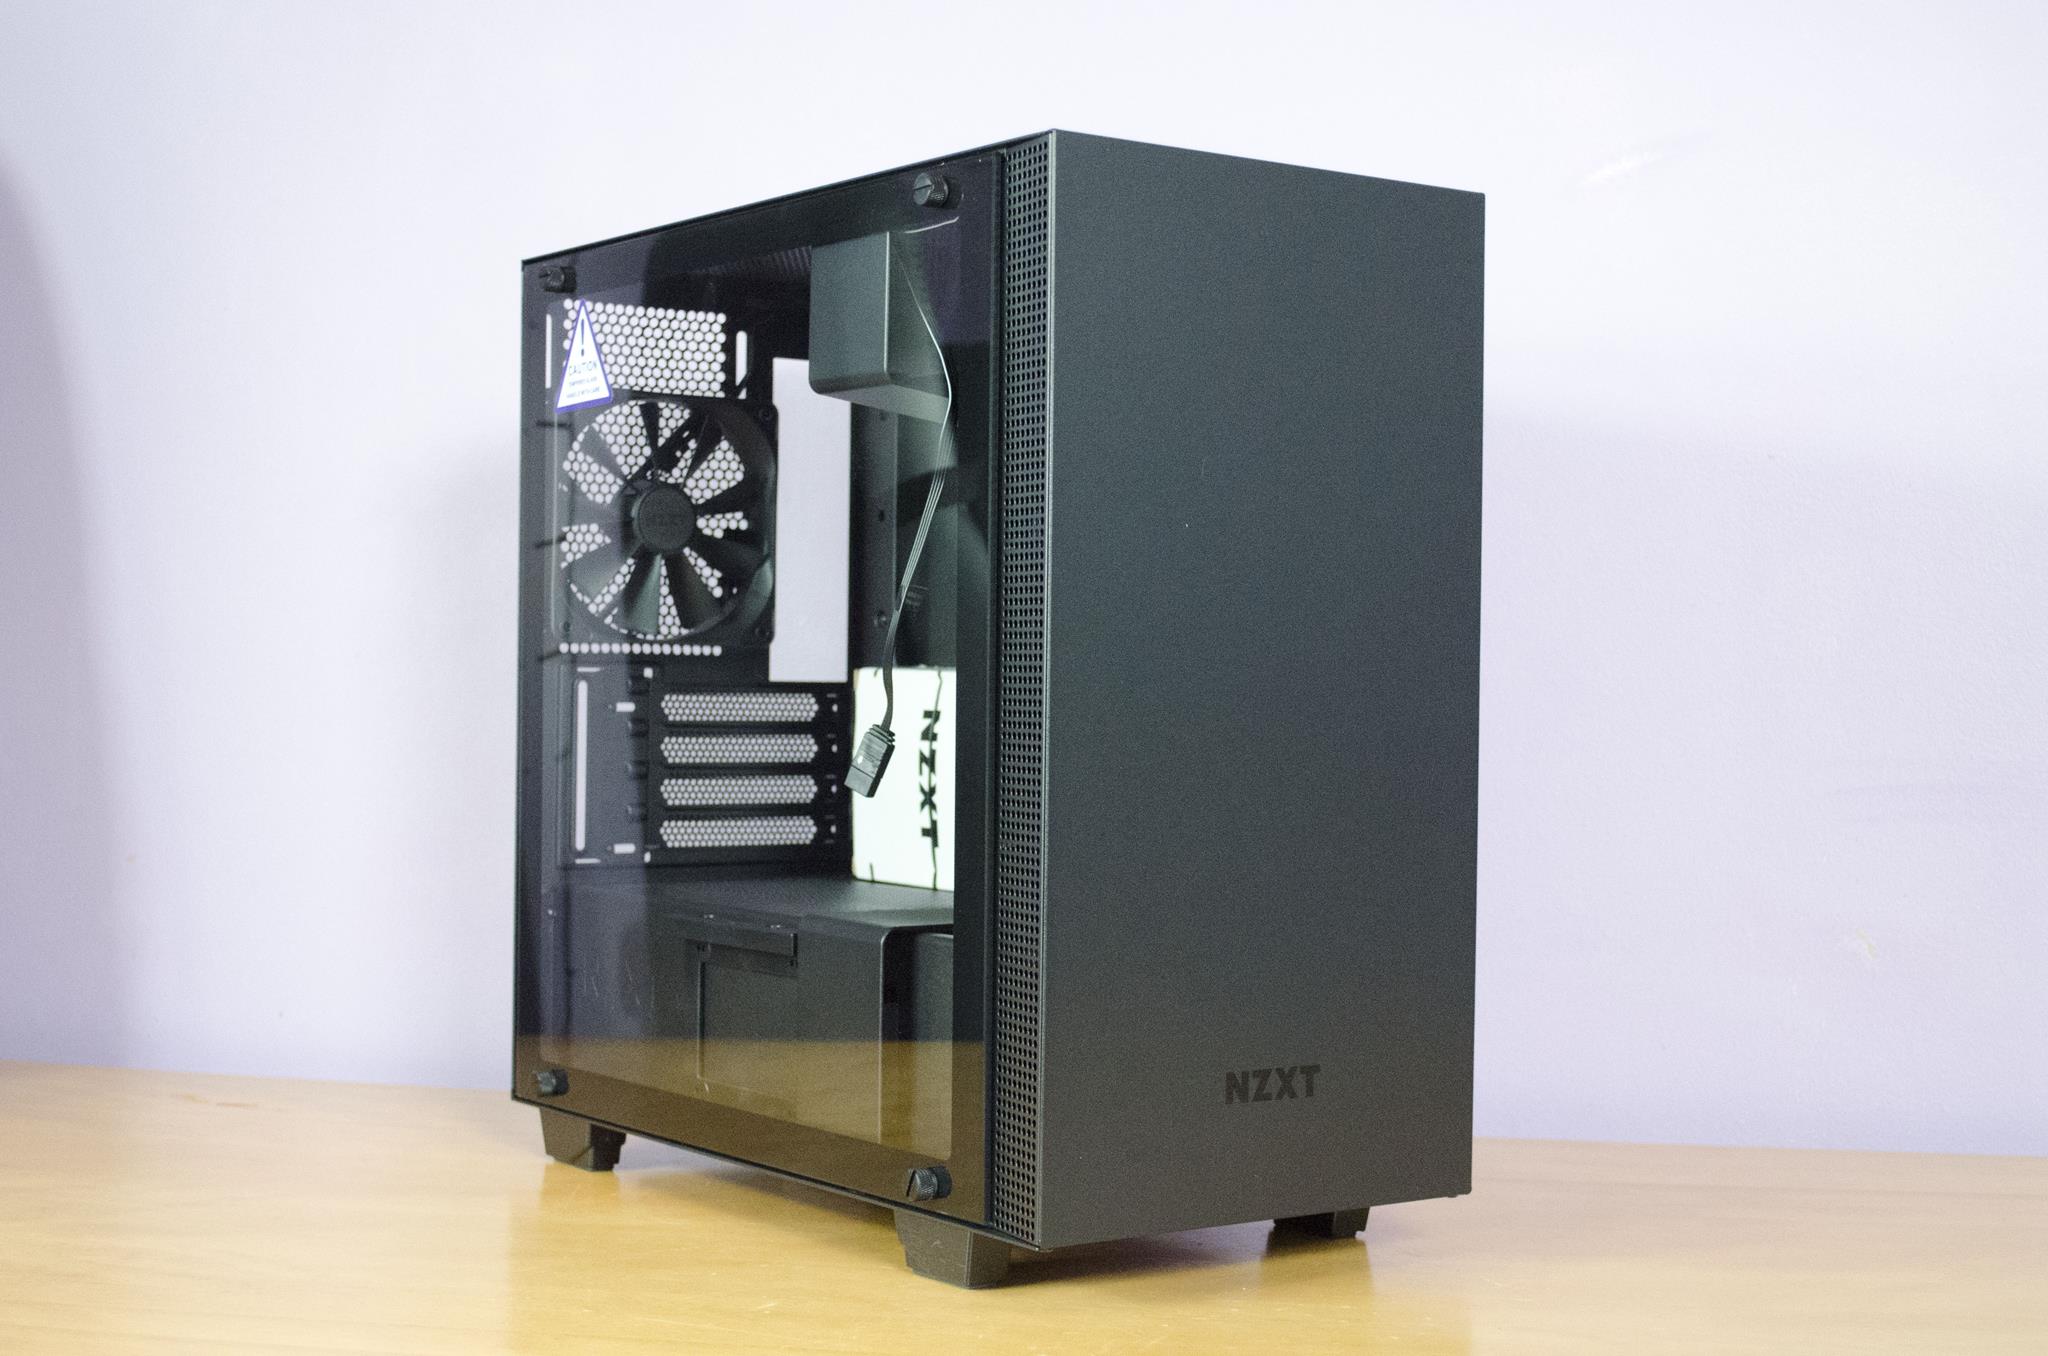
The H400i has a lot to offer and one of the first things I noticed was its simplistic yet elegant look. The front is matte black and features a small NZXT logo towards the bottom. On the side of the front panel are ventilation holes so when front intake fans are mounted to the case they have somewhere to pull air in from.

While some people prefer a full mesh front panel, I am fond of the side vents. These vents are able to allow plenty of air to be pulled into the case and not having the whole front panel mesh helps to reduce the noise that comes out of the case.

The tempered glass panel covers the whole side of the case except for the wents on the front panel. The tempered glass is held onto the case with four thumb screws, one in each corner.

On the back, we have the standard motherboard and PSU cutouts alongside four PCI Expansion bays. We can also see the rear exhaust fan that can easily be moved up or down depending on your component configuration inside the case. To slide the fan up or down, simply loosen the screws a tiny bit and move the fan to the desired position then tighten them back up.

Keeping with the simplistic look, the H400i’s secondary side panel is plain matte black and matches the front panel.

The front IO is on top of the case and features a power button, 2x USB 3.0 in NZXT purple and the mic/audio out inputs.

The mesh on the top vents is magnetic which means its easily removed. Now, there are a couple reasons to take this off. The first is so you can install your AIO or fans a bit easier, the second is to clean and lastly is if you want the best possible airflow available from the case. While the magnetic mesh still allows for plenty of airflow, there is no denying that it does block some air from passing.

NZXT was making sure to look after us and in doing so, they have added an easily removable filter to the ventilation for the PSU fan. Pulling this filter out from the bottom back of the PC will allow for easy cleaning and when inserted will help to keep all that nasty dust out of your PSU. Those who keep their PC on the floor will surely benefit from this!

Working our way into the case and taking the front panel off reveals a nice sized removable fan filter. While you can already see some fans mounted inside, this filter is big enough so you’ll be able to mount an AIO or fans inside the filter itself if you so decide.

Taking the filter off and we can house a 240mm or 280mm AIO or a pair of 120mm or 140mm fans. Again, we see the mounts where you can move the fans up and down a bit to help get it into the right position depending on what hardware you have inside.

There is quite a bit going on inside the H400i. While this is a Micro-ATX case, don’t for one second think that means it’s lacking in features. One thing you will either think is brilliant of hate, is the main cable area where cables pass through from the back to the front. NZXT has recently been adding these bars here and while they are easily removable that would leave a massive eyesore to the cables behind it. A lot of people have some very mixed feelings about these. Personally, I don’t really mind them and do find they make a nice change from the standard holes with rubber grommets in them.
As this is a Micro-ATX case, NZXT has decided to add a SSD mound to the front side of the PSU cover rather than the top as we see with a lot of cases. This is to do with the size of the case and NZXT not wanting to obstruct any components you may want to fill the PCI expansion bays up with. Looking at it from the inside and we can see the front intake fans and how they are mounted on the outside of the bracket and would easily allow for an AIO to be installed in this space. One thing I was really happy to see was the rather large cable passthrough hole on the top of the motherboard tray. This will give users ease of access to anything on the topside of their motherboard with minimal effort.

The cable management bar as I liked to call it can be removed by taking out the screws in the top and bottom and then simply sliding it out. The main reason to remove this would be if you were installing a larger AIO radiator into the front mounts as while not impossible, the cable management bar will definitely be in the way a bit. You may also need to remove this when installing power and SATA cables to a front mounted SSD should you put on in the frontside bay.

Not a lot going on towards the rear of the case. We can see the rear exhaust fan. One thing you might be wondering now is why is the main hole in the motherboard tray so massive? Well, that is to make sure that CPU cooler installation and changing goes as easy and smooth as possible without having to take the motherboard out of the case. There is nothing worse than having to disconnect everything from the motherboard and take it out to replace a cooler and NZXT have done their best to combat that in the H400i.

Taking a look at the backside of the motherboard tray and one of the things I noticed first was NZXT’s cable management. They have already started you off with some great cable management which should hopefully make things easier to have a nice clean build. Looking around and there are also plenty of ways to route your cables and secure them so they stay in place. There is also plenty of room where the power supply will be to stick cables out of the way! NZXT has also gone and added a fan controller and two SSD mounts to the back side of the motherboard tray. While some people like to show off their SSDs, some will appreciate being able to hide them out of the way and out of sight.

Final Build
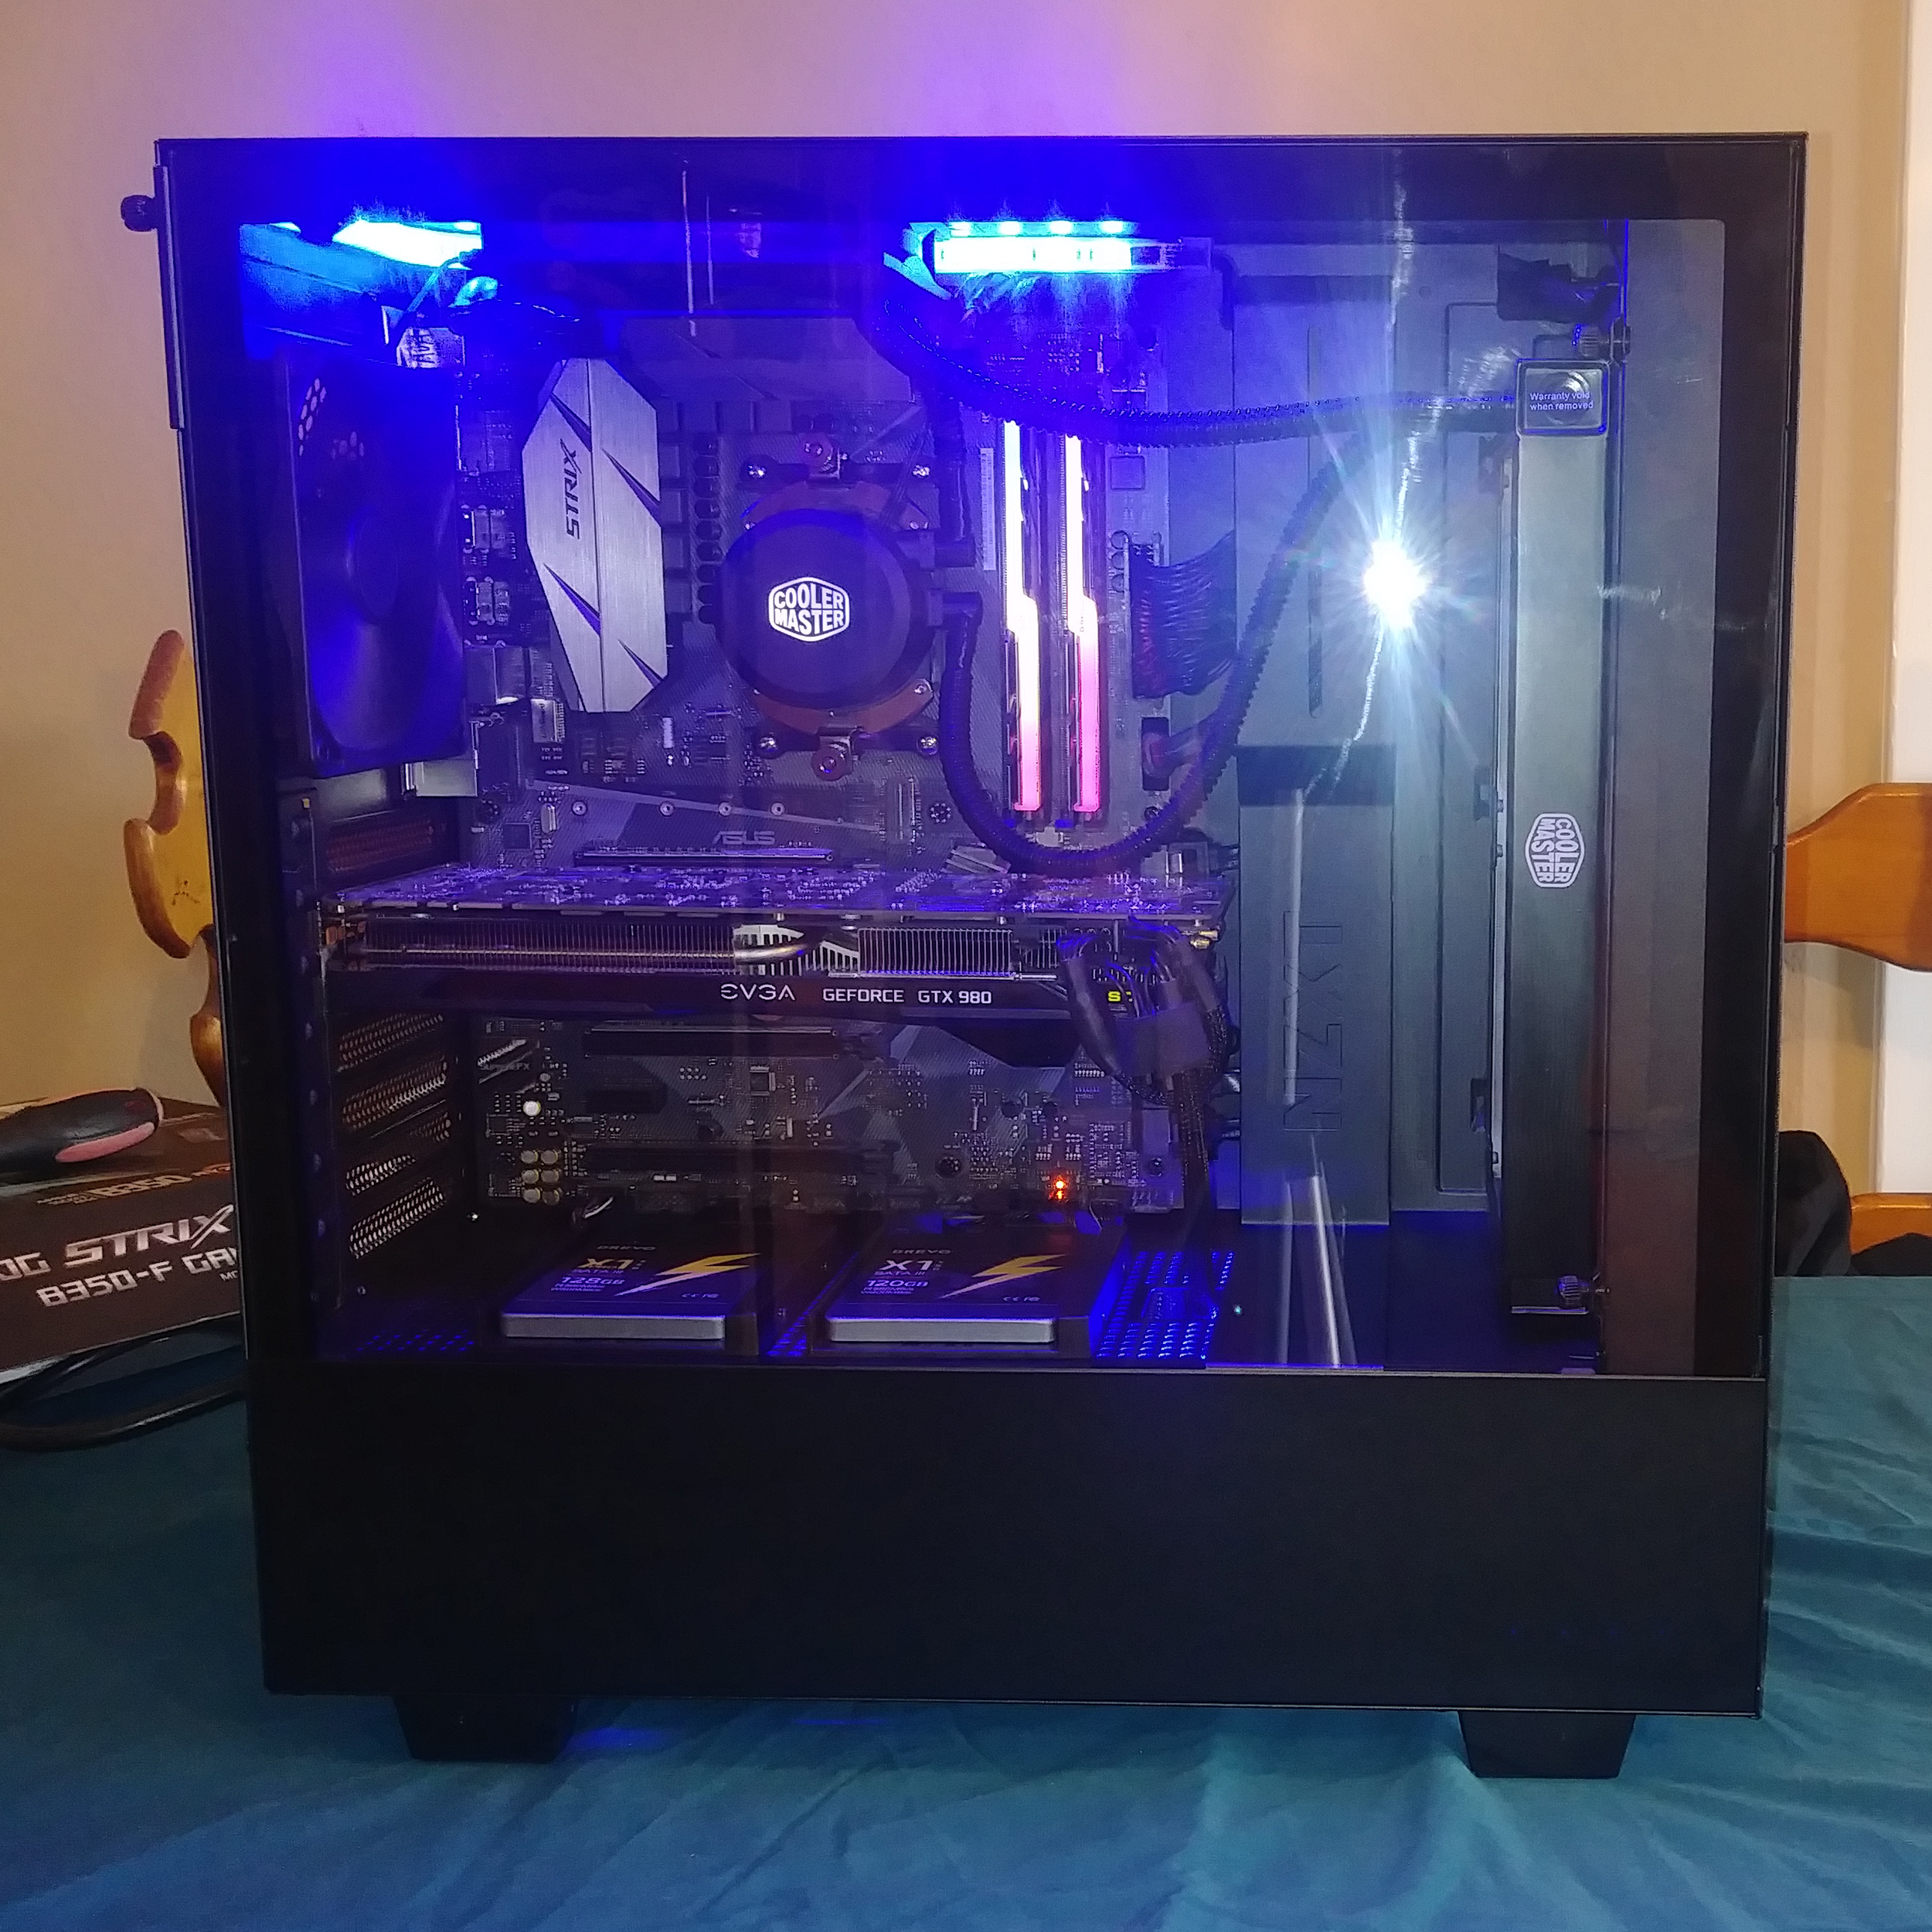
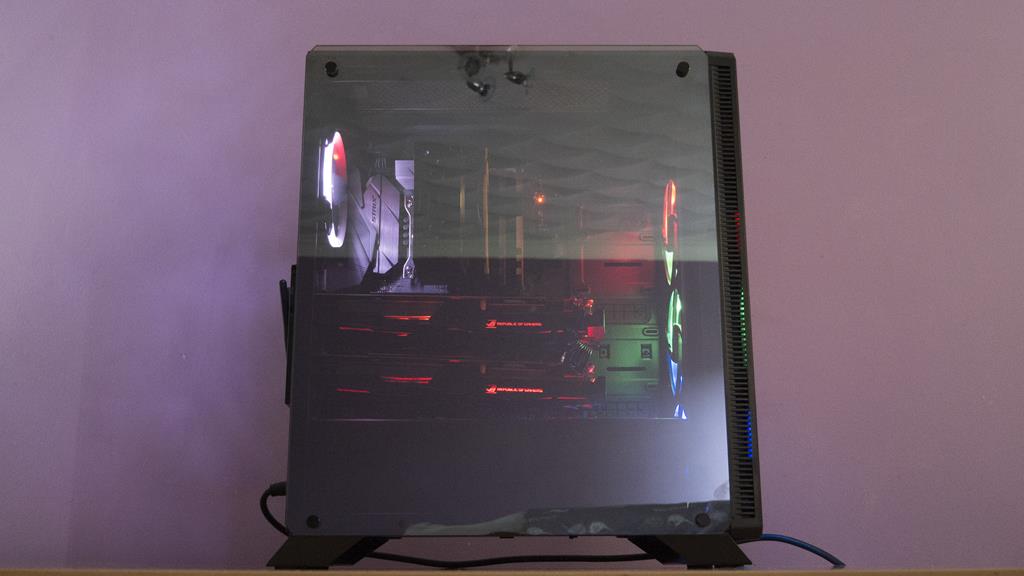
It has been awhile since I have done a build in a smaller case but I didn’t run into any issues with the H400i. When building inside this case, everything went smoothly and there were only about 2 seconds of worry that was easily overcome. When installing the Kraken X42 AIO, it was a very tight fight against my 24-pin power cable on the motherboard. However, as you can see below it fit without any real issue and I was quite relieved about this. Aside from that, everything else fit with ease. As you can see an NVIDIA GTX Titan GPU fit with plenty of room to spare and the cable routing was easy as can be. NZXT has put a lot of time and effort into making sure users are left with the easiest and cleanest looking cable management as possible and it really shows with the H400i. In saying this, please pay no attention to my 24-pin cable as unfortunately the cable itself is ridiculously short and this was the only way to route it so that it would plug into the PSU. This is to do with the cable itself and nothing at all to do with the case. While there is certainly no denying fitting the AIO Cooler was a bit tight, it went in without issue and there is plenty of room for everything else so overall, the internal of the case are well laid out.

It is also worth mentioning that while we were unable to show it due to hardware failure(our motherboard died, nothing to do with the case!) this case does feature RGB LEDs. As well as the spare strip we saw in the accessories box, there is also a strip already installed in the case itself. The H-series cases also come in two other sizes if Micro-ATX is not for you!
Conclusion
Performance and Design
There is no denying that this case looks amazing with or without a build inside it. NZXT has done a great job at offering a Micro-ATX case that features a simplistic yet elegant design and has plenty of features. While the H400i does come in a couple of different colour options, the all black version is very sleek and should fit in just about anywhere. The Tempered glass side panel which we are starting to see more and more of these days is a great way to get a view of the internal components and will allow users who want to, to really show off their build. Even with being a Micro-ATX case, there is still plenty of room for cooling, from fans to AIO’s NZXT have done a great job at allowing you to incorporate both of these into your PC with ease. There is also plenty of room for those looking to install a full custom loop water cooling unit into the H400i.
While there is plenty of room for storage devices, two of the SSD mounts are found on the backside of the motherboard tray. This will allow users to show off their primary SSD inside the case and then hide any other drives out of the way as to not make the build look cluttered. While I am all for showing off your SSD, those who may not have matching SSDs may like being able to hide them out of the way. Let us also remember that the cable management options, in this case, are very good and should leave everyone with a clean looking build, even if this is your first time building in a PC you should have no issues routing your cables in the H400i.
Value
Coming in at around £145 at the time of review, this case definitely costs a pretty penny. While value for money can be a very subjective issue, there is no denying the H400i is a feature packed case that offers a great design. Thanks to the H400i’s design, users will be left with a clean and amazing looking build inside the case as not only is there plenty of room for components, NZXT have made sure everything is where it needs to be. From fan mounting to cable management, NZXT has laid out the H400i great and really made it enjoyable to build in. If you are looking for a very clean looking case that features a tempered glass side panel so you can show off your build, the H400i is definitely a great option and well worth considering.

Many thanks to NZXT for sending in their H400i Micro-ATX Case for this review!


