


ALPHACOOL Rise Flat Reservoir D5 and Apex VPP Pump Review
Introduction
ALPHACOOL released a new reservoir named Rise Flat Reservoir. It is available with D5 and DDC pump tops separately. The user can buy a pump/reservoir combo as well. This expansion tank stands at 120x120x50mm making it an ideal choice for cases that are space constrained. To spice things up, ALPHACOOL has provided an ARGB LED strip that the user can integrate into the reservoir for some vivid visuals on the expansion tank. It is made of Acrylic material and has a capacity of 200ml.
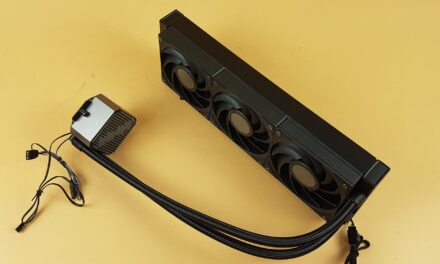
ALPHACOOL has also released a new pump named Apex VPP. This pump is compatible with D5 and VPP pump tops. The pump is powered by a SATA connector which is wise implementation and there is a 4-pin connector as well that can be used to control the speed of the pump. The pump’s maximum rated speed is 4500 RPM with a maximum flow rate of 340 L/H at a 4.25m pressure head.
| Product | Price |
| ALPHACOOL RISE FLAT D5 Reservoir | €104.98 |
| ALPHACOOL APEX VPP Pump | €74.98 |
Specifications
Reservoir

Pump

Packaging and Unboxing

The pump is shipped inside a brown color cardboard box. The pump is from ALPHACOOL’s VPP series.

ALPHACOOL has listed generalized benefits of this pump like energy efficiency, silent operations, etc.

Opening the box will show the pump enclosed in bubble wrap.

The Rise Flat Reservoir is shipped inside ALPHACOOL’s standard packing box made of cardboard.

Opening the box will show the contents. Our unit came with an Apex VPP pump pre-installed.
Contents
Let’s take a look at what is bundled with the reservoir.

ALPHACOOL has provided a comprehensive guide and we would suggest that users check the guide first and look at the installation instructions carefully.

There are two sets of mounting brackets. These are 120mm size brackets. One set has more depth to it compared to the other set. Both serve different purposes as specified in the manual. Use the Extended brackets if you want to show the front side of the reservoir. In this configuration, the pump side will be facing the fan mount. Use the normal size bracket if you want to show the pump side of the unit. In this configuration, the flat side of the unit will face the fan mount.

ALPHACOOL has provided:
- Plug Removal/Installer
- Hexagon Allen key
- 4x M3x6 Screws
- 4x M4x6 Screws
- 1x Transparent Stop Plug
- 1x Washer

There is an ARGB LED strip that is using JST connector. ALPHACOOL has also provided a digital RGB cable adapter which can be used to connect the reservoir’s proprietary connector to the motherboard 5V 3-pin header.

There is a ring bracket for the D5/VPP mount. It is secured using 8x screws which are M4x12.
Closer Look
Let’s start with the Apex VPP pump.

The dimension of the unit is 65x65x41mm. The housing of the unit is made of aluminum material whereas the pump material is synthetic. It is in a black color finish. ALPHACOOL has done a good job in the overall finishing.

Looking at the bottom of the pump housing, there is an ALPHACOOL branding with nothing else. The pump’s SATA and 4-pin PWM cable are coming out from one end. The cable is nicely sleeved.

ALPHACOOL has made some design changes. Looking at the top of the pump, we can see that ALPHACOOL has employed ceramic bearings. They have moved the motor’s coil from the inside to the outside. This has resulted in smooth and stable running of the pump which has also improved the power efficiency.

Looking at the side of the pump’s housing, there is a sticker label. The operating voltage of the pump is 8V to 13VDC. The pump supports a maximum coolant temperature of 65°C. The minimum speed of the unit is 2500 RPM and the maximum speed of the pump is 4500 RPM. The pump is designed in Germany and made in China.

I appreciate ALPHACOOL for using the SATA connector instead the MOLEX connector. In about time, they have made a much-needed change. We can see the 4-pin PWM connector. However, it seems like only two pins are active. We will see in the testing if that has any effect.

There is a gasket O-ring provided in the box. There is no mounting ring or bracket provided with the box. I assume this is due to the fact that the ALPHACOOL reservoirs come with those brackets.
Now that we have taken a look at the pump, it is time to switch our attention to the reservoir.

The ALPHACOOL Rise Flat Reservoir D5 is an acrylic made expansion tank that has a dimension of 120x120x50mm. That is the specialty of the design. This expansion tank has a length and width of 120mm fan size. However, it has a height or thickness of 50mm which is understandable.
ALPHACOOL has designed this unit keeping in view the space constraints in the SFF builds where there is not enough space and by keeping the overall size in the 120mm fan size, they have ensured maximum compatibility. The reservoir can be installed on the radiator or in the case. Please keep in mind that it can’t be mounted on the 140mm size mount.
The above picture shows the front view of the reservoir. There is a single port here that can be used to fill the tank. It already has a stop plug. These plugs are made of plastic material and can be roughed out easily so handle them with care. There is a single gasket running on the entire length of the frame. The coolant can’t come out of this domain. There are a total of 10 screws used on one side of the expansion tank to secure the two-body unit. We can see a dedicated portion in an almost L shape cutout for the reservoir. there is an opening on the base from where the coolant will flow towards the pump top.

The above picture shows the backside of the unit. This reservoir has a pump top for the D5 and VPP pumps. You can’t use the DDC pump on this particular unit. The DDC version of the Rise Flat Reservoir is also available. Pay attention to this information when buying.
There is a black color plate on the left side of the unit here with the ALPHACOOL branding. It is removable. There is another G1/4” port on the top left side. It does not have a stop plug. Seems like it is supposed to be used for filling the tank, by default. However, it is up to the user to decide which port to use as this tank has a total of 6x G1/4” ports. The two ports on the base are dedicated and they can’t be used for any other purpose. It is important to use them as specified in the user guide.

The above picture is taken after removing the black color plate from the unit. Look at the running of the gasket. There are 12 long screws used on this side to secure the block. ALPHACOOL has done a fantastic job in the overall layout and finish. The small holes around the pump top are where the M4x12 screws will go in to secure the pump to the reservoir.

The above picture shows the base of the unit. I am calling it the base because the pump has to be kept on the lower side when the unit is to be installed. There is a black color stop plug installed. It is on the dedicated Inlet port. The port facing the pump top is the dedicated Outlet port. There is another refill port on the corner of the unit.

There is another refill port on the top of the unit. It also has a stop plug pre-installed.

The above picture shows the other side of the unit. It is flat and does not have any refill port.

The above picture shows the ALPHACOOL Apex VPP pump installed on the unit. Take a look at the mounting ring. The pump is passed through this bracket/ring and then secured using the M4x12 screws. The black color plate on the left side now makes more sense and gives a pleasant outlook to the unit.

The above is a close-up view of the unit from its front side. I like the aesthetic and flow of the layout.

The above picture shows the dedicated ports on this unit clearly. The port under the pump top is the OUT port and the port on the left with a black color stop plug is the dedicated IN port. Pay attention to these.

The above picture shows the normal-size brackets installed on the unit. Pay attention here as well. Using the standard size brackets, the pump side of the reservoir will be facing you meaning the pump will be visible in the overall build.

The above picture shows the bracket installed on the unit.

Notice the thickness of the threads of the screws in the above picture. One set is of M3x6 size whereas the other set is M4x6 size. Use the M3x6 screws to install the brackets on the radiator and use the M4x6 screws to install the brackets on the reservoir.

The above picture shows the unit with the extended brackets installed on it focusing on the side view of the unit.

The use of the extended bracket gives enough clearance for the pump to face the radiator or the fan mount in the case. The extended brackets are used when you would want to show the front side of the reservoir in the build.


The above pictures show the various angles with the extended brackets installed on the unit.

The above picture shows the ARGB LED strip placed on the inset on one side of the reservoir. Place the ARGB LED strip with LEDs facing the reservoir body unlike how it is shown in the above picture. Be gentle and careful not to damage any LED. Keep the strip there and then install the bracket, the bracket will cover the LED strip and will keep it there. You can peel off the cover on the backside of the strip and the strip will paste on the bracket for a secure installation.
Test Set-Up
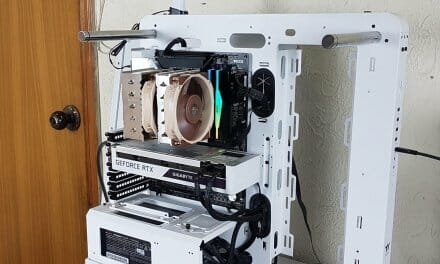
To test the combo unit, we set up a loop on the AM5 platform. My hands were tied as I ran out of the tube and made do with what I have left. I have set up the ALPHACOOL Eisblock XPX EDGE AURORA Digital RGB- Full Brass and Eisblock XPX PRO AURORA Digital RGB – Full Brass so that they can be connected to the ALPHACOOl NexXxos XT45 1260 SuperNova radiator any time. The loop needed to be set up without disturbing the tubes on the Edge block. Anyway, thanks to ALPHACOOL the tubes are on the way at the time of this writing.
We have set up a loop using the following configuration:
| CPU Water Block | ALPHACOOL Eisblock XPX Edge AURORA Digital RGB – Full Brass |
| Reservoir | ALPHACOOL Rise Flat D5 |
| Pump | ALPHACOOL Apex VPP |
| Tubes | ALPHACOOL TPV 16/10mm |
| Fittings | ALPHACOOL EISZAPFEN 16/10 Straight and EISZAPFEN HF Quick Release Connector |
| Radiator | ALPHACOOL NexXxos XT45 240mm |
| Fans | Noctua NF-A12x25 PWM |
Digital RGB Lighting
The ALPHACOOL Rise Flat Reservoir D5 comes with an ARGB LED strip. We have used the strip on the reservoir. The strip is using a JST connector. ALPHACOOL has also provided an adapter cable so that the user can connect the cable to the 5V, 3-pin ARGB headers on the motherboard. We have used a GIGABYTE motherboard for this testing. The RGB FUSION 2.0 detected the strip and it was working flawlessly.


Testing
The following test configuration is used: –
- AMD Ryzen 7 7700X [5.2GHz, 1.260V]
- GIGABYTE X670E AORUS MASTER
- XPG LANCER RGB 32GB @ 6000MHz DDR5
- Colorful GeForce iGame GTX 1050Ti 4G [For Display]
- Sabrent Rocket 4 Plus 2TB NVMe SSD
- bequiet! Straight Power 11 850W Platinum PSU
- Thermaltake Core P6 TG Snow Edition in an open frame layout
We have used Alphacool Subzero thermal paste for testing. The other Alphacool AIOs were tested using the same thermal paste. The testing is done on an open-air bench system. Once inside the chassis, the temperatures are expected to rise and would largely depend upon the optimal airflow inside the chassis. Cinebench R23 is sued to stress test the CPU and HWInfo64 is used to monitor the sensors.

The graph is self-explanatory. This level of performance is coming at a much better noise output compared to the DeepCool’s LT520 which is a 240mm AIO cooler.
We have also tested the flow rate of the pump by setting up the following configuration:
ALPHACOOL Rise Flat Reservoir D5 è Apex VPP è Thermaltake Pacific TF1 Flow Rate and Temperature Sensor è ALPHACOOL Rise Flat Reservoir D5.
This way we have ensured that there is no block that could restrict the coolant flow and can measure the absolute flow rate of the pump in question. The maximum flow rate was 569 L/H which is way above the rated 340 L/H. the reported temperature of the coolant was 15°C. The ambient was 14°C at that time.
Conclusion
We have tested the ALPHACOOL Rise Flat Reservoir D5 and Apex VPP pump in this content. These are new releases from the manufacturer and seems like ALPHACOOL is now making this pump integrated with their release of new products. The Rise Flat Reservoir is available in the following configurations:
- Rise Flat Reservoir D5 without pump
- Rise Flat Reservoir DDC without pump
- Rise Flat Reservoir D5 with VPP Pump
- Rise Flat Reservoir DDC with pump
So, what makes this reservoir special? This is a compact yet stylish expansion tank standing at 120x120x50mm. A keen eye will immediately get to the point that this reservoir is using 120mm fan mounts which is a standard mount and is commonly available in PC Cases. The 50mm is the thickness of the unit. This reservoir is specifically suited for space-constrained cases given its size and mounting provision.
The unit is made of acrylic and ALPHACOOL has done a good job in the overall design and build quality of the unit. The reservoir we have got has a pump top for the D5 and VPP series pumps. ALPHACOOL also sent an Apex VPP pump to be tested. The reservoir has a total of 6x G1/4” ports. Two out of these ports have a dedicated function. The port under the pump top is the OUT port whereas the port alongside is the IN port. The other 4x ports are refill ports. 3x of these ports come with a pre-installed stop plug. These plugs are made of plastic and they are the only part where the build quality is not on the job as they can easily rough out and become useless. Take care when handling them.
ALPHACOOL has provided an ARGB LED strip comprising 5x LEDs. There is an inset on one of the sides where the strip is to be placed. Make sure that the LEDs are facing the unit during the set-up. ALPHACOOL has provided two sets of brackets that can be used to install this reservoir on the fan mount inside the case or on the radiator. Keep in mind that the reservoir is not compatible with the 140mm mount. One set of brackets is extended and both sets serve different purposes. The normal length brackets are used to save more space and in doing so they expose the pump side of the unit in the build. The extended brackets show the front view of the reservoir in the build.
The installation of the pump on the reservoir is simple and convenient though I would like ALPHACOOL to start using the standard Philips screws for their products. This is general feedback, not a complaint. The installation of the unit itself is convenient. We did not face any issues during the issue. The tank has a capacity of 200ml so filling the loop can be a bit inconvenient. The ARGB LEDs were working fine with the GIGABYTE RGB FUSION 2.0 and we love the overall outlook and vivid lighting in the unit.
The ALPHACOOL Apex is a new pump in the VPP series. ALPHACOOL is using ceramic bearing in this pump and has moved the motor coil from inside to outside. This has enabled the ALPHACOOL to provide a more reliable pump with smooth operations. This pump is also power efficient.
There is no button slider on the bottom of this pump. The user can control the speed of the pump using the 4-pin PWM cable from 2500 to 4500 RPM. The pump voltage rating is 8V to 13V DC. The pressure head is 4.25m. The maximum coolant temperature is 60°C. The pump is powered by the SATA cable which is a welcome change. Finally, they are saying bye-bye to the MOLEX connector. The maximum flow rate of the pump is mentioned to be 340 L/H.
We have used Thermaltake Pacific TF1 to measure the flow rate of the pump without any block or component in the loop. The coolant would go directly into the TF1 and from there it will go back to the reservoir. We have used straight compression fittings in 16/10mm size for this loop. The maximum rating on the TF1 was 569L/H which is way above the rated flow rate. The pump is quite powerful. We have used another Apex VPP in the loop configured for the ALPHACOOL SuperNova 1260mm radiator.
During our use of the pump, we noticed that the pump is not responding to the change in the speed using the fan header on the GIGABYTE X670 AORUS MASTER. However, the second Apex VPP was responding to the changes and the lowest it could go was 2700 RPM. Initially, the pump made a strange noise. It was probably from the bubbles forming in the reservoir. After bleeding the loop, the noise disappeared though bubbles were still present on the top of the reservoir. The Apex VPP pump is silent and quite powerful.
The ALPHACOOL Rise Flat Reservoir D5 is listed at €104.98 at the time of this review. This reservoir with the Apex VPP pump is a powerful combo and we have seen roughly a 4°C difference over the regular 240mm AIO which is DeepCool LT520. We have used the ALPHACOOL 240mm radiator in the loop. ALPHACOOL is providing a 3-year warranty on these products. I can’t wait to see ALPHACOOL releasing the 240mm and 360mm distro plates and would love to try those with a hard tube build. The Rise Flat Reservoir and Apex VPP come recommended by us.
We are thankful to ALPHACOOL for the provision of the test units.


![Deal – FIREBAT FD2 Mini PC [2026]](https://www.enostech.com/wp-content/uploads/2026/06/image-63-150x150.png)

