


Thermaltake View 51 TG ARGB PC Case Review
Introduction
- Manufacturer: Thermaltake
- Product Page: View 51 Tempered Glass ARGB
- Purchase: £189.98 At the time of review from Scan.co.uk
Thermaltake once seemed to have a major focus on releasing products that offered good quality for the money. While this is still true, they seem to have switched focuses onto more higher-end stuff. From DIY water cooling to amazing Tempered Glass Chassis, Thermaltake is taking no prisoners and realising product after product. Those looking to stick with one company for most of their build will want to consider Thermaltake as they have a vast catalogue of products. Those looking to Mod their build will also be happy to know that Thermaltake does all they can to make this as easy as possible, whether you’re a novice or pro. Thermaltake is stepping their game up and the latest case of theirs to come through for review is nothing short of spectacular. Today, we are going to have a closer look at the View 51 TG ARGB. This case features 3x tempered glass panels, all of which are 4mm thick and the main side panel is a swing door! This case looks amazing on the box so let us go ahead and work our way through the closer look so we can see what it has to offer up close and in person.
Closer Look
The box gives off a bit of flair! The View 51 TB ARGB packaging gives loads of details about the case and even gives users a look at what the case could look like with a full build in it. We can also see that the RGB system is compatible with ASUS, MSI and Gigabyte if nothing else! This case is also quite heavy so be careful when getting it out of the box!

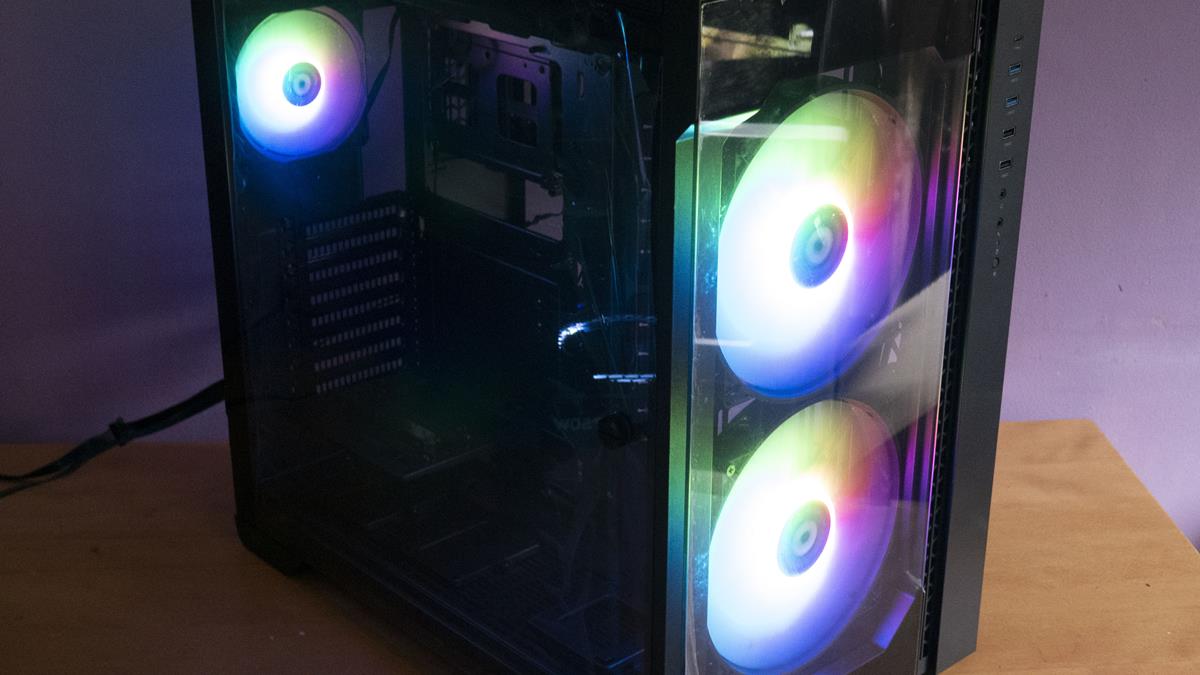
The front panel is 1 of the 3 4mm thick tempered glass side panels. Behind the TG panel, we can see two MASSIVE 200mm RGB fans. Not only are these fans going to look amazing, but they are also going to provide a lot of airflow through the case with as minimal noise as possible.

To the right of our dual 200mm fans the View 51 TG ARGB offers, there is a nice front IO panel. Here, we have a USB Type-C port, 2x USB 3.0, 2x USB 2.0 alongside our standard headphone and mic jacks.

The top corner of the case has a sort of indented triangle on it with a fairly large-sized power button! There will be no missing this in the night when its dark as it should be easy to feel! It also does look rather nice when you can see it, adds a bit of something special to the case.

Making our way around the case and the main side panel has a pair of hinges on the back. As previously mentioned, the side panel is a swinging door (which can be taken off if needed) I like this approach to a TG side panel. If nothing else, means you don’t have to worry about dropping it when trying to take it off or putting it back on the case.

On the back of the case, we have 8x PCIe expansion bays, our rear exhaust fan, motherboard cut out and a PSU cut out. The Expansion bays can be turned sideways so you can vertically mount a GPU without the need for modding.

The View 51 TG ARGB features a sort of dual-chamber design if you will. Simply put, the room behind the motherboard tray is much bigger than normal. As such, your PSU will be on the backside of the motherboard tray as well some other vital components. With this in mind, Thermaltake has gone and added 2x major ventilated areas on the side panel to allow for better airflow. Both of these also have there own easy to clean dust filters.

Last but not least, the top of the case features the last 4mm thick TG panel and it is a beauty! You can fit many coolings options up here from dual 200mm fans to a 360mm radiator for either DIY liquid cooling or an AIO.

The bottom of the case is raised off the floor quite a bit as to allow for better airflow throughout the case. There is also another easy to clean dust filter here that simply pulls out from the back of the case. This dust filter can also be washed in the sink if needed to help ensure it is as clean as possible.

The top and front panels, while removable, don’t just pull off as they do on cheaper cases. You will need to remove some thumbscrews and slide then before the lift out. they kind of work in sync as well as you need to take one out first to get the other to come off! However, once you find what you’re looking for, it is quite easy so don’t worry.


Opening up the case and wow! There is loads of room and loads of stuff going on in here so please forgive us if we forget something! Just having a look around we can see plenty of mounting room for fans, coolers, radiators, distro plates and more. There is also an easy to use Vertical GPU mount, SSD mounts, Controller mounts and we can even see through the CPU cutout hole the HDD tray in the backside of the case! Thermaltake have done an incredible job making sure this case offers it all and I must say, it sure seems to have most any standard feature you could need. Best of all, it’s all modular so if you don’t want to use something, it’s like it may be able to be removed/moved somehow.

One the very bottom of the View 51 TG ARGB case we have a couple of SSD mounts, which can be removed. We also see a 3rd mount which looks to be for a fan controller or maybe a pump/res combo of some sort. Either way, all 3 of the these can be removed allowing you to install up to 3x 120mm fans instead. As you can see, the floor of the case is well ventilated so they will be able to pull in our expel some good airflow.

The vertical GPU mount comes preinstalled. However, if you’re not looking to make use of it, you can simply undo a couple of screws and just take it out of the case, easy as that! Thermaltake have gone above and beyond with their modularity in this case!

Not only is there a nice cutout for easy CPU cooler installation (once you removed the 3.5 HDD bay on the backside) but there are also plenty of holes to pass cables through at the top of the motherboard! It was also nice to see that the rear fan features the same ARGB effects as the front fans. We have seen a lot of cases where the back fan is a plain black fan and doesn’t reflect the overall quality of the case, but not in this case! Thermaltake keeping it real and making sure this case offers as much as possible.

The front 200mm cans can, of course, be taken out and replaced with several other options for your cooling needs. What’s even better is the fact that the whole bracket they are on, can be taken out if not needed. This allows users a bit of extra room if they need for distro plates, reservoirs. pumps or what have you.

A few things are going on around the back but certainly not as much as the front! However, there is still plenty of room back here!

Here we can see the Fan controller and the 3.5′ HDD bay.

The PSU goes in the bottom here and with that being said, it should also give you an idea of just how much room is here. Again, you can fit a PSU between the motherboard tray and side panel so that’s quite a bit of room.

The ARGB fans have a lot of easy to use options, simply click the button and scroll through the colours they have to offer. All I can say is these fans look much better in person and with the wide array of fans Thermaltake currently offer, there is no reason for any build in this case not to look top-notch!


Finals Thoughts
As you will notice, I didn’t do a full build in this case. The reason being, I just didn’t have the hardware to do it justice! The View 51 TG ARGB deserves a build designed for a king and standard hardware just will not cut it! We can still see all the positive points this View 51 TG ARGB has to offer though. First up, the sheer size of this thing is ridiculous and it’s just as heavy as it is big. Next up, the modularity it offers is second to none, literally just about everything, excluding the main-frame can be removed if you are not going to utilize it. There is no denying Thermaltake wanted users to be able to customize and build in this case however they wanted. There are mass amounts of room for water cooling gear from radiators to reservoirs and there’s even room for a distro plate! The dual-chamber design allows you to really show off the main components of your build and the options are endless of what you can do inside this case.
On top of the room and modularity, the quality of materials used is exactly what you would expect from a case of this price. Coming in at around £200, give or take a few £££, this case is well worth the money. While £200 may seem like a lot to some for a case, when you compare it to the cost of the rest of components that will go into a build like this, it all of a sudden isn’t that bad. For the money, you are getting a spacious case will a multitude of building options. One thing is for sure though, the View 51 TG ARGB is designed to have a full-on DIY Custom Liquid Cooling Solution used in it.
It is definitely a shame that I did not have the hardware on hand to do a full build in this case, but one day soon when I do I will revisit this case and go all out! This case is truly amazing and most of the features almost anyone could want in a case of this design. If you’re looking to go all out on your build and money is not an option, this case is worth checking out!

Many thanks to Thermaltake for sending in the View 51 TG ARGB for this review!


