


Cryorig R1 Ultimate CPU Air Cooler Review


Introduction
Cryorig was established in 2013 and they have for sure come a long way in terms of providing some cool cooling solutions in the PC market. Their specialty is in the cooling solutions for more than anything else hence we can see their main product lines carrying the air coolers, liquid coolers, fans, and related accessories.
I will be taking a look at their ultimate air cooling solution named R1 Ultimate in this content. This is a dual tower cooler with some interesting design features like two fin stacks per tower each with different count of fins, convex heat pipes alignment on the base, displaced heat pipes alignments inside the heatsink to name a few. The cooler has 7x copper heat pipes each of 6mm thickness and a nickel-plated copper base. Cryorig has bundled two of its XF140 fans with this cooler. This cooling solution is rated to handle the TDP of 250W+. The Cryorig R1 Ultimate is compatible with Intel: 2066, 2011(-3), 1150, 1151, 1155, 1156< and AMD FM1, FM2/+, AM2/+, AM3/+, AM4 sockets.
Product: R1 Ultimate
Manufacturer: Cryorig
Price: £73.99 at Overclockers at the time of the review
Specifications

Packing and Unboxing
The product is shipped inside a cardboard box.

There is not much information on the front of the packing box except a picture of the cooler.

The cooler is designed for better compatibility and clearance with the wide range of PC chassis in the market. According to the Cryorig, the cooler can be installed in as many as 5 steps (quite a low number). It is designed for better acoustic performance.

This is the informative side of the packing box as we can see the specifications of the fans and the heatsink. There are diagrams on the top showing the dimension of the cooler. The socket compatibility information is printed at the bottom. They have done a good job of providing critical information for the buyers.

You can register the cooler to get an extended warranty. How cool is that!

The accessory box is placed on the top. The contents of the box are printed on the top. This reminds me of the Noctua packing design.

The cooler is placed inside a cardboard box. It has a diagram of the cooler.
Contents
Following are included:
- 1x Heatsink
- 2x 140mm fans
- 1x Thermal Paste
- 1x Intel Backplate
- 1xx AMD Backplate
- 2x Mounting Brackets
- 4x Standoff Screws for Intel LGA115x
- 4x Standoff Screws for Intel LGA20XX
- 4x Standoff Screws for AMD
- 4x Thumb Nuts
- 2x Clip sets
- 1x Screwdriver
- 1x Y-Cable
- 4x Anti-Vibration pads for fan
- 1x User Manual
- 1x Alcohol pad (70% concentration)

Closer Look
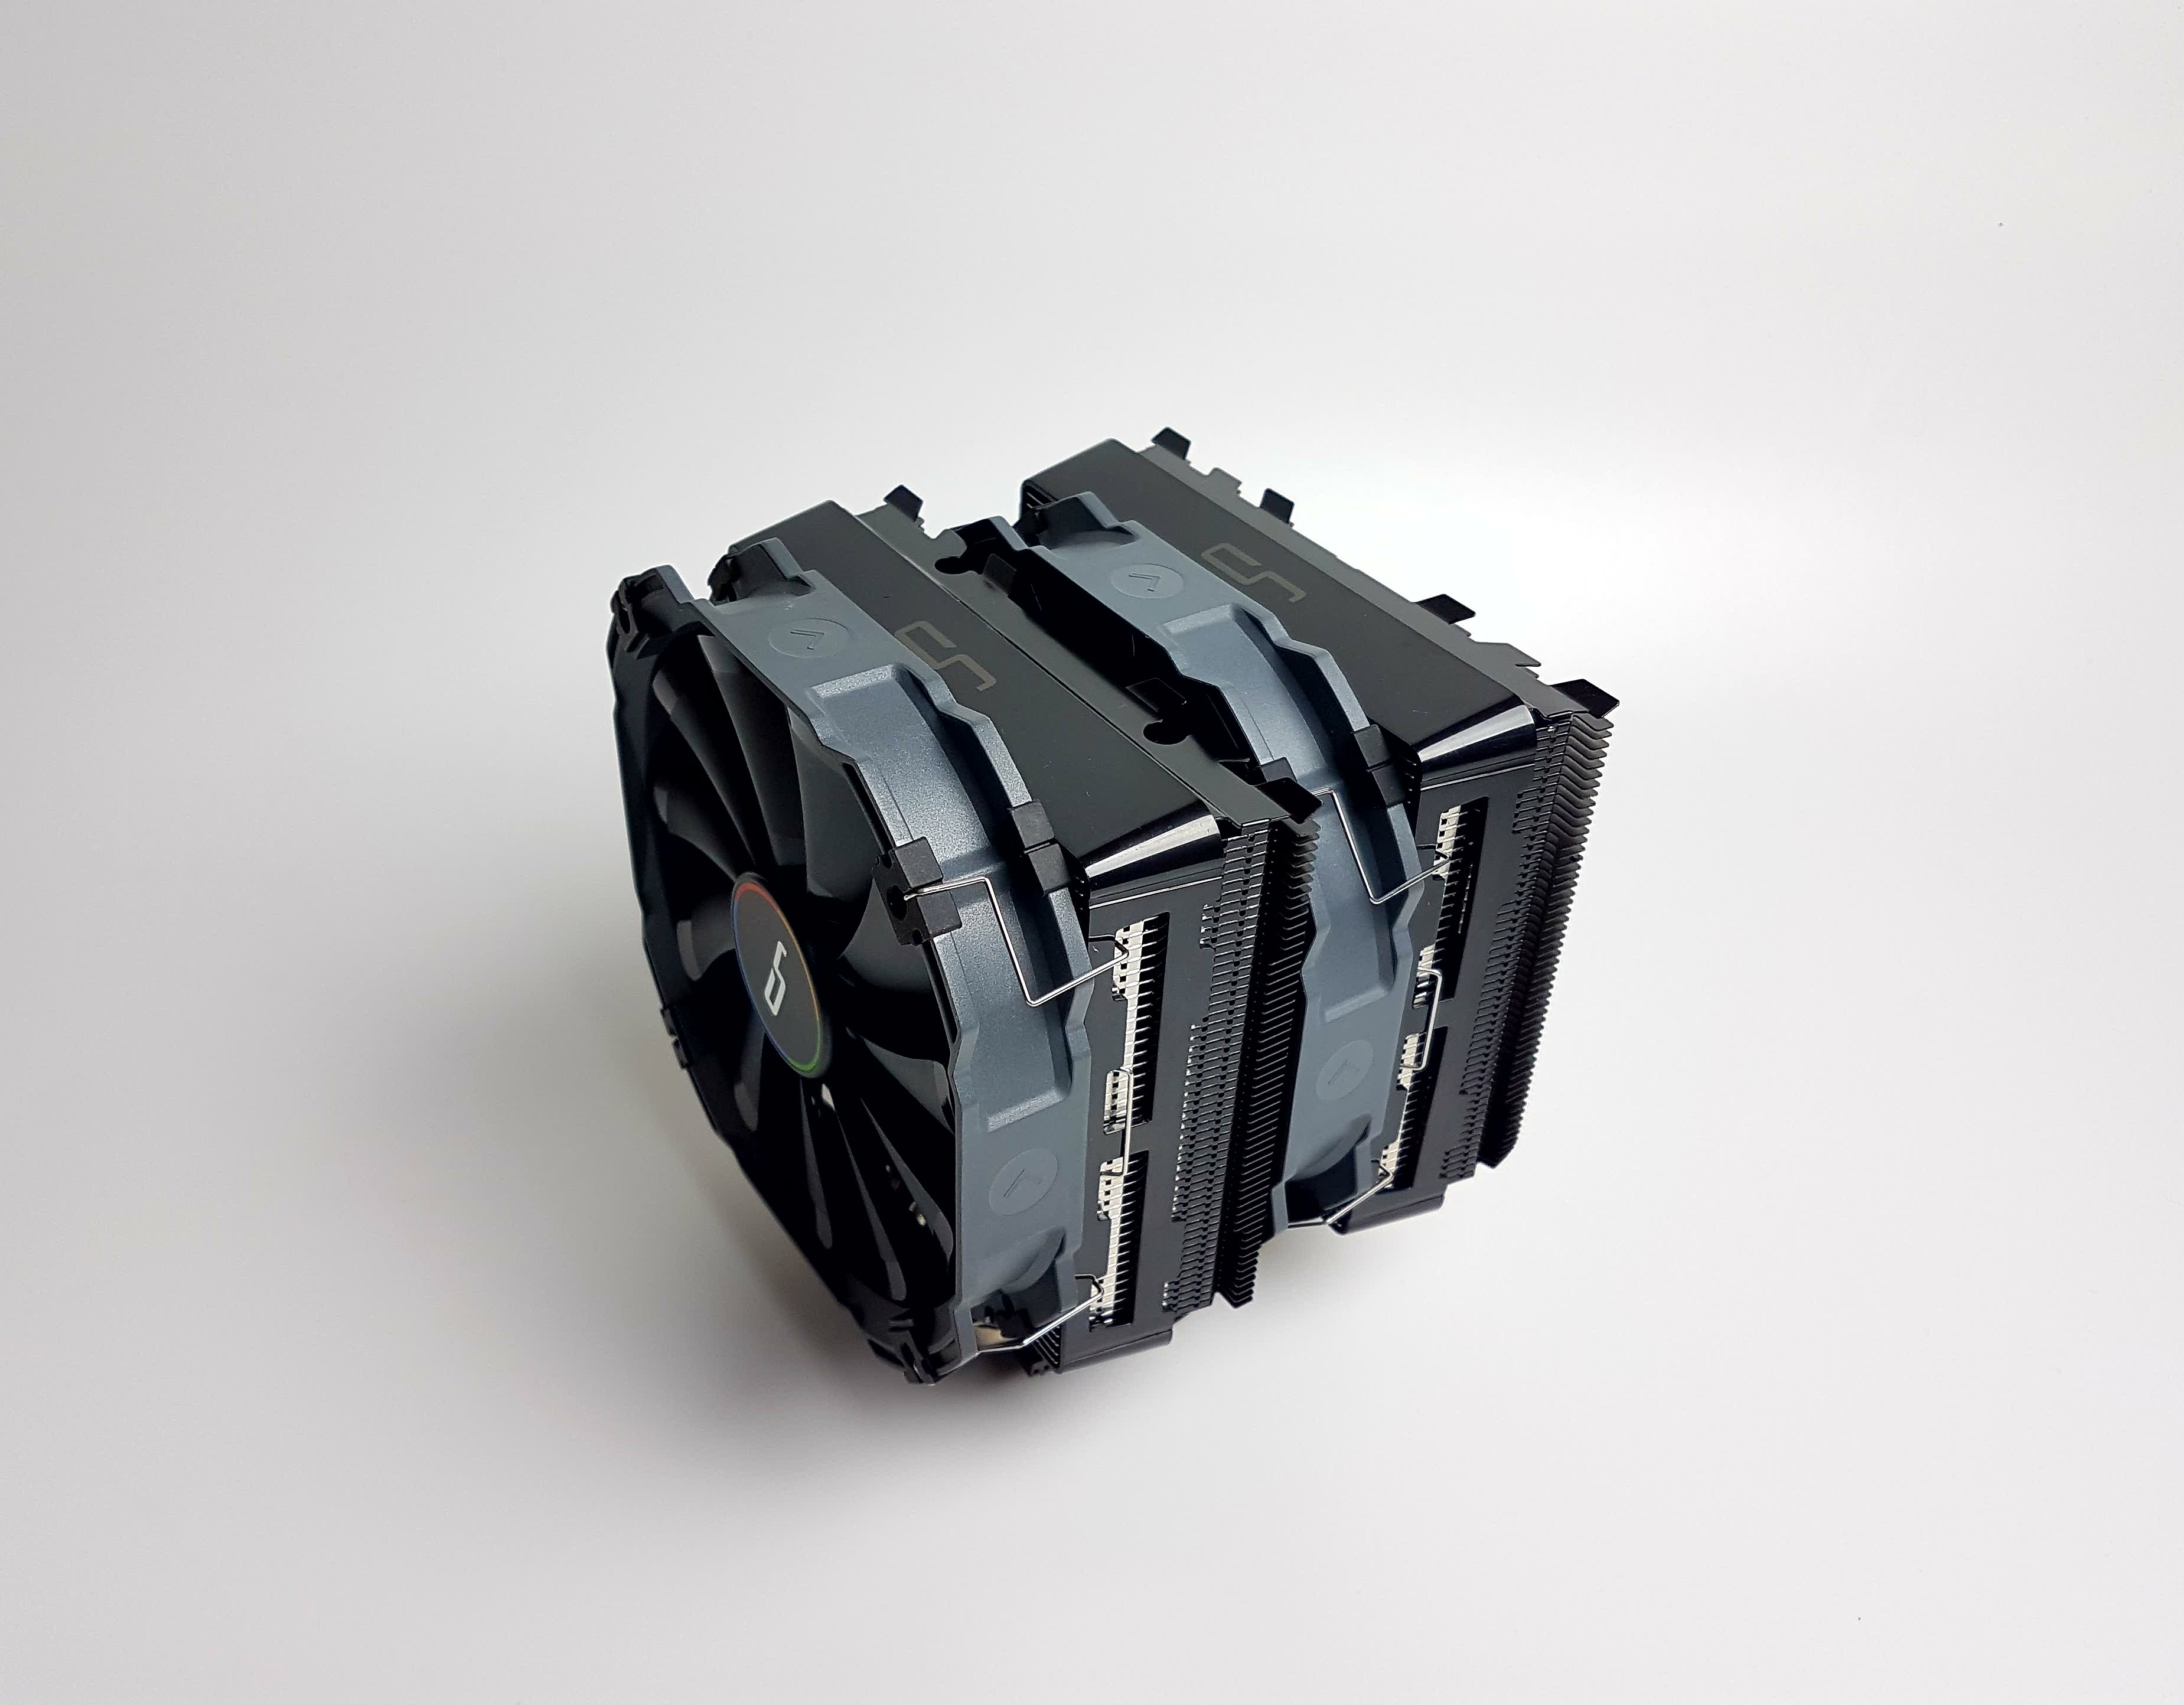
The Cryorig R1 Ultimate is a dual tower premium cooling solution from the manufacturer. It is all black cooler with stylish covers on the aluminum portion. Cryorig is calling this cooler as Apex of the cooling technology. Here are some of the features:
- DirectCompress Soldering
- Heatsink Displacement Optimization
- Jet Fin Acceleration System
- Heat pipe Convex Align
- Multiseg Quick Mount System
- CustomMod Covers for customization
- 6 years of total warranty after registration of the product
Heatsink
It is time to take a look at the cooler.

The dimension of the cooler is 142.4x140x16.3mm (LxWxH) where 168.3mm is the overall height of the cooler. The weight of the cooler is 1282g with the fans and 970g without fans. The Cryorig R1 Ultimate is compatible with Intel: 2066, 2011(-3), 1150, 1151, 1155, 1156< and AMD FM1, FM2/+, AM2/+, AM3/+, AM4 sockets. The cooler is rated to handle the TDP of 250W+. The special black coating is done on the rear fin portion on both towers.

One thing I must appreciate about this cooler is the looks of it. This cooler out of the box is quite a show with its gray and black accent. The fans’ gray color frame goes hand-in-hand with the black color of the heatsink the cover. Looking at the top of the cooler, we can spot a Cryorig brand logo in the center of the cover. This cover is replaceable and Cryorig is calling it CustomMod covers. The user can buy the desired color cover separately. While these covers may give the impression that they are metallic, they are not and Cryorig has done a marvelous job in ensuring that high a finish on these covers. These are made of the high-grade ABS material and finished in metallic color. They are available in Red / Orange / Green / Blue / Black / White colors. They are glossy and a fingerprint magnet. These covers are hiding the aluminum portion of the heatsink whereas the other portion is in black coating.

Before proceeding further, one thing that I would like to highlight is the dual fin stack approach per tower. Each tower has two fin stacks if I were to put it that way. Cryorig is using its patented DirectCompress Soldering technique to solder both portions of the fin stack with the copper heat pipes. According to Cryorig, this technique results in 10% more surface area for faster heat transfer.
Cryorig has displaced the heatpipe alignment on the heatsink fins, resulting in a nonlinear arrangement of the heat pipes inside the soldered assembly. The Heatsink Displacement Optimization™ allows for better and more evenly spread heat conduction on the fins compared to traditional linear alignment.

Let’s take a look at the front side of the cooler. I have removed the 140mm fan to take a picture of the heatsink from the front side. The front portion of the fin stack has 42 fins with a gap of 2.4mm between any two fins and a thickness of 0.4mm. Thus on the front, we have a fewer dense fin stack. The rear fin portion has 53 fins with a 1.8mm gap between any two fins and each having a thickness of 0.4mm. The fins are jointed in the middle of the fin stack. The front side does not have any color coating. The fins are not sharp either.

The above picture shows the rear portion of the fin stack. Both towers have a similar finish. This portion of the fin stack is black color coated. We can see cutouts in the layout with 3 cutouts on each side. The fins are jointed in the middle here as well. This is the rear portion which I have mentioned above to be having 53 fins.
What benefit such a design would offer? According to the Cryorig, the loose air intake and the high-density exhaust makes the heated air leave the tower quickly. Cryorig is calling this their Jet Fin Acceleration System. By the laws of fluid dynamics, the increase in fin count in the exhaust section squeezes airflow and increases exhaust airspeed.

The left and right sides are identical. I did not remove the covers while taking pictures which I kinda felt like something I should have done. Taking the covers off will show two fin stacks pressed to each other on both sides. There is an inset on the black color fin stack right next to the border area of the aluminum fin stack. This is a design element and has nothing to do with the installation of the fans. Cryorig was smart enough to use the removable covers to hold the metallic clips to secure the fans to the heatsink.

The Cryorig is using 6mm thick 7x copper heat pipes which are finished in nickel coating. The heatsink has offset design coming from the base which I will show shortly. The above picture shows the layout of the heat pipes on the second tower from the backside.

The above picture shows the layout of the heatpipes on the front side tower. Here, the heat pipes are taking less space and are taking sharp bend coming out of the base. We have only 40mm of the distance from the center of the base to the front side of the tower whereas the distance from the center of the base to the rear tower is 77mm. This is the offset design.

The offset design is now more obvious. The cooler has 30~35mm of clearance for the RAM height. This is with the front fan. Also, this particular design helps in avoiding heatsink’s overhanging on the DIMM slots.

The crossbar is already installed on the base of the cooler. The middle screw seems tilted and not fully screwed in. There are two spring-loaded screws on the sides of the crossbar. I like and prefer the design where the crossbar is pre-installed and has spring-loaded screws as it takes the guesswork away from the user.

The Cryorig R1 Ultimate has a C1100 Pure Copper nickel-plated base. I have taken the picture after using the cooler which is why it is looking that way in the picture. Ignore my lazy ass for not cleaning it properly. The base has a dimension of approximately 39x44x10mm. Here 10mm is the height of the completed base block.
Fans
The Cryorig has provided two XF140 fans with this cooler. Here are the specifications of the Fans:
| Dimension | 140x140x24.5mm |
| Speed | 700~1300±10% RPM |
| Noise | 19~23 dBA |
| Airflow | 76 CFM |
| Air Pressure | 1.44 mmH₂O |
| Current | 0.16A |
| Rated Voltage | 12VDC |
| Power | 1.92W |
| Fan Power Connector | 4-Pin PWM |
| Bearing | High Precision Low Noise Bearing |
| Cable Length | 320mm approximately |

The XF140 fan has 11 blades. The left and rightmost sides of each blade have glossy black coating whereas the rest of the area is in matte black color. The center has a sticker on it with a Cryorig brand logo in the middle. One smart design aspect is the arrow symbols on each side of the gray color frame. Two symbols on opposite sides show the direction of the airflow whereas the other two show the direction in which the blades spin. There are black color anti-vibration pads on the mounting corners.

Both fans have 4-arms assembly on the backside holding the motor and blades to the frame. The frame of the fans is made of plastic and is quite sturdy. One of the arms is wider as it has a channel for wires passing. There is a latch as well to stop falling off the wires from the channel. The speed of the fan is printed on the sticker pasted in the middle.

The fans are powered by a 4-pin PWM connector which is in black. The cable has a mesh on it though not a sleeve.
Installation
Since the cooler is tested on the Intel LGA2011(v3) socket, here are the steps needed for the installation on this socket. This is by far the easiest installation that I have ever seen on high-end dual-tower CPU air cooler.

Install the Intel LGA20xx standoffs on the pre-drilled mounting holes around the socket.

Place the mounting brackets such as the standoff side faces up. Make sure that pointing corners are facing opposite the CPU socket. Secure the brackets using 4x small size thumb nuts. Apply the thermal paste.
Place the heatsink with the fans on the CPU by aligning the spring-loaded screws on the crossbar with the standoffs on the mounting brackets.

Pass the screwdriver from the top. The rear fin section of the front tower has two cutouts for this purpose. The above picture shows that exactly.

The tip of the screwdriver would sit on the head of the spring-loaded screw. Connect the 4-pin PWM connectors of both fans to the 4-pin PWM fan header(s). You can use the bundled Y-Cable to connect both fans to a single fan header.
Here are the pictures of the assembled cooler.


Clearance
The height of the Cryorig R1 Ultimate is 168.3mm. You can use the PCPartPicker to check the compatibility of the cooler for the chassis. As a general rule, your chassis should have a minimum of 170mm clearance for this CPU Cooler height. Why more? In case you need to adjust the height of the fan, you would need more room in the chassis. The height of this cooler is more than that I have seen in the competition like Noctua NH-D15.

On quad-channel DIMM the backside of the cooler overhangs the DIMM slots. The above picture is showing this limitation. The CORSAIR VENGEANCE RED LED DDR4 kit has a height of approximately 49mm and the cooler could not be installed without removing these two sticks.

The Cryorig R1 Ultimate has RAM clearance of up to 35mm. Since the heatsink has an offset design, the front side of the cooler does not overhang the DIMM slots hence there should not be an issue on the front except when you would want to use high profile RAM on the front and fan may obstruct that.

The Cryorig R1 Ultimate is not hindering the first PCIe 3.0/4.0 x16 slot but sitting closer to it to my discomfort. As this cooler has also been tested on the ASUS ROG Strix Z390-E Gaming motherboard, there is no such issue. On ASUS ROG Rampage V Edition, it comes closer to the first slot. Please, keep in mind that we are talking about two different platforms here. On the consumer side, the majority of the motherboards have PCIe 3.0 x1 slot up top.
Testing Methodology
The Testbed configuration is:
- Asus Rampage V Edition 10
- Intel i7 6850k
- CORSAIR Vengeance 4x8GB @ 2666MHz
- Gigabyte GTX 1060 6GB
- Samsung 840 EVO 250GB SSD
- CORSAIR AX1200i 1200W PSU
- Primochill Praxis Wetbench
The following software was used for testing and monitoring.
- Asus Real Bench v 2.44
- Real Temp GT v 3.70
Here is the settings table for testing:
| Intel | Stock Voltage (V) | 1.130 |
| Stock Clock (MHz) | 3600 | |
| OC Voltage (V) | 1.350 | |
| OC Clock (MHz) | 4300 | |
| Turbo Boost | Disabled | |
| C-States | Disabled | |
| Speed Step | Disabled | |
| Thermal Paste | Noctua NT-H1 | |
| Test Run Time | 60 minutes | |
| Idling Time | 15 minutes | |
| Fan Speed | Manually set to run at 100% PWM cycle. | |
A stress test run is made for the first time after the cooler’s installation. The duration of the test is 60 minutes. After this run, the PC is shut down for a minimum of 15 minutes. Actual testing is done afterward. This gives enough time for the thermal paste bonding. Please, keep in mind that cure time varies from thermal paste to thermal paste. We are using Noctua NT-H1 on our test bench for all the coolers testing. This will ensure the standardization and mitigate any performance benefit that may come using the supplied thermal paste. Delta temperatures are reported on the graphs (Delta Temp = Average of all cores’ max temps – ambient temp). The testing is done on an open-air bench system. Once inside the chassis, the temperatures are expected to rise and would largely depend upon the optimal airflow inside the chassis.
Not every run of the stress test may yield the same result. This could well be due to many factors like mounting pressure, thermal paste application, varying ambient temperature. Not to mention the silicon differences even among the same category of the chips. Hence, it is pertinent to mention the testing methodology along with the specifics.
Let’s take a look at the results.
Results


As expected the high-end, dual-tower air coolers are sitting in the closer thermal margin and Cryorig R1 Ultimate is no exception to that.
Noise
The sound meter was showing the noise level of the cooler to be 50 dB(A) with an ambient sound level of 32 dB(A).
Conclusion
The Cryorig R1 Ultimate is a premium dual-tower cooling solution from the manufacturer rated for a thermal cooling capacity of 250W+ TDP. The dimension of the cooler is 142.4x140x16.3mm (LxWxH) where 168.3mm is the overall height of the cooler. The weight of the cooler is 1282g with the fans and 970g without fans. The Cryorig R1 Ultimate is compatible with Intel: 2066, 2011(-3), 1150, 1151, 1155, 1156< and AMD FM1, FM2/+, AM2/+, AM3/+, AM4 sockets. The cooler is rated to handle the TDP of 250W+. The special black coating is done on the rear fin portion on both towers.
The Cryorig R1 Ultimate has interesting design elements and Cryorig is calling this cooler as Apex of air cooling technology. This cooler has dual tower design. There are two fin stacks per tower. One stack is finished in black color thermal coating whereas the other stack is in its silver color aluminum. Both fin stacks have aluminum fins. These two fin stacks and 7x heat pipes are soldered using Cryorig DirectCompress technology. According to Cryorig, this gives more surface area for effective heat transfer. The front fin stack has 0.4mm thick 42 fins with a 2.4mm gap. This fin stack is where the air will enter in the heatsink from. The rear fin stack on the same tower has 0.4mm thick 53 fins having a 1.8mm gap. This fin stack is where the heated air will exhaust. Cryorig is calling this their Jet Fin Acceleration System. By the laws of fluid dynamics, the increase in fin count in the exhaust section squeezes airflow and increases exhaust airspeed. Another important design element is the displaced heat pipes in the heatsink forming a radial design rather than a linear one.
There are two black color metallic finished covers on both towers. These covers are on the front fin section resulting in a total black color scheme on the cooler which sits that well with the gray color frame of the fans. The looks on this cooler are on another level as compared to the majority of the industrial-looking designs in the market. These covers are replaceable and are available in 6 colors. They can be bought separately. The Cryorig is using its patent-pending MultiSeg Quick Mount system in this cooler. I have found the installation of this cooler effective and simple in as many as 5 steps on the X99 platform including the application of the thermal paste. The one big advantage of the cooler is that we don’t need to remove the fans to install the heatsink.
The Cryorig has provided two XF140 fans with this cooler. Their dimension is 140x140x25.4mm. The power rating of a fan is 1.92W using 0.16A at 12VDC. The user can optionally install a third fan as well for which a set of clips is provided in the accessory box. These fans are rated for up to 1300±10% RPM speed at a maximum of 76 CFM airflow and 1.44 mmH₂O static pressure rating. Both fans have anti-vibration mounts on the mounting corners.
The height of the cooler is 168.3mm. Keep that in mind when choosing a PC Chassis for your build. Make sure to have at least 170mm of clearance for the CPU Cooler height in case you would need to adjust the fan’s height. The cooler has clearance for up to 35mm height of the RAM. The front side of the heatsink does not overhang the DIMM slot but the fan does. The backside of the cooler does overhang the DIMM slot in a quad-channel configuration only. On consumer platforms like Intel Z390 or AMD X570, this cooler should not obstruct the first PCIe 3.0/4.0 x16 slot but on my X99 motherboard, it was sitting that close to the first slot to give me discomfort. There is also an R1 Universal cooler with better clearance.
The Cryorig R1 Ultimate has a retail price of US $94/£73.99 at the time of the review. The cooler has performed quite well on our test bench. The user can get a total of 6 years warranty by registering their cooler with Cryorig. 6 years of warranty makes this cooler competitive though pricing is subjective. In terms of the looks and nice performance, one can’t go wrong with the Cryorig R1 Ultimate cooler.
We are thankful to Cryorig for allowing us to review their R1 Ultimate CPU Air Cooler.


