
Introduction
Fractal Design is a leading designer and manufacturer of premium PC hardware including cases, cooling, power supplies and accessories. Fractal Design was established in 2007 and ever since they have come out being among the major manufacturers of high end PC components. They are based in Gothenburg and with offices in the US as well as Taiwan, Fractal Design has gained a global reputation for innovative design, elegant aesthetics and solid build quality. Fractal Design products are available in over 45 countries worldwide, and are still growing. The Define R2 was the turning point for the manufacturer as that chassis gained the reputation and trust that is now a hallmark of the Fractal Design.
Fractal Design has sent us their Meshify 2 PC case for the review. The salient features include:
- Iconic angular mesh design provides filtered airflow with a bold, stealth-inspired aesthetic
- Spacious and extensively adaptable dual-layout interior easily accommodates large motherboards up to and including 285 mm E-ATX
- Support for radiators up to 360 mm in front, 420 mm up top, or 280 mm in the base in the default Open Layout
- Includes 6 HDD/SSD trays, 2 SSD brackets, and 12 universal Multibrackets for mounting up to 10 drives
- Expandable to 14 trays and 4 SSD brackets with 3 Multibrackets installed in the top and bottom for a max of up to 21 drives in Storage Layout
- New chassis design opens up to fully expose the case interior on three sides for totally unhindered installation and cable routing
- New front nylon filter that can be removed for increased airflow
- New front panel design with hinged removable mesh and tether-free bezel for easier access to front fan mounts
- Three front USB ports including one USB 3.1 Gen 2 Type-C with fast charging support and speeds up to 10Gbps
- Ultra-slim Nexus+ 2 fan hub connects up to three PWM fans and six 3-pin fans directly in line with cable channels along the edge of the case
- Outstanding cooling capacity with a total of nine 120/140 mm fan mounts and three preinstalled Dynamic X2 GP-14 fans
- Detachable PSU cable shield and integrated cable guides with velcro straps further simplify cable management behind the board
- Versatile Multibracket that converts any unused fan position to an HDD, SSD or pump mount
- Two vertical GPU slots for use with the Flex VRC-25 PCIe riser, available separately
- Easy-to-clean high airflow nylon filters on the front, top and base with full PSU coverage and convenient front access
- Ventilated PSU shroud with two-part removable cover for optimal cable concealment and front radiator support
- Tool-less, top-latching side panels allow quick access while preventing accidental drops
- Bridgeless expansion slots ensure obstruction-free connections for easier installation and hookup
Item: Meshify 2
Manufacturer: Fractal Design
Price: USD 129.99 MSRP
Specifications

Packaging and Unboxing
The chassis is shipped inside a standard brown color cardboard box.

The product specifications are printed over here along with a diagram of the case.

The salient features of the case are printed over here. The modular design of the Meshify 2 is highlighted using diagram.

The case is tucked between two thick white color Styrofoam pads. There is an accessory box tucked between the pads on the side.
Contents

I love the presentation from the Fractal Design. There is a large size cardboard box having the accessories placed inside.

We have:
- A comprehensive user manual
- 4x HDD Tool-less Brackets
- 1x Small box with the mounting hardware

The small box has Meshify 2 Accessories printed over it.

The backside of the box list the quantity of each type of item enclosed.

The above picture shows the containers of various screws, Dampeners, socket wrench etc.
Closer Look
Let’s start with what Fractal Design is saying about the Meshify 2. A classic evolved.The Meshify 2 is a high-performance case with a bold, stealth-inspired aesthetic. Its striking exterior features bolt-free, flush tempered glass, a fully removable top granting excellent interior access, and a fully redesigned front with USB-C, hinged mesh panel and removable nylon filter. The flexible dual-layout interior supports large storage arrays and multi-radiator setups that makes cooling a breeze.
The new Meshify 2 is available in following configurations:
- Meshify 2 Steel
- Meshify 2 Light Tempered Glass [Black and Gray Colors]
- Meshify 2 Dark Tempered Glass
- Meshify 2 Clear Tempered Glass
We are taking a look at the Black color version of Meshify 2 Light Tempered Glass. The case has a dimension of 542x240x474mm (LxWxH). The dimension without protrusion/feet/screws is 541x240x454mm. The net weight of the case is 10.5Kg. This is quite a heavy weight case in its class. Which makes sense as the case is quite rugged. Everything about this case is all black finish.
Let’s start by taking a closer look on the exterior of the chassis.
Exterior

There is an angular mesh on the front panel. This angular design is bold yet stylish and mimics the stealth aesthetics.

There is a Fractal Design branding on the lower left side on the mesh.

Here comes the first striking feature of the case. The front mesh is hinged on the case’s main frame making the mesh removable plus it is tether-free bezel design which makes it easier to access the front fan mounts. One can simply pull the mesh by grabbing the Fractal branded metal sticker on the mesh.

Fractal Design was paying attention to the details as they have placed a Nylon made non-magnetic dust filter right behind the front mesh. This dust filter can easily be popped out by pulling it upward. That simple! In other words, Fractal has ensured the maximum airflow on the front side and in case this airflow seems restrictive, easily remove the front dust filter without having the need to pop the complete front panel out.

The above picture shows front mesh and dust filer side-by-side.

The above picture shows the front of the chassis with complete front panel removed. Place your hand on the cutout at the bottom of the panel and pull it gently to take it out. There are 2x Dynamic X2 GP-14 fans pre-installed on the front. The user can install up to 3x 120mm or 140mm fans on the front. The radiator up to 360mm can be installed on the front. The mount rail system is rugged. The fans are installed on the inner side of the main frame and their cables are routed from the side. The top frame has a large size white color LED.

The above picture shows the backside of the front panel. It is made of plastic.

The far right side has 3x catchers. This is where the front removable mesh is connected to. Looking closely, there are 3x screws on the main frame of the case on the left of these catchers. These are securing the side bracket. These would need to be removed to change the default open layout of the case to the superlative storage layout.

There is an option to secure the side panels to the frame of the chassis for safe transportation. One screw is installed on the top left side of the plastic bracket. One can’t open the side panel without removing this screws.

Similarly the steel side panel is secured using the screw on the top right. Remove this screw to open the panel.

The Meshify 2 Light Tempered Glass has a 4mm thick flush and light tinted tempered glass on the left side panel. This panel has no bolt and its access is simple but quite effective. These panels are designed to be tool-less and top-latching making their opening and closing super convenient.

The above picture shows the inner side of the TG panel. It has studs on the top which are hinged on the top frame.

The above picture shows the top latch. This latch goes inside the main frame to secure the panel.

The above picture shows the other side latch with a slider button. To pop the panel, simply pull that button and the panel will come lose.

The base of the panel has latches that are placed on the bottom frame of the case.

We have a standard layout on the rear. There is a cutout for the IO shield of the motherboard. On its right, there is a vented area where the user can install a 120mm or a 140mm fan. 1x Dynamic X2-GP-14 fan is preinstalled. We can adjust the height of the rear fan which is a wise design.

There are 7x bridgeless expansion slot covers which are reusable. We have 2x PCIe slots in the vertical layout which allows the user to install the graphics card in vertical layout. The user would need a riser cable which is not included in the box. Also, this would place the graphics card closer to the TG panel which could impact the thermal performance of the card.

The above picture shows the slider button on the top right on the rear of the case. Slide it to open the side panel.

We have a standard ATX PSU mount on the bottom. There is a PSU cover with captive thumb screws. It is mounted on the PSU and PSU is put inside the case from the rear. The captive thumbscrews secure the PSU on the frame.

There is a single large size non-magnetic dust filter on the bottom. We have 4x feet on the base to give enough lift to the main frame for ventilation.

The dust filter can be removed from the front side which is a good move in my opinion as removing this large filter from the rear is not convenient subject to where the case is placed.

The above picture shows the bottom of the case with filter removed. We have a complete vented area on the bottom and the rail mounts are clearly suggesting that the user can install fans/radiator on the base as per the requirement. There is an option to install 2x 120mm or 140mm fans or 240mm or 280mm radiator on the base.

There is an HDD cage installed using removable screws on the base. The user can adjust the position of the cage inside the case on the base giving enough flexibility to the user.

The top of the case has another striking feature. The complete top is removable giving the maximum space to the builder. There is a single piece steel made cover on the top having a mesh in the center.

The above picture shows the backside of the top cover. If you are thinking this mesh is a dust filter, there is more to it!

There is a non-magnet dust filter covering the entire top.

The filter has hinge system. Slide out the panel to unlock it and lift it. Similarly, when putting it back, place it over the top and slide it in. that simple!

The above picture shows the dust filter removed from the top.

We have a removable radiator/fan bracket on the top which allows the user to install up to 3x 120mm or 140mm fans and up to 420mm radiator on the top. The good design element is that the user can install the fans/radiator on the bracket outside of the case and can put the complete assembly back easily. The far side of the top has non-removable elements. I am not sure what those two large size cutouts are for. The design would not allow the user to install the fan/radiator on the top of the bracket as this would hinder the top panel and the dust filter.


The remove the top fan/radiator bracket, one would need to open the TG panel first. There are two screws on the top frame of the case. One is on the left most side and the other is on the right most side as shown in the picture. Remove them so that the bracket can be removed.

The above picture shows the bracket taken off the top of the case.

The above picture highlights the open layout of the case. We have a spacious layout without any hindrance for convenient installation of the components.

The above picture shows the open layout from another angle.

There is pass through cutout for the fill port in water cooling gear on the top frame. There is a screw on the right side of this fill port. This screw would also need to be removed to convert from the open layout to the superlative storage layout.

I/O panel is located on the top frame of the chassis. Following connectivity options are on the I/O panel.
- 2x Audio Jacks
- 1x USB Gen1 Type-C 10Gbps port
- 1x Power Button
- 1x Reset Button
- 2x USB 3.0 ports

The right side panel is made of steel. It is finished in the black color.
Interior
Let’s take a look at the interior of the chassis.

We have a spacious layout to work in. The complete inside is in matte black color. The Length of the inner frame is 492mm and height is 340mm. From the front view, it seems like we have a narrow space on the top with respect to the motherboard. The top displacement is 30mm. The displacement with respect to the RAM is roughly 37mm. We have a neat and clean finish, overall. There is a side cover on the right side of the motherboard tray. This is another striking feature of the case where this cover can be relocated towards the left side to change the layout to superlative storage one. This way one can configure this case to be used for storage server configuration or any other massive storage requirement related configuration. The GPU clearance is 315mm in Storage layout.

The motherboard tray has 8x standoffs in the black color preinstalled. These standoffs are installed for standard ATX configuration. The case can house the motherboards of up to E-ATX size (285mm). There is large size cutout on the tray to install the CPU cooler. We have noted that backplate of the cooler can’t be installed after installing the motherboard in the case. Fractal Design is recommending installing the cooler or its mounting hardware on the motherboard outside the case. This is rather strange for such spacious case.
There are two cutouts on the top and two are on the right of the tray. There is a single large size cutout on the PSU shroud near the tray while another cutout is on the left most side. Almost all the major cutouts have rubber grommets on them.

The 2x Dynamic X2 GP-14 fans are pre-installed on the front. These fans have 3-pin connectors and they are rated for 1000 RPM at 19 dBA noise level.

There is a Dynamic X2 GP-14 fan on the rear. All-in-all there are 3x 140mm fans pre-installed in the Meshify 2 which should be ample for sufficient airflow.

The Meshify 2 has 7+2 PCIe slot covers. These are reusable ones and have vents for ventilation.

The above picture shows the side of the PSU shroud. The shroud is running on the entire length of the case and has an angular design on the top. There is a Fractal branding on the left side of the shroud.

The top of the PSU shroud has vented design for effective airflow. The user can mount 2x 2.5” drive brackets on the shroud which is optional. There is a large size cutout on the shroud facing the tray having a rubber grommet. There is another small size cutout on the left side as well.

There are two plastic made covers on the right side of the shroud. These are removable though we have experienced inconvenience when putting them back on. These are there allowing the user to utilize the base for water pump or pump/reservoir combo placement.

The above picture shows the cables coming out on the top most inner side of the case on the front from the IO panel.
Let’s take a look at the other side of the chassis.

The backside of the case has some key features and highlights. There is a PSU cover at the bottom which hides the cables on the lower chamber for some clean outlook. It is removable and made of plastic material. We have a 30mm cable management space on the sides and almost no restriction at the bottom.

The above picture shows the backside of the case with the PSU cover removed.

There are two tabs on the PSU cover having Pull printed on them. Simply pull them to release the cover and pull the complete cover out.

The above picture shows the PSU cover outside of the case.

Another striking and my personal favorite feature is the cable management provision on the backside. We have Fractal Design branded Velcro straps and cable guides for some neat and clean cabling.

The cable guides can have up to 3 cables passed through them and secured using the Velcro Straps.

Fractal Design has provided a Nexus+ 2 smart hub in the Meshify 2 case. This hub allows the users to connect up to 6x 3-pin connector fans and 3x 4-pin PWM connector fans to it. It is slim and smart design and I really appreciate the location of the hub on the case. The hub has two cables for connectivity. One is the 4-pin connector which the user can connect to the 4-pin PWM header on the motherboard and a SATA connector to power the entire hub.

There is a Multi-Bracket installed on the side cover. This is Fractal Design’s approach towards providing a single solution for multiple usage like mounting water cooling pump, 120mm fan, 2.5” drive etc on the bracket and Meshify 2 is enabled to house multiple of these brackets at various spots.

There are 2x 2.5” drive brackets on the back of the motherboard tray.

The lower chamber has a removable and repositionable HDD cage with two tool-less caddies.


The above pictures show the tool-less caddies. By default we have 6x caddies for superlative storage layout. More can be purchase separately if so required.

We have spacious space for the PSU. By default there is a 310mm of space available for the PSU and its cables. This space is available with HDD cage on its default location. PSU clearance is 250mm.

We have following cables coming out of the front IO panel:
- USB Type-C Gen1 10 Gbps connector
- USB 3.0
- HD Audio

System panel connectors.

The Dynamic X2 GP-14 fans have 3-pin connectors.
Storage Layout
The default layout of the Meshify 2 is open which can be converted in superlative storage layout. For that we need to remove the side panel first. We have mentioned earlier that one screw on the top and three screws on the front need to be removed. Also, the front fans are removed for convenient installation.

The screw shown in the picture also needs to be removed before the panel fully pops out.

The above picture shows the case with the side panel removed.

The covers on the PSU shroud are to be removed as well.

The above picture shows the side panel moved towards the front on the left side.

The above picture shows the inside of the side panel as we take a look from the right side of the case. The tool-less caddies can be attached directly to the side panel from here.

The above picture shows the plastic cover taken off from the side panel. This plastic covers needs to be removed to access the multi-bracket.
ION+ 860P PSU
Fractal Design has sent us top rated ION+ 860P PSU for the test build. This is Tier-A listed PSU. Here is what Fractal Design is saying about their PSU, “The Ion+ Platinum is a high-performance fully modular PSU with whisper-quiet operation, enhanced cable flexibility and superior output quality. A user selectable semi-passive Zero RPM mode maintains pure silence under light loads, and the custom-tailored 140mm fan with FDB bearings barely breaks a whisper under heavy use. Revolutionary UltraFlex cable with its ultra-high strand count wire and special insulation bends and twists effortlessly to make installation and cable-routing a breeze. Ion+ is available now in 560, 660, 760 and 860 watt capacities, all with 80PLUS® Platinum Efficiency, 10-year warranty, and a full electrical protection suite for your peace of mind.”
The features of the PSU include:
- Fractal Design UltraFlex DC wires have game-changing flexibility for effortless cable-routing and connectors that twist and bend to fit your installation—not fight it
- Equipped with a custom-tailored Fractal Design Dynamic Series 140 mm fan with exceptionally low minimum speed and true long-life FDB bearing
- 80PLUS® Platinum Efficiency for optimized electrical performance and reduced heat generation
- User selectable Zero RPM mode allows for either silent, passive operation in low load situations or continuous low speed fan operation for additional cooling
- Outstanding output quality with tight voltage regulation and extremely low noise and ripple
- Fully modular design for reduced clutter and maximum ease of installation
- Premium Japanese 105° C capacitors provide enhanced reliability and durability
- Compact 150 mm depth easily fits compact spaces with extra headroom for cable management
- Over Power Protection, Over Voltage Protection, Short Circuit Protection, Under Voltage Protection, Over Current Protection and Over Temperature Protection
- Extra-long 600 mm 24-pin ATX cable and 700 mm 4+4 pin cable
- Extensive 10 year warranty

The PSU is shipped inside a cardboard box. It is a fully modular PSU.

The salient features of the PSU are listed here along with semi-passive zero RPM mode graph.

Fractal Design has provided Velcro straps, 4x screws and the user manual in the box.

The unit is placed inside a cloth cover whereas the cables are provided in a Fractal branded bag.


The above picture lists the specifications and the general data of the unit.

Following cables are provided with the unit:
- 1x ATX24 Cable [1x connector]
- 2x EPS Cables [2x connectors]
- 3x PEG Cables [6x connectors]
- 3x SATA Cables [10 connectors]
- 1x MOLEX Cable [4 connectors]
- 1x Power Cable


The ATX24 cable is highly flexible one thanks to an ultra-high strand count wire and special insulation, the UltraFlex DC wire bends and twists effortlessly to fit the installation instead of fighting it. Combining an increased strand-count and reduced diameter of just 0.08 mm allows thinner, more flexible cables, and specially formulated insulation increases flexibility without impacting efficiency or current capacity. Connectors bend and twist to make for easy connections in tight spaces with less resistance and strain.

The ION+ 860P comes equipped with a custom-tailored Fractal Design Dynamic Series 140 mm fan that offers low minimum speed as well as long-life Fluid Dynamic Bearing. The user has the option to turn on the Zero RPM mode. User selectable Zero RPM mode allows for either silent, passive operation in low load situations or continuous low speed fan operation for additional cooling

The side of the PSU has dual color layout in an elegant manner. There is a Fractal Design branding on the lower portion.

The headers’ side of the unit has a dedicated button to activate Zero RPM mode which is by default turned off. We have 11 headers here the cables.

The rear side of the unit has a vented portion for effective ventilation. We have a 3-pin power port and a power on/off button. The power label is printed over here. The unit is following the 80 Plus Platinum certification.

The above picture shows the unit with all the cables attached to it.

The above is a close up view of the cables connected to the PSU.

During our components stress testing the PSU was offering consistent voltages across the points.
Test Build and Experience
Assembling inside the Meshify 2 has been a smooth and straight forward experience without any glitch.

I started with the motherboard installation. The cooler’s mounting hardware and RAM were installed on the motherboard outside of the case.

Next, the Fractal Design ION+ 860 Platinum PSU was installed.

The ATX and EPS cables were connected and the ASUS ROG Strix GeForce RTX 2080 was installed.


Next, the Fractal Design Celcius+ S36 Dynamic was prepared. Since this cooler has integrated fan hub on the radiator, the cables of the fans were routed as such to make a neat and clean outlook.

All three fans of the cooler were connected to the integrated hub.

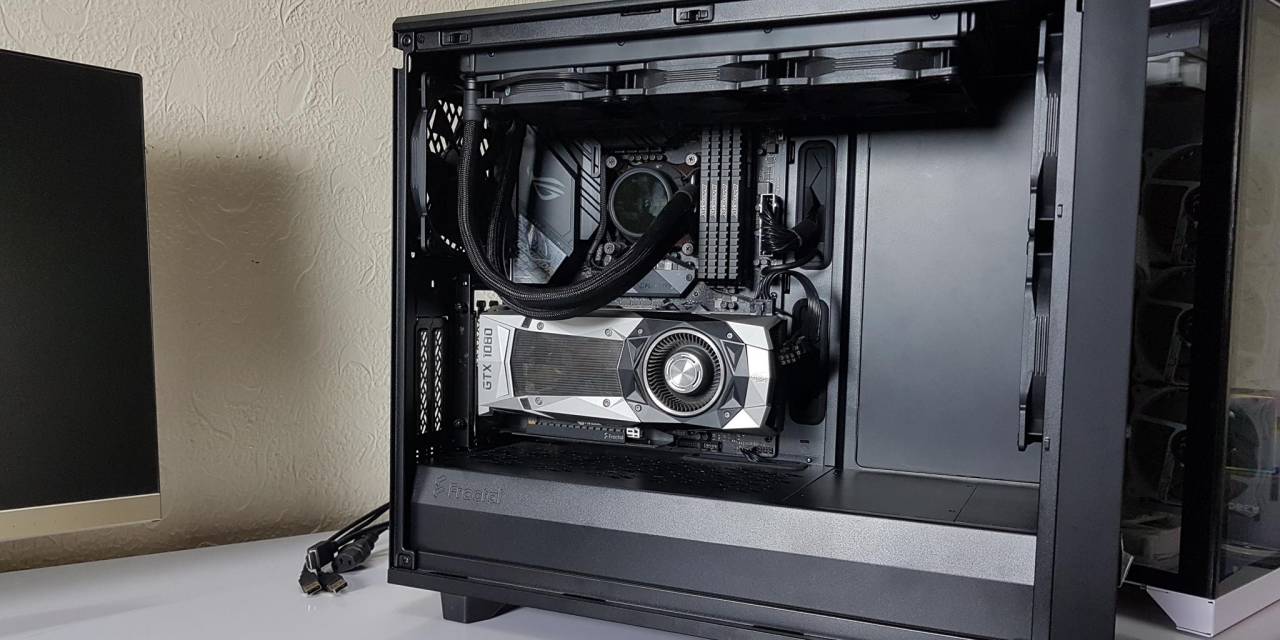
The above picture shows the fully assembled PC in the Meshify 2.

The above picture shows the close up of the water block on the Celcius+ S36 Dynamic.

The above picture shows the top view of the radiator bracket with the cooler installed on it. The cooler was installed outside of the case and bracket was placed afterwards on the case for convenient installation.

Our RTX 2080 bricked so we ended up using Nvidia GeForce GTX 1080 FE instead.

Cable routing was super easy and we did not face any issue in this aspect. The connectivity of the front panel system connectors is easier.

The ATX cable of the ION+ 860 Platinum is flexible and takes much less space. The picture shows the front panel USB Type C connector as well.

The EPS connector was connected.

The Nexus+ hub’s 4-pin PWM connector was connected to the CPU_FAN header on the motherboard. We did not connect any 4-pin fan on the Nexus+. The three Dynamic X2 GP-14 fans were connected to the 3-pin headers on the Nexus+. The fans connected on the 3-pin headers don’t show up in the UEFI/BIOS. I am not sure at what speed the three pre-installed fans were spinning.

The above picture shows the backside of the case. We did the minimal cable management and it still does not look bad at all. The PSU cover does a good job hiding the cables mess at the base.

The above picture shows the flexible ATX-24 cable of the ION+ 860 Platinum PSU.

The above picture shows the rear side of the build.

Test boot was a success.

The last step was to place the TG panel back on.
Testing
Following test build is used for thermal testing:
- ASUS ROG Strix Z390-E Gaming
- Intel i9 9900k [Stock, Auto]
- Fractal Design Celcius+ S36 Dynamic
- Ballistix Elite 16GB DDR4 kit @ 3000MHz
- Lexar 610 NVMe 250GB SSD
- Nvidia GeForce GTX 1080 FE
- Addlink S70 256GB NVMe SSD
- Fractal Design ION+ 860P
- Fractal Design Meshify 2
Noctua NT-H1 is used on the CPU IHS. AIDA64 Extreme 6.30 is used for the thermal testing using FPU and GPU at a time. Following configurations have been tested and reported in the graph:
- Stock Configuration [Front Panel installed]
- Front Mesh and Dust Filter Removed
The cooler’s fan was set to run at 100% PWM cycle. Rest of the settings were on Auto, Stock in the UEFI/BIOS. A stress test of 30 minutes was done using AIDA64 Extreme 6.30 (FPU and GPU) with idle time of 10 minutes. System was powered off between all runs for a minimum of 30 minutes as well.
Let’s take a look at the results.

The ambient temperature was 33.4°C. We have reported absolute temperature in the graph. The average of cores temperatures was taken. There was a difference of 1.5°C in both test configurations indicating that the airflow is not that restrictive. One can remove the front dust filter to improve the airflow further which would come handy for the air cooling on the CPU.
For graphics card, the result is similar. We are seeing a 2°C delta between both configurations. This is still within the acceptable margin and we are ok with the overall results.
Conclusion
The Fractal Design Meshify 2 is the new iteration in the Meshify series following the Meshify C and S2. The Meshify 2 is also now available in Compact form as well. The Meshify 2 is a mid-tower PC case which packs tons of features with rugged build quality all around without compromising the aesthetics. The Meshify 2 is available in 4 configurations. We have spin the Meshify 2 Light Tempered Glass in Black color. Fractal Design has done a fantastic job in the over finishing of the chassis. It is all in black from head to toe. The case has a dimension of 542x240x474mm (LxWxH). Its net weight is 10.5Kg which is quite something in its class but makes since we have an enlarged body case in steel finish.
The case has an angular front mesh design which speaks for itself and it has a dust filter right behind it. The smart design allows the user to open the front mesh for better air intake or better yet take the front mesh completely off without removing the front panel, thanks to hinge design. We have tool-less, to-latching side panels with 4mm tinted tempered glass on the left. No more bolts or screws to remove/install the side panels.
The case supports dual-layout. By default it has an open layout which suffices for the majority of the users including gamers, water cooling enthusiasts. For those who would want to have massive storage capability, we can turn the open layout into a superlative storage layout. The case supports motherboard up to 285mm E-ATX size. The cutouts have rubber grommets on them. Fractal Design has provided 3x Dynamic X2 GP-14 fans in the Meshify 2. Two are on the front and 1 is on the rear. The cable management is on another level to my liking. We have cable guides and Velcro strips for some neat and clean job. There is a PSU cable shield on the base to hide the complete lower chamber for clean outlook on the backside. To make things more interesting, Fractal has introduced their Nexus+ 2 smart hub on the backside of the case which is SATA powered and employs 6x 3-pin headers and 3x 4-pin headers. The user can connect the 4-pin PWM connector to the motherboard header to control the PWM fans from a single source. There is a multi-bracket provided in the case which allows the users to either use it for the water cooling pump, or 2.5” drive brackets or 120mm fan mount with various mounts in the Meshify 2 for the multi-bracket.
Another striking feature is the removable fan/radiator bracket on the top which is completely detachable which not only gives the user an open space from top and front but makes the installation of the fans/radiator convenient. The top panel is tool-less as well. We don’t need to remove any screw to take the panel off though the bracket is secured using two screws for which the side panel needs to be removed.
Cooling Provision
Following are the fan mounting possibilities (Total of 9 fan mounts):
- Up to 3x 120mm or 3x 140mm fans on the front [2x 140mm Pre-Installed]
- Up to 3x 120mm or 3x 140mm fans on the top
- 1x 120mm or 1x 140mm fans on the Rear [1x 140mm Pre-Installed]
- Up to 2x 120mm or 2x 140mm fans on the base
Following is the radiator mounting support:
- Up to 360mm radiator on the front
- Up to 420mm radiator on the top
- Up to 280mm radiator on the base
- Up to 120mm radiator on the rear
Storage Provision
Storage provision is:
- 5”/2.5” drive mounts: 6 included, 14 in total + 1 Multi-bracket
- Dedicated 2.5” drive mounts: 2 included, 4 in total
Clearance
- CPU Cooler of up to 185mm height is possible
- Graphics Card of up to 315mm length is possible in Storage layout
- PSU length of 250mm with the HDD cage
Fractal has done a good job for the filtration in the Meshify 2. We have a non-magnetic nylon made dust-filter on the front. A similar dust filter running in full length on the top which is also hinged design. A single full length filter is on the base that can be removed from the front of the case. There is no HDD LED indicator. Personally speaking I am not bothered as in my opinion the only Con in such a spacious case is the lack of support to mount the cpu cooler’s backplate after installing the motherboard in the case. A USB Gen-1 Type-C 10Gbps port on the front IO panel is a plus.
The Fractal Design ION+ 860P is Tier-1 listed PSU which is fully modular and comes in 10 years warranty from the Fractal Design. The distinctive feature is the enhanced cable flexibility and good output quality. These units high-grade Japanese Capacitors rated for 105°C. There is a dedicated button allowing the user to select semi-passive Zero RPM mode maintaining silence under loads. There is a custom tailored 140mm fan which uses FDB bearing to ensure super quiet operation. The revolutionary UltraFlex cable bends and twists effortlessly to make installation and cable-routing a breeze, thanks to an ultra-high strand count wire and special insulation. These units have Over Power Protection, Over Voltage Protection, Short Circuit Protection, Under Voltage Protection, Over Current Protection and Over Temperature Protections.
The assembling inside the Meshify 2 was a walk in the park and there was no issue faced at all. Probably this is my first case where I am not reporting any issue or giving any heads up. The Fractal Design Meshify 2 is listed at USD 129.99 MSRP. The ION+ 860P is listed at USD 139.99.
There is definitely more to it than meets the eyes and the Meshify 2 is bringing on the table more than it costs with Fractal covering all the bases. We have no compromise on the build quality and the set of features in this price range are quite distinctive and rich. The case supports massive water cooling gear and can be configured to either support the massive storage requirements. We have a single solution for all these requirements. Could not have done better than this! The Fractal Design Meshify 2 has won our top award “Must Have”.
We are thankful to the Fractal Design for providing a review sample.


