


SilverStone FARA R1 Chassis Review
Introduction
SilverStone Technology was founded in 2003 on the principle of recognition that merely having innovative expertise within the industry is not enough. Their objective is to ensure that their expertise is delivered to all products with consistency, in response to user’s needs, and with maximum user satisfaction. SilverStone Technology thrives on the challenges of rapid technological advancements and creating aesthetic standards for the industry. Their products are of high quality. Product lines include PC Chassis, PSU, Cooling Solution, Storage devices, etc.
About the time that we are seeing a coming back trend of mesh front panel chassis. This is good news for the users who prefer front ventilation for effective airflow. More particularly is the rising competition in the budget segment of the mid-tower chassis with front mesh. FARA R1 is an exact candidate for this price segment. We reached out to SilverStone for the review of FARA R1 and they sent one our way. The FARA R1 is a compact mid-tower chassis available in two colors; white and black with each color available in the tempered glass side panel and solid side panel making it a total of 4 variants. The model we are looking at is SST-FAR1W-G where FA refers to FARA, W stands for white, and G stands for tempered glass. A bit confusing when reading the full model name i.e FARA R1 and stated model no FAR1. Anyhow, I digress. Coming back to the topic, the FARA R1 supports standard ATX, microATX, and mini-ITX form factor motherboards. Despite being a compact mid-tower, the provision for cooling gear is quite good though with limitations which we will address. CPU cooler of up to 165mm height can be installed in this chassis and graphics card up to 322mm with front fans. Standard ATX PSU of length ranging from 160mm can be installed. Here are some of the features:
- Stylish and distinct tempered glass mid-tower ATX chassis.
- A fully meshed front panel with shortened chassis provides a large surface area for air intake.
- The precisely designed interior provides sufficient space for high-end graphics card and multiple cooling options.
- Two USB 3.0 ports and one USB 2.0 port integrated with a single audio jack provide great flexibility for various mobile audio accessories.
- Removable filters on top and bottom make cleaning out the dust a breeze.
Product: FARA R1W-G
Manufacturer: SilverStone Technology
Price: MSRP is $59.99 whereas it is retailing on Amazon at $68.42 at the time of the review
Specifications

Dimensions

Packaging and Contents
The chassis is shipped inside a standard brown color cardboard box.

FARA R1 is printed on the front along with the company’s website address. This is minimal information which may not help the user/reader much. But this is how most of the chassis packing boxes are.

Features of the chassis are printed here along with the minimal specifications. Serial no and model no are printed on a white color sticker along with the weight of the package. In order for the user to know more details about the chassis, full specifications are uploaded on their website.

Opening the box will show the chassis wrapped inside a transparent sheet and tucked between two white colors Styrofoam pads. One of the pads was broken from a top side but chassis was delivered scratch less. Pads did their job well!
Accessories
The SilverStone has provided:
- Standoffs
- Standoff socket wrench
- Various Screws
- Zip ties
- 1x Warranty Guide

There is no user manual included in the chassis which in my opinion should have been provided. The user can download the manual from their website. The downloaded manual has 13 pages and is quite elaborative taking the user step by step towards building inside the chassis and showing compatibility/clearance aspects pictorially.
Closer Look
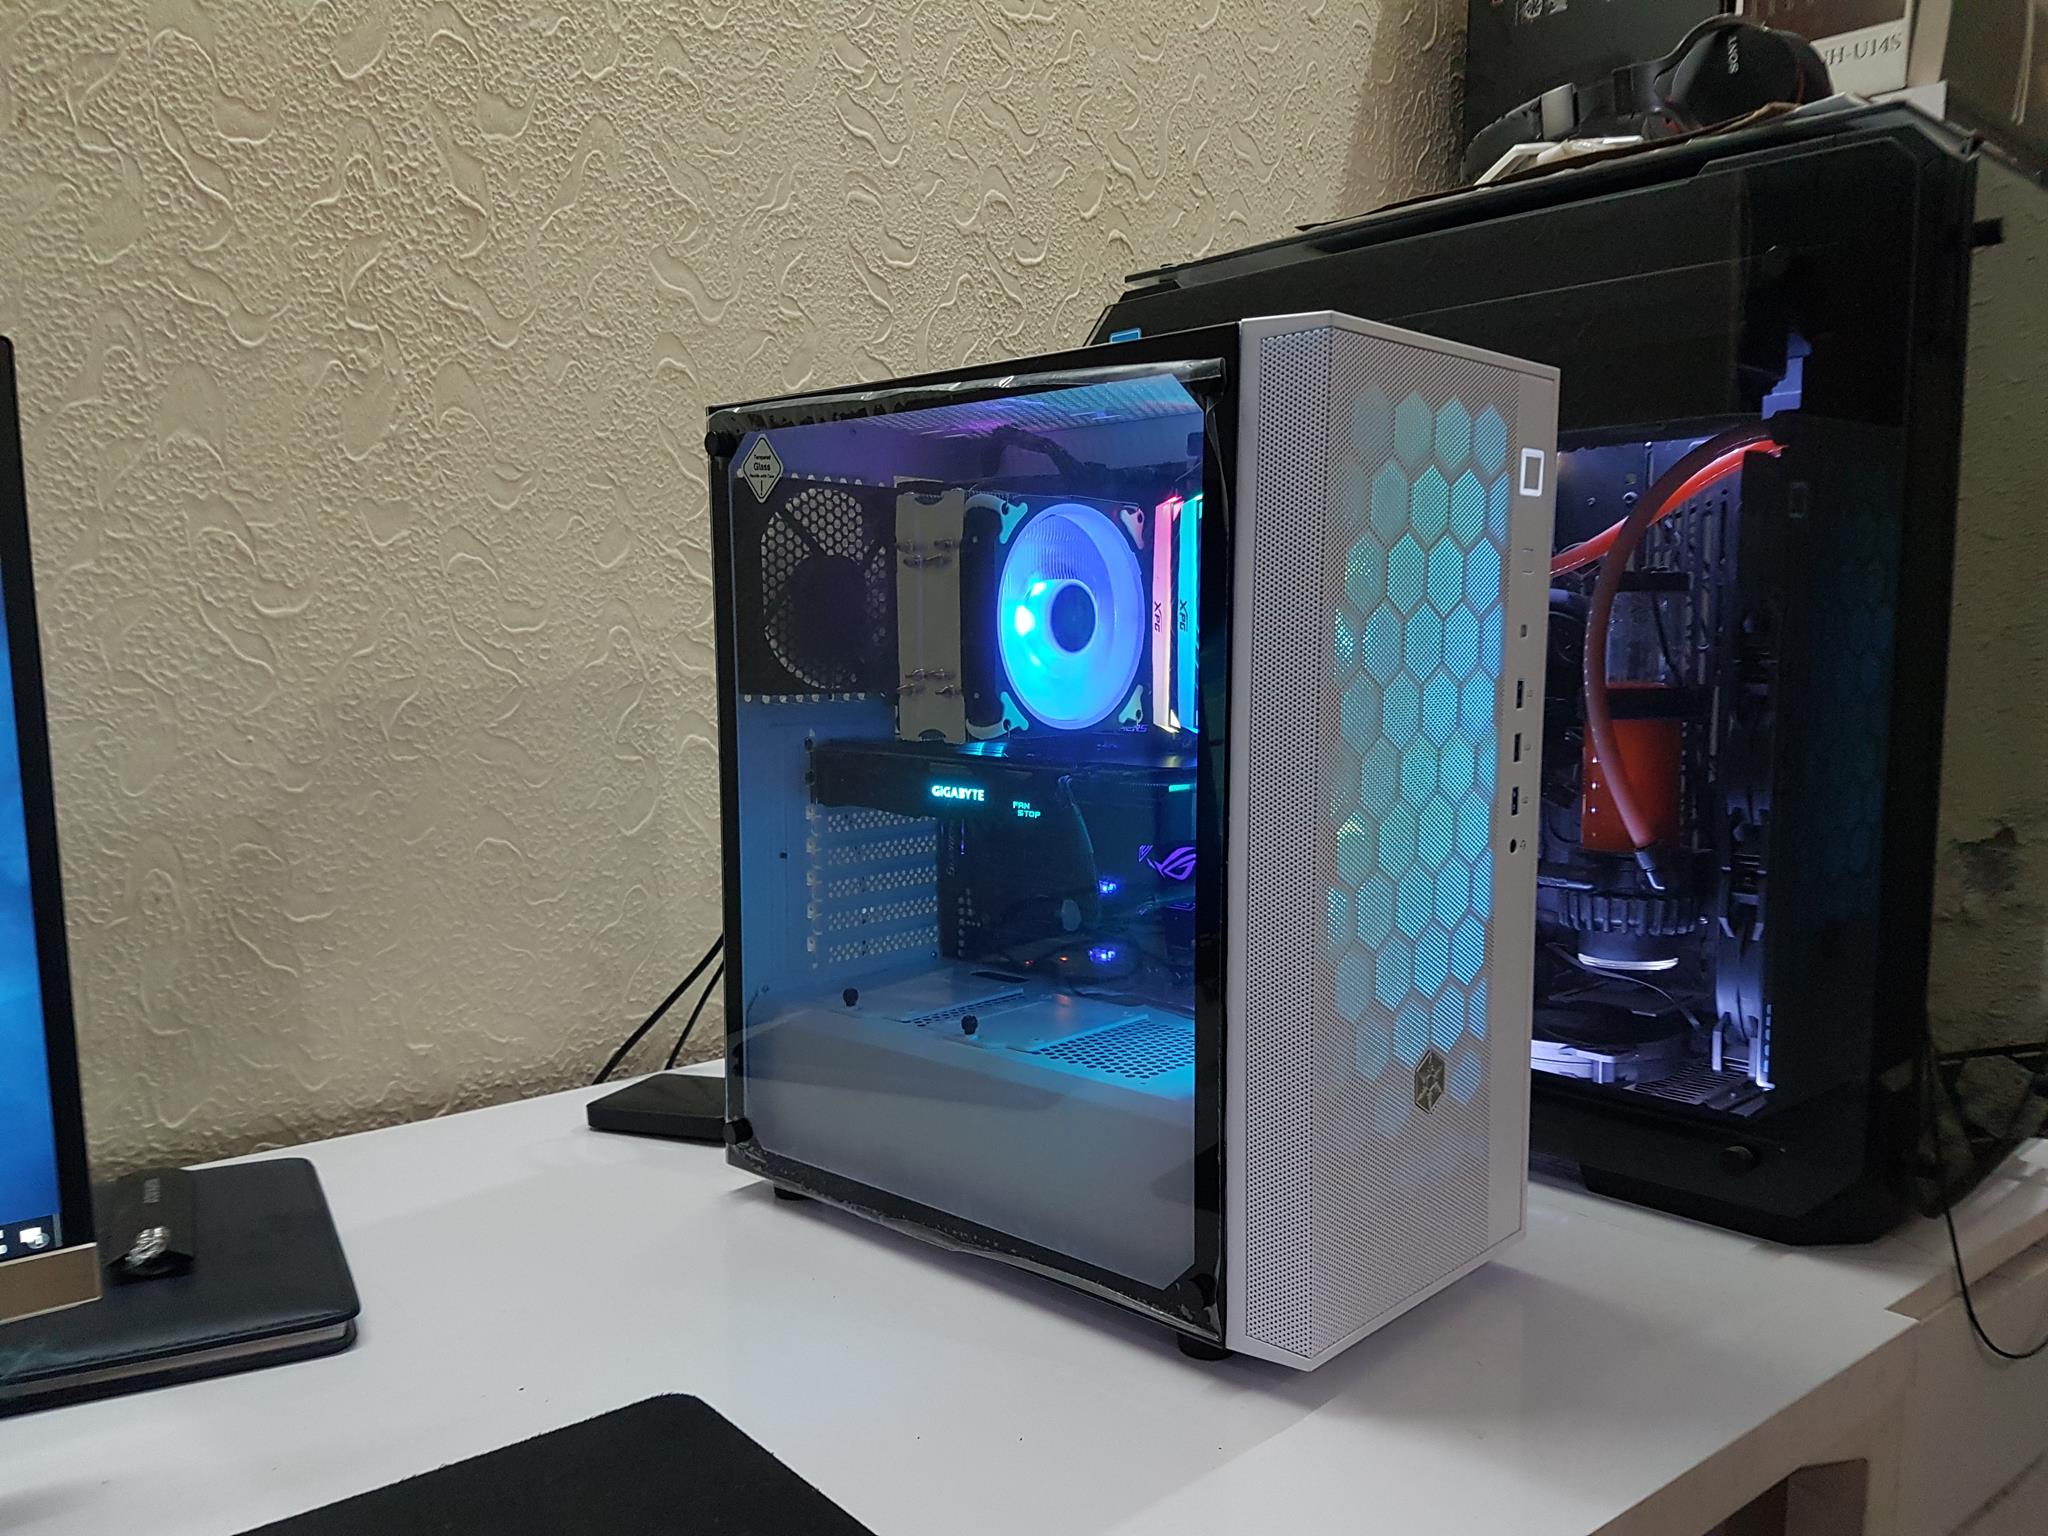
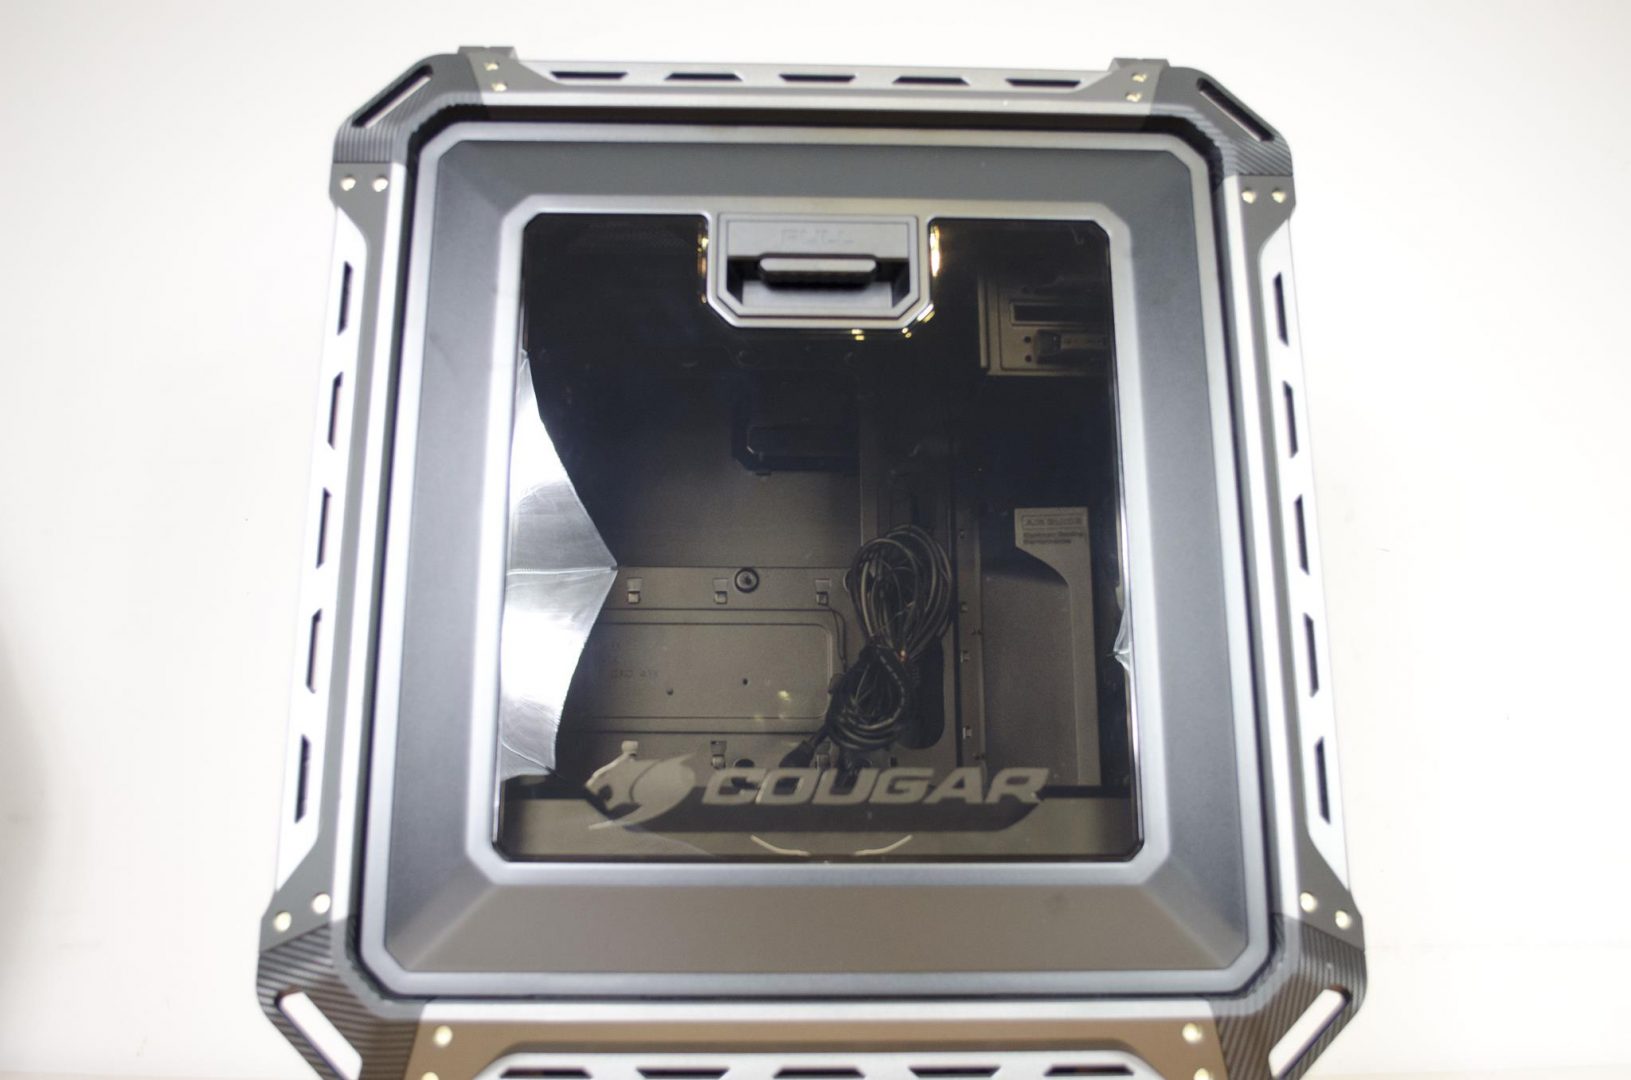
It is time to take a closer look at the chassis and see what it offers in this price range. The dimension of the chassis is 207x446x390mm (WxHxD). Chassis is made of steel, plastic, and tempered glass. The net weight of the chassis is 5KG. In terms of volume, this chassis has 37 Liters of space. This giggles me as I remember the volume of LD01 is 36.6 Liters (if this tells you how compact we are talking about though LD01 is quite spaciously built for being a microATX chassis). The white color model speaks for itself as it looks that good in person.

Exterior View
Let’s start with an exterior view of the chassis.

The front panel has a mesh design. There is a silver color SilverStone branded sticker pasted towards the lower side. The honeycomb structure is quite visible from the front side. The paint job is right on the money though we spotted variation in a color tone on the front panel and the rest of the structure which is understandable as both are in different materials i.e plastic and steel. Another striking difference is the location of the I/O panel as it is provided on the front side towards the right border. Following connectivity options are provided on the I/O panel:
- A white color illuminated Power button
- A reset button
- An LED Indicator
- 2x USB 3.0 ports mentioned as U3
- 1x USB 2.0 port mentioned as U2
- A microphone/audio jack in a single port
- Lightly tinted tempered glass side panel with front panel mesh intake for increased airflow. No need to sacrifice performance for aesthetics.
- Total of 6 fan mounts in a shortened chassis body creating an unobstructed airflow path to effectively cool internal components.
A slight glimpse of the tempered glass panel gives an idea that the panel is not fully flushed and is bit protruding as compared to the front panel.

Looking at the side panel, we have a light tinted tempered glass panel. The borders of the panel are finished in black color. The elegance of the white color chassis is speaking for itself. Surprisingly we found a black color fan on the rear inside a white color chassis. Seems like a first cut to save some cost. The protective sheet on the tempered glass has a Tempered Glass, Handle with care sticker pasted. The mesh side of the front panel extends towards this side providing maximum air intake opportunity from the front. There is a nice gap between the surface on which the chassis is placed and the bottom side of the chassis. We can see 4x black color screw covers on each corner of the glass panel which are used to install the panel on the structure. Place one hand on the panel while installing/removing as there is no catching mechanism to avoid the fall of the panel. As soon as all four screws are removed the panel will come off.

The rear side of the chassis has a standard layout. Up top, we have a cutout for the motherboard rear I/O plate followed by the mesh designed 120mm fan place. The good thing is the user can adjust the height of the rear 120mm fan in 5 places. In the middle section, we have 7 PCIe slot covers. The first two are reusable whereas the rest of them are not reusable as they pushed-out design. This is a second area where we are seeing a cost-saving aspect. The good point is the top two slots have reusable covers so that would come handy in case of a single graphics card use scenario.

Since the head sides of the PCIe slot covers are on the exterior much like what we saw on the AZZA Apollo 430, there is a cover plate that is secured using a non-captive thumb screw. The benefit of this design is that the PCIe slot covers sit in the plane with the chassis surface. At the bottom, we have a provision for a standard ATX PSU. The solid steel side panel is secured using two thumbscrews which are not captive.

The other side of the chassis has a solid steel panel.

The top side of the chassis has a magnetic white color dust filter. This filter has a black color magnetic belt on the inner side. The above picture is giving a bit of hint in two different white color tones coming from plastic and steel though I must say SilverStone has done a good job in keeping this difference minimal.

Removing the magnetic dust filter, we can see the vented design on the top. The user can install 2x 120mm fans or 2x 140mm fans on the top. The user can install a 120/240mm radiator on the top but with limitation with respect to the RAM height. With up to 32mm RAM, the user should not face any issue installing the radiator with fans on the top. Since the majority of the users don’t use low profile RAM, there is simply no way out on using a 240mm radiator with the fans on the top. With high profile RAM, the user can install the 240mm/280mm AIO on the front side. This limitation is coming from the compact design of the chassis. We have tested that by installing ASUS ROG RYUO 240mm AIO using ADATA XPG SPECTRIX D41. With that RAM, we could not install the AIO on the top side. Then we switched the RAM with GSkill Ageis RAM which allowed us to install the ASUS AIO on the top. To install AIO on the front side, we can be restricted by the length of the graphics card.

On the bottom side of the FARA R1, we have a non-magnetic removable dust filter on the PSU mount. There is a cutout on the bottom section of the front panel. This is where one has to grab the front panel and pull it over to take it out.

We have 4 black color feet on the corners of the chassis giving it enough height from the surface.
Interior View
It is about time to take a peek at the inner side of the chassis. Let’s start with the front side.

The front panel can be removed by grabbing it from the base and pulling out. We have rail mounts for 120mm and 140mm fans on the front side. The fan support is:
- Up to 3x 120mm fans
- Up to 2x 140mm fans
The radiator support is:
- A 120mm radiator
- A 240mm radiator
- A 140mm radiator
- A 280mm radiator
There are two cutouts on the right side from where the cables can be passed through. Though the user can install fans on the front outer side a quick installation of a 120mm fan in the middle was not successful as the cables coming out of the I/O panel’s PCB obstructed the panel. I also would not suggest installing fan this close to the front mesh. The recommended way is to install the fans on the inner side of the front with screws going through the front rail.
Since the I/O panel is on the front panel of the chassis, it will pull out the I/O panel’s cables along as well. Removing the front panel after assembling might be cumbersome particularly when the I/O panel’s cables would have been connected and zip tied.

We have a large size mesh/dust filter covering the honeycomb structure and the vented panel. It is not removable and I would not suggest washing it without covering the I/O panel as the PCB might not have the protective coating in this price range.

Removing the glass panel will show the white beauty of this chassis. One thing is the tooling on the top and bottom sides of the chassis. Note the cutouts which are there for the steel side panel. Seems like they are using the same tooling regardless of the panel type. Maybe a cost-saving factor! There is a close resemblance between the motherboard standoffs and the 4x mounting corner sockets on to which the glass panel is secured. We have a solid PSU shroud which has 2x 2.5” SSD brackets on the top. This view will give a certain impression of how compact this chassis is.

The total height of the inner side is 330mm whereas the length is 347mm. Taking a closer look at the motherboard tray, we have three cutouts on the top. There is a large size CPU cutout for ease of cooler’s installation. 6x black color standoffs are pre-installed. 3x more are to be installed by the user. They are provided in the accessories and a socket wrench is also provided for their convenient installation. Each mounting hole is labeled IAM where I stand for mini-ITX, A stands for standard ATX, and M stands for microATX. Naming nomenclature is also printed below the CPU cutout area. There are 6 cutouts on the right side of the motherboard tray. They are in the shape of a 3×2 array with three rows each with 2 columns. There are no rubber grommets. This is another cost-saving step. There is no flex in the tray. The build quality and the paint job are well done. The distance from the top of the motherboard to the top of the chassis is approximately 28mm or so. The displacement from the top is roughly 24mm so there is that when it comes to supporting the RAM with AIO up top. The maximum height of the CPU cooler is 165mm. SilverStone has mentioned in the user manual that the cooler should not protrude 20mm above the motherboard tray.

There is a black color 120mm non-RGB fan on the rear. I was expecting a white color fan but no complaint in this MSRP. This fan is rated for 1250 RPM or so. The FARA R1 chassis has a Delta A certification from Cybenetics.

The PCIe slot covers are not fully flushed on the chassis surface. As can be seen, the first two covers are reusable while the rest are not.

The user can install up to three 120mm or two 140mm fans on the front side. The gap between the front-mounted rail and the PSU shroud is just 28mm approximately. Since the fans and radiators are supposed to be installed on the same side, a 360mm radiator with all three fans is not possible. Also, adding a radiator and fan would reduce the space available for the graphics card. For example, if we install an AIO having a 27mm thick radiator with 25mm thick fans then they would take roughly 52mm of the space on the front. As per the specifications, a graphics card of length 322mm can be installed with the front fan. With front-mounted AIO this allowed length reduces to 295mm. without the front fan, the graphics card length is 347mm.

Looking at the PSU shroud, we can spot 3 cutouts placed in front of the motherboard tray. There are two 2.5” SSD brackets as well allowing the user to install SSDs in this place. The SSD brackets have captive thumbscrews. The cutouts don’t have rubber grommets. One caveat in using these cutouts is that PSU fully flushes them and leave no room to pass the cable through these cutouts with PSU installed. Good luck if you think the solution is to route the cables first and then install PSU!

Removing the SSD brackets will show the vented portion of the shroud. Taking a closer look, one can sport mounting holes for the fans on the shroud giving the impression that the user can install 2x 120mm fans on the shroud for airflow. The fan mount facing the PSU will not serve any purpose as flushed PSU will not leave any breathing room. The fan mount towards the front of the chassis may work for air intake provided HDD cage is not used and can be used for air intake for the graphics card. There is no mentioning of these mounts in the specifications.

Now, it is time to take a look at the backside of the motherboard tray area. One peculiar thing that will catch the eye is 4 holed raised design. This is quite an innovative and smart move by the SilverStone as it allows for a multi-direction cable tie point. There are a total of 12x cable tie points which are plenty. There is another 2.5” SSD bracket on the backside of the motherboard tray. The dual-chamber design is obvious from this angle.

The bottom chamber has an HDD cage and PSU mounting area. The user can install only 1x 3.5” HDD in the FARA R1. The top of the cage has a mounting provision for another 2.5” SSD. In terms of storage, the following provision is made in FARA R1:
- 4x 2.5” SSD
- 1x 3.5” HDD
This is kinda disappointing to see that FARA R1 is offering only 1x 3.5” drive provision. And the way it is the two 2.5” SS brackets on the PSU shroud may also end up useless as the cables pass through areas are fully covered by the PSU itself leaving no room for the user except routing the cables above the shroud towards the right side of the motherboard tray.

A black color caddy is provided in the HDD cage for a 3.5” HDD.

A provision for a 2.5” SSD can be seen on the HDD cage.

SilverStone has recommended a PSU of length 160mm with the HDD cage. The total length from the right side to the HDD cage is 185mm approximately. This includes PSU and cables both. There is not enough room and this will make it further challenging if non-modular PSU is used. If we remove HDD cage then there is approximately 350mm of space for the PSU and the cables.


The front panel cables include USB 3.0, USB 2.0, HD Audio, and front panel connector cables. The cables are in black color and have sufficient length.
The following seems to have been done with this chassis in a hope of keeping the cost low:
- No front-mounted fans.
- The black color fan on the rear.
- Pushed out the design on 5 PCIe slot covers making them not reusable.
- Single HDD caddy/tray limiting the user to only one 3.5” HDD.
- Standoff like mounting holes on the side panel to install the glass panel.
- The same tooling on both sides of the chassis frame giving a hint on the same production run for solid steel or glass panel mounting.
- No captive thumb screws except on the SSD brackets.
- No rubber grommets.
- No USB 3.1/Type-C port on the I/O panel.
Installation
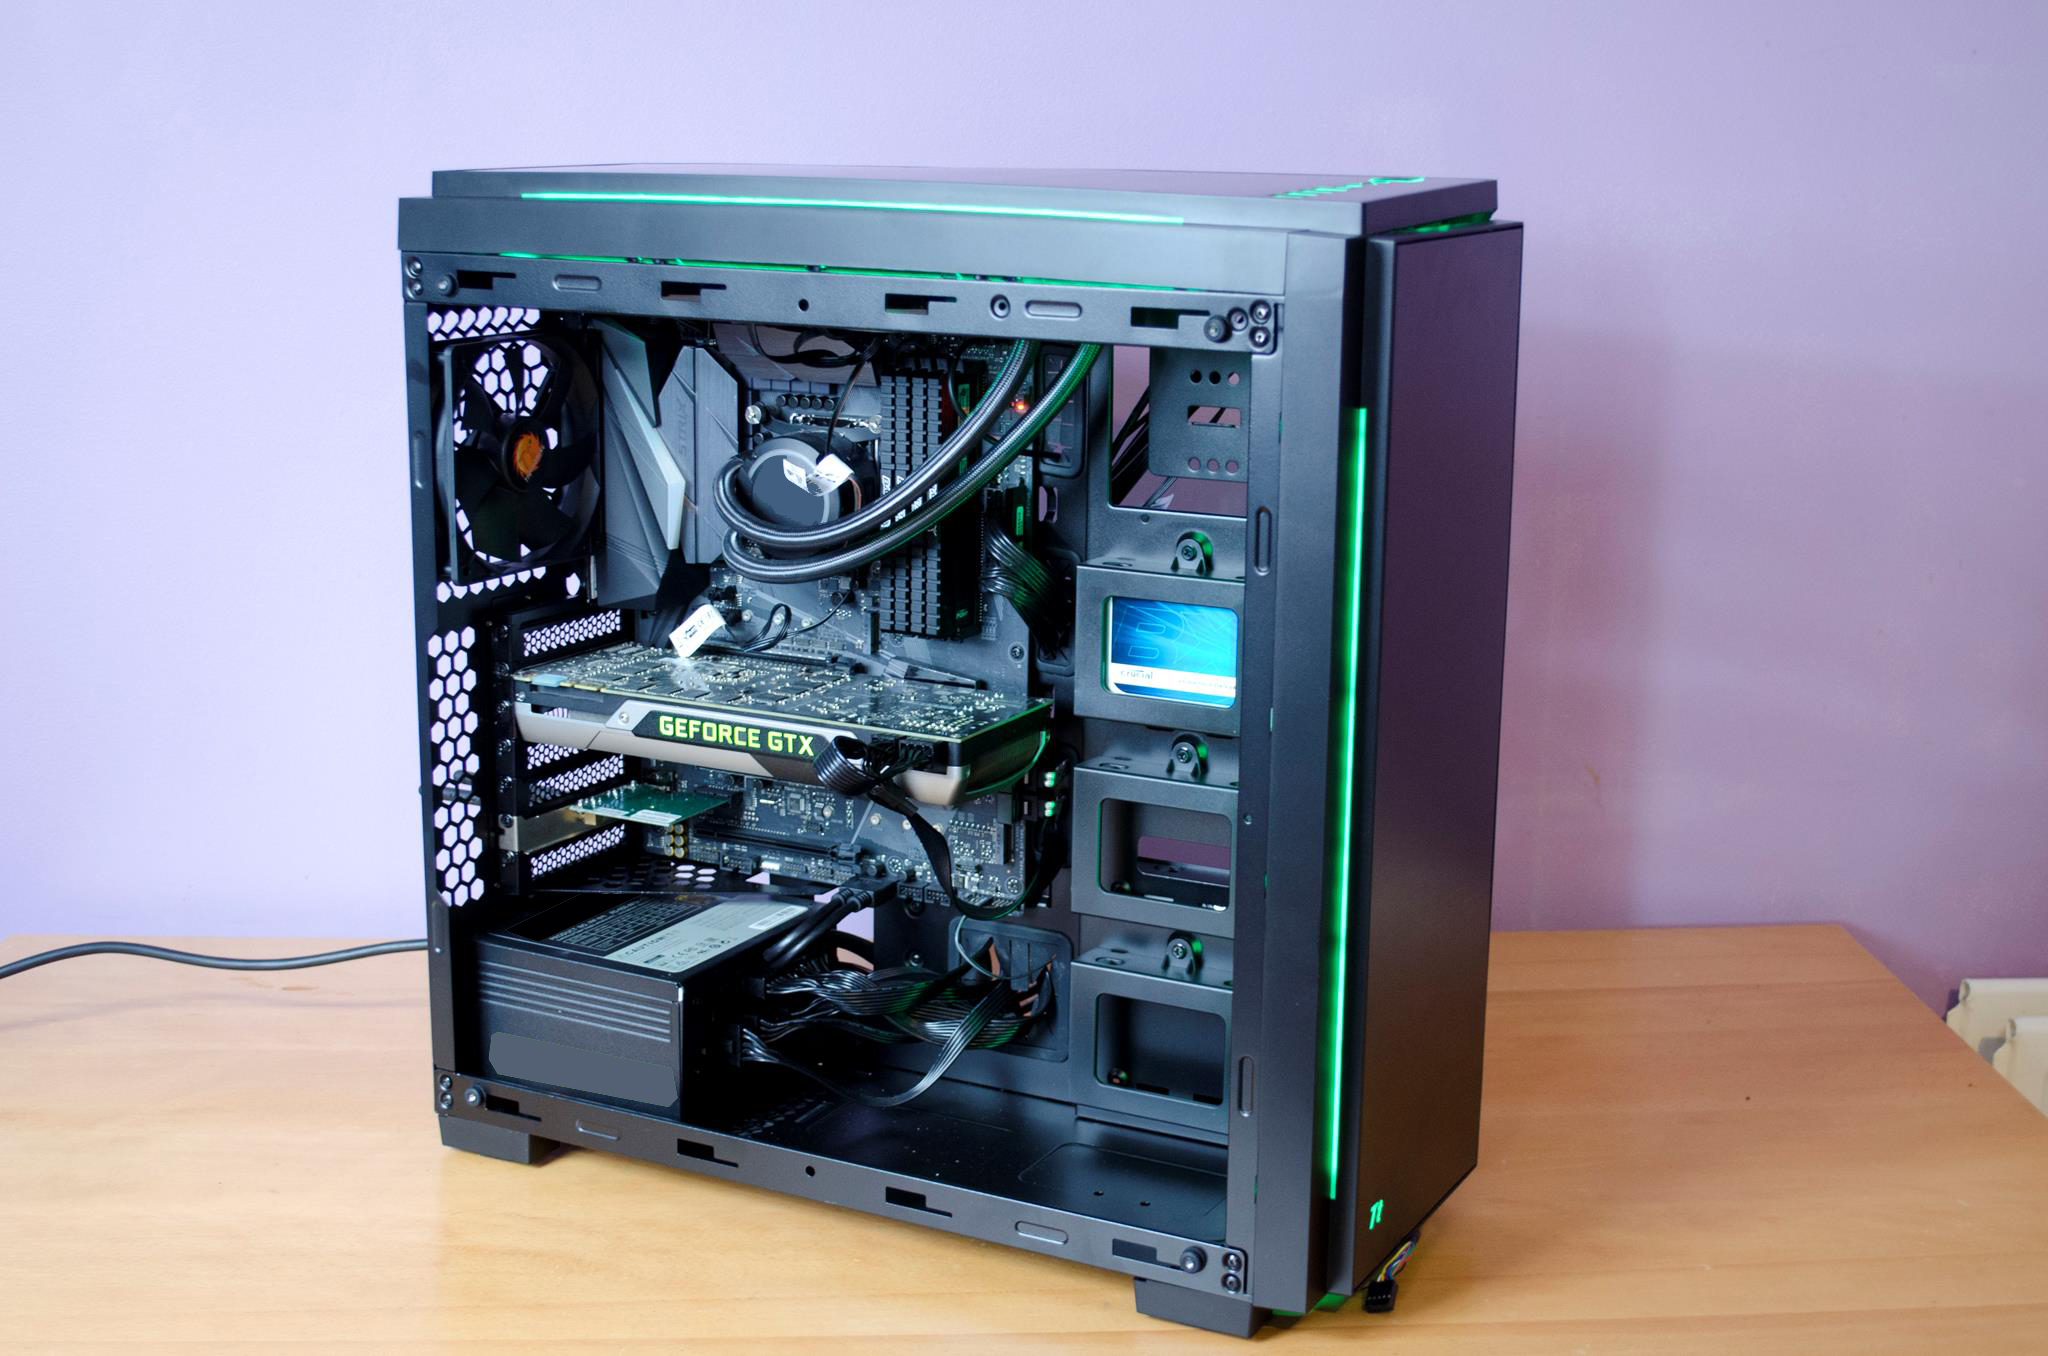
Basic installation particularly with an air cooler is simple and straight forward but there are considerations with respect to the AIO and high profile RAM as well as PSU length and front-mounted 2.5” SSD brackets. Before going further, here is the list of the test build that I have used in this chassis:
- Intel i7 6850k
- Asus ROG Rampage V Edition 10
- ADATA XPG Spectrix D41 4x8GB @ 2666MHz
- Samsung 840 EVO 250GB SSD for OS Drive
- SilverStone AR12-RGB Cooler
- Gigabyte GTX 1060 Gaming G1 6GB
- Antec HCP1300 PSU
The installation started with 3 leftover standoffs. I have been using Intel i7 8700k and Asus Strix Z390-E Gaming motherboard for the test builds but unfortunately, my CPU decided to take an eternal sleep which left me no choice but to use X99 platform for the test build. I am not going into a debate of if E-ATX is an official standard or nor but this motherboard has a dimension of 12×10.7inch (30.5×27.2cm). The standard ATX size motherboards have a dimension of 12×9.6inch (30.5×24.4cm). Though SilverStone never mentioned the compatibility of FARA R1 with motherboard size above standard ATX, installing this size motherboard in this chassis was an easy job. The design and layout of the chassis itself do not hinder the user installing the EATX size motherboard. But it has considerations of its own with respect to the AIO on the front side.

Next, the motherboard was installed. I had installed the CPU and RAM out of the chassis. So the complete assembly went inside in a single go. Also, I connected the EPS connector to the motherboard outside of the chassis.

Next, I installed the 2.5” SSD on the front-mounted bracket and passed the SATA and power cables through the middle cutout on the PSU shroud. It was a tight cable pass through.
In the next step, I tried to install the PSU. Since I don’t have 160mm length PSU, I installed Antec HCP1300 which has a length of 190mm. the SATA and power cables coming from the middle cut out of the shroud obstructed the PSU installation. I had to remove the cables and pass the PSU in its mounting place. Since its length is already exceeded from what is recommended, I had to remove the HDD cage to make room for PSU cables.
Next, the graphics card was installed. The SSD was installed on the bracket located on the backside of the motherboard tray. Next up was the cables routing and management. There is roughly 15mm of space on the sides at the back. Since there was no HDD cage, handling the cables was an easier task. I would suggest the user give some flexibility to the front I/O panel’s cables so that if the front panel has to be removed after the installation, the cables may not hinder the removal of the panel.

Some pictures of the build are:

Testing
One thing that I have not yet mentioned is the lack of stock fans on the front side. The chassis is shipped with only one fan on the rear. Since this is an airflow version as it has a mesh on the front side, we would want to see the thermal performance of the chassis.
Following configurations were used to test the thermal performance:
- Thermal testing with front panel installed with no front-mounted fans
- Thermal testing with the front panel removed and no front-mounted fans
- Thermal testing with front panel installed and 2x 120mm fans installed on the front
- Thermal testing with the front panel removed and 2x 120mm fans installed on the front
Each testing session was of 30 minutes of gameplay using Far Cry 5 at 1080P and Ultra settings. I will report Package temperature on the graph to represent the worst-case scenario instead of taking an average of all cores’ temperature values. The maximum temperature of the graphics card is reported in the graph. Between the testing sessions, the system was put to idle for a minimum of 15 minutes.
The cooler’s fan was set to run at 100% PWM duty cycle. The rear fan has 3-pin format and it was set to run at its full speed. These settings were set from the UEFI/BIOS.
Results

In stock configuration i.e no front-mounted fans, the maximum temperature hit by the CPU was 75°C under gaming load and it managed its clock on Auto settings. The graphics card hit 82°C which is on the high side. In the next step, we removed the front panel and repeated the test. This time the CPU was hitting 72°C and the graphics card was still hitting 82°C. This made it clear that removing the front panel was not making much of a difference and that front-mounted fans are required to lower the temperature.
We introduced 2x SilverStone Air Blazer 120R fans on the front. The fans were borrowed from their PF360 cooler which we got earlier for the review. The salient specifications of these fans for our interest are:
| Speed | Up to 2200 RPM |
| Airflow | Up to 93 CFM |
| Static Pressure | Up to 3.53 mmH₂O |
| Noise | Up to 35.6 DB(A) |
These fans were set to run at their 100% PWM cycle.

The tests were repeated with the revised configuration. The CPU temperature peaked at 67°C with the front panel on. There is a roughly 8°C drop in the CPU temperature. The graphics card’s temperature was 79°C. Only 3°C reduction! Next, we took the front panel off and repeated the test. The CPU was still at 67°C whereas the graphics card was 78°C.
This makes the case clear for the SilverStone FARA R1. If you are going for this chassis (and we will not hold you back), you should have 2x 120/140mm fans ready for optimal performance.
Conclusion
We are seeing a trend of meshed front chassis coming back which is a good sign though this trend is currently in the budget segment. We have taken a spin on the SilverStone FARA R1 chassis. There are 4 variants of this chassis as this chassis is available in white and black colors with two versions per color, solid steel side panel, or tempered glass side panel. We have tested the SST-FAR1W-G model. Here W means white and G means glass. It is a compact mid-tower chassis and white edition is quite dope in looks. The dimension of the chassis is 207x446x390mm (WxHxD). Chassis is made of steel, plastic, and tempered glass. The net weight of the chassis is 5KG. The SilverStone FARA R1 supports mini-ITX, microATX, and standard ATX (12×9.6inch) size motherboards.
In terms of the cooling department, the user can install up to 3x 120mm on the front or 2x 140mm fans on the front. Up to 2x 120/140mm fans on the top and a 120mm fan on the rear. The radiator of sizes 120/140/240/280mm can be installed on the front and radiators of sizes 120/240mm can be installed on the top. The maximum height of the CPU cooler is 165mm with maximum allowed displacement towards the top of the motherboard being 20mm. the graphics card of length 347mm can be installed without front fans. With a front fan, this length reduces to 322mm. with a front-mounted liquid cooler of thickness 52mm, the permissible length of the graphics card is 295mm approx. In terms of the storage, this chassis can house up to 4x 2.5” SSDs and just a single 3.5” HDD which is a letdown for the users having multiple HDDs. Standard ATX PSU of length 160mm is recommended by the manufacturer with the HDD cage. The chassis has 7x PCIe slot covers. The top two are reusable while the rest are not reusable. The rear fan is black and has a maximum speed of 1250 RPM. The chassis has 12 cable tie points with 8 having a unique design allowing the user to use zip ties in any direction.
The front panel has a vented design with a dust filter on the inner side. The dust filter is pasted. SilverStone has installed the I/O panel on the front side. The outer looks of the front side are quite killer but cabling the I/O panel on it can make the removal of front panel inconvenient after the PC is fully assembled. The top has a magnetic dust filter. The option to install top-mounted AIO is dependent on using low profile RAM otherwise install the AIO on the front side. With standard ATX motherboard, there is roughly 100mm of space available on the front side of the chassis. The PSU shroud has a vented top and it has two 2.5” SSD brackets. The PSU fully flushes the shroud’s top leaving no to little room for passing the SATA cables from the top SSD brackets. The glass panel is light-tinted. Be careful while handling the glass panel as there is no protection from the chassis itself. As soon as the screws are removed the panel will fall off so place one hand on the panel while removing/installing it. The PSU mounting area has a removable, non-magnetic dust filter in the white color on the underside of the chassis frame. The black color feet give enough height to the chassis for ventilation from the bottom.
SilverStone has informed that this chassis has an MSRP of $59.99 making it quite a package at this price point. It is retailing on Amazon at $68.42 at the time of review.
In terms of the thermal performance, our testing has shown that front-mounted fans are a must-have for this chassis to give optimal airflow. The build quality is on the money as is the hallmark of SilverStone. The paint job is done with almost perfection. Slight variation can be seen on the front panel as compared to the rest of the chassis which is understandably coming from different materials (steel and plastic). At the price point of $59.99 MSRP, I can’t complain much about some lacking as the overall set of features in this price point still makes this case making a compelling case and comes recommended by us provided you can afford to install 2x fans on the front on your own.
We are thankful to the SilverStone for giving us the opportunity to review SST-FAR1W-G.


