


Thermaltake View 27 PC Case Review
Introduction
When it comes to PC Chassis’, the market is filled with a variety of competitive offers starting from low budget range to as high as enthusiast chassis costing up to $900. Recent trends are geared towards the modular approach where possible and with Chassis like Phanteks Evolv ATX, Core X9 from Thermaltake etc users now have flexibility in terms of designing the layout for their build and taking out the chassis parts which are not needed. Recently, Phanteks has launched their high-end, enthusiast grade Chassis Enthoo Elite costive massive $900 for a chassis and giving stiff competition to the likes of Case Labs, though such chassis have niche market.
Today, we’ll be reviewing Thermaltake’s unique product i.e the View 27. This chassis reminds me of EKWB’s Vulture though that was a limited edition. View 27 is a mid tower chassis with gull-wing design built around custom loop. It is Tt LCS certified. The enlarged window panel with wraparound design advances the View 27’s visual presentation. The View 27 has the capability to deliver an outstanding cooling efficiency throughout the entire case.
At the front of the case, users can install up to either 360mm DIY liquid cooling radiator, or 360mm AIO liquid cooler, with a long graphic card at the same time. Additionally, a 120mm exhaust fan is preinstalled at the rear to optimize system ventilation. To keep the interior dust free, all intake ventilation holes are specially designed with removable dust filters.
Specifications
| Part No | CA-1G7-00M1WN-00 |
| Case Type | Mid Tower |
| Dimension (H x W x D) | 508 x 201 x 479mm |
| Net Weight | 6.4 kg |
| Side Panel | Transparent Window |
| Color | Black |
| Material | SPCC |
| Cooling System | Rear (exhaust) : 120 x 120 x 25 mm fan (1000rpm, 16dBA) |
| Drive Bays | 2 x 3.5’’ or 2.5’’(with HDD tray)
4 x 2.5’’ (with the M/B tray) |
| Expansion Slots | 8+2 |
| Motherboard Compatibility | 6.7” x 6.7” (Mini ITX), 9.6” x 9.6” (Micro ATX), 12” x 9.6” (ATX) |
| I/O Port | USB 3.0 x 1,USB 2.0 x 2, HD Audio x 1 |
| PSU | Standard PS2 PSU (optional) |
| Fan Support | Front: 3 x 120mm Rear: 1 x 120mm Power Cover: 1 x 120mm |
| Radiator Support | Front: 120mm, 240mm, 360mm
Rear: 120mm |
| Clearance | CPU cooler height limitation: 155mm
VGA length limitation: 410mm (Without Front Fan) PSU clearance limitation: 180mm |
Packing
Chassis packing box is a typical corrugated cardboard box. On the front of the box there is a diagram of the View 27 with its panels, drive cages, and fan apart to give the user an idea of the build possibilities. Brand and model number is printed on the top side.

Backside of the box has a diagram of the chassis as itself, Tt LCS certified stamp is printed right next to it. LCS certified chassis from Thermaltake guarantees the power users that the chassis is fully compatible with extreme water cooling.

On the right side of the box, diagram of the chassis and model name are printed.

On the left side of the box, specifications of the chassis are printed. Chassis diagram and model number are printed on the top of the specs table.


Chassis is wrapped inside a polythene sheet and placed between two pieces of styrofoam to ensure the safety of the chassis while in transit.


Accessories
There is not much in the accessories department. We have 4 cable ties, speaker cable and bag of needed screws.


Closer Look
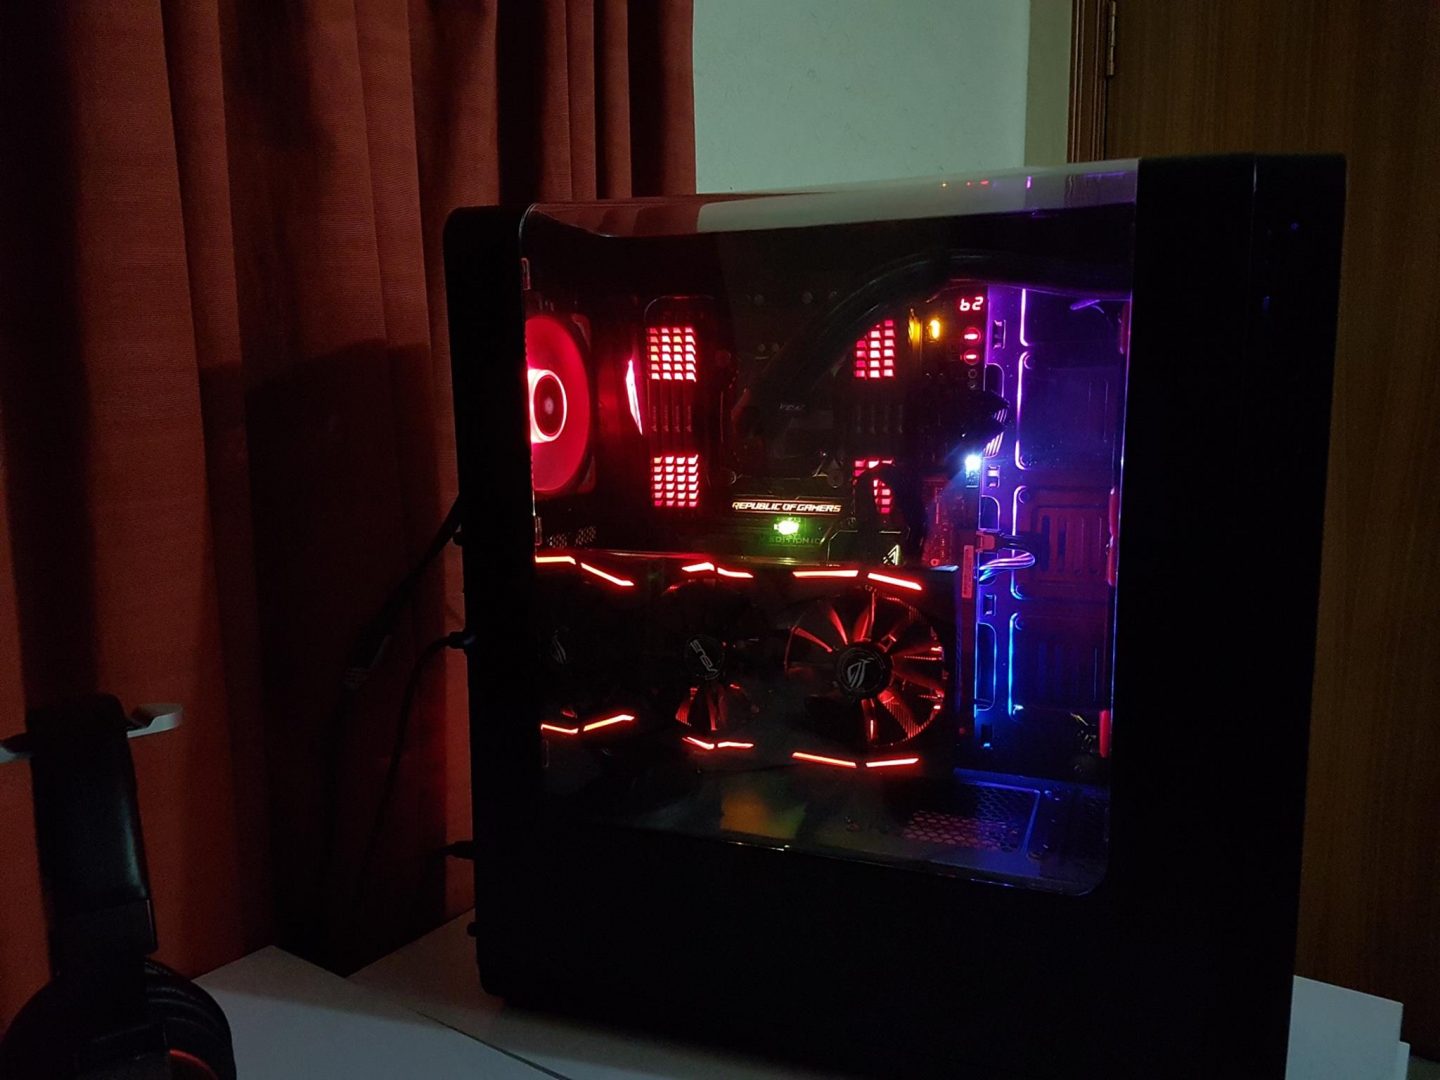
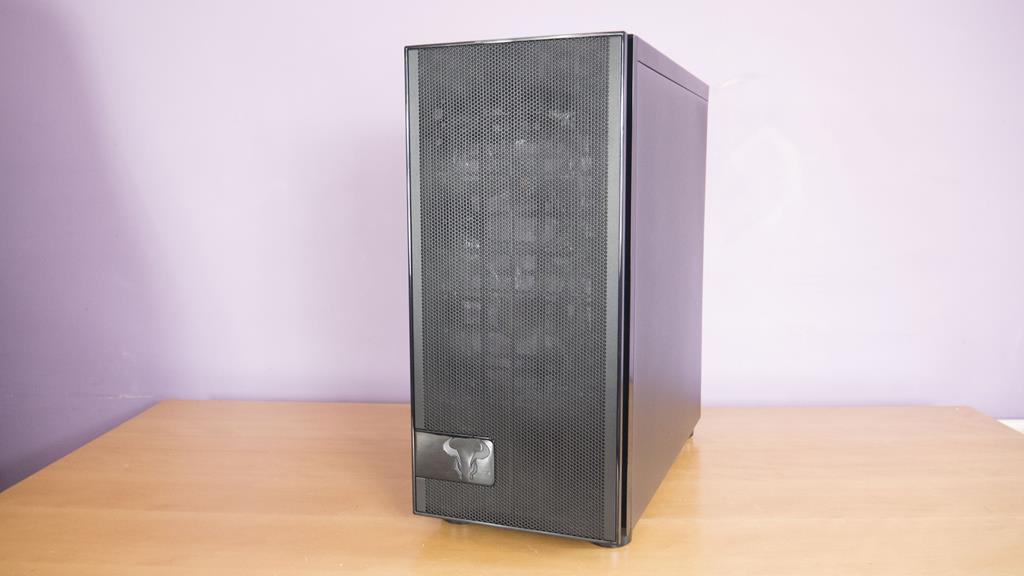
This is a mid-tower chassis aimed at gamers who would also love to show their builds from the top down. There are two unique features in the chassis. Unlike most of the other available options available in the market, this chassis has a transparent top hence there is no fan/radiator mount provision on the top. Chassis has built-in provision to mount the graphics card in a vertical orientation if desired. This is almost a new trend among the enthusiasts to install the graphics card in this position and many are modding their chassis for this provision. All this with yet being a budget chassis is quite remarkable.Chassis is made of SPCC material and its interior and exterior are black. The front panel is very stylish, it is a tinted transparent window which is highly reflective yet see through.
We made two observations in our sample. First, there was a scratch line on the top side of the chassis on the non-window panel. Second, the gull-wing panel was not seated properly and was out of proportionate from the geometrical symmetry between the chassis and the panel. Though, later on, it was made to fit approximately in proportional symmetry.

Left side (which is sometimes refers to as front) has a see through window panel which is going upwards in wrap around design. On the right side, we can see air intake for the front fans. This intake has mesh for dust filter from inside. Two thumb screws are visible on the back side of the chassis to give tool-less access for panel removal. IO panel cables are visible inside the chassis along with one 120mm fan on the rear.

The right side of the chassis has an air intake on the left side on the front panel. This is also covered with inside mesh for dust filtering. One single side panel is visible. It has a nominal flex in it and is quite sturdy. Two thumb screws are visible on the back side which can be removed to take off the panel.

The front panel is very pleasing and has a black tinted transparent window, this window is reflective yet see-through. A honey Comb design is visible though this is purely for aesthetics and does not have a dust filter, this does not mean that intake is not dust filtered. Left and right side of the panel has mesh and there is a removable dust filter between fan mounts and chassis. More on it in the later section.

The front IO Panel has 1 USB 3.0 port, 2 USB 2.0 ports, Microphone and headphone jack. The power button is on the right side whereas reset button is on the left side. All the headers are covered for dust protection.

On the rear side of the chassis shows height adjustable mounting of a single 120mm rear fan. IO shield area is on its left side. There are 8 PCIe slots in a horizontal position which is an impressive number for a mid-tower. There are 2 PCIe slots in vertical positioning should one would want to install the graphics vertically. On the bottom we have PSU cut out. Two thumb screws are on the top. To remove the main side panel, all four screws including two on top and two on right side need to be taken off.

Bottom of the chassis has four feet to raise the level of the chassis from the ground. Its main area is indented inside the both sides hence giving it more height from the surface. PSU mount has a ventilated area with a dust filter that can be removed for cleaning.

These 4 screws on the bottom side of the chassis right next to the dust filter can be removed to take out the drive cage.

Top view of the chassis. One can clearly see the build through top all the way to the left side of the chassis hence the name gull-wing style. Thermaltake name and logo are visible on the top of the front panel.

This is the view inside of the chassis from the top with the panel off.

Once the side panel is off, one can see the spacious area to build a powerful PC in this chassis. There is PSU shroud which is a plus given the price tag of this chassis. The cable management pass through do not come with rubber grommets in them. This could be seen by many as a con though overall this design is symmetrically very well balanced.
There are three cutouts on the right side of the motherboard tray for cable passing. Two cutouts are visible on the bottom in case one would build a mini-ITX or MicroATX size build. There are two cutouts on the PSU shroud on the bottom of the motherboard tray. Corsair should take a note of this. Even this budget chassis has got the users covered by providing necessary cut outs for bottom mounted cables to pass through. There is a single cut out on the PSU shroud facing the rear side. This is for passing the power cables for the graphics card. There are three cutouts on the top side of the tray. CPU power cable (EPS) can be passed through any of these holes depending upon the cable management style. Fan cables etc can also be passed through these holes.

We’ve a large size CPU are cut out. All the standoffs are pre-installed in standard ATX configuration. This chassis has support for mini-ITX, micro-ATX and regular ATX size motherboards. Though, we’ll show our readers that this chassis also supports E-ATX size motherboard.

These form factors have been coded as is visible on the bottom portion of the motherboard tray. A for ATX, M for micro-ATX and I for mini-ITX. Standoffs are mentioned in these codes for easy understanding of the users regarding which standoff to use for which form factor motherboard.

On the far right side of them motherboard tray, there are three uniquely designed SSD mounts. There is a small size cut out on the right side of these SSD mounts. These can’t be used for SATA and Power cables of the SSD as these cut outs are too narrow to allow for flexible connectivity of the cables. We use these cut outs to pass through fan power cables.

These pictures will help the user to understand the cutout limitation.


We passed the cables with one cable at a time and connected with the SSD but then SSD could not be mounted due to larger surface area requirement of the cables.

Then the SSD was tested with reverse direction mount. Cables were passed through the main cut outs between SSD mounts and motherboard tray. Cables were snuggled in very well. One would need to be delicate as the same cut out will be used to pass out 24-pin ATX power cable. Though SSD can be mounted on the lower mount depending upon the number of the SSDs.

One can see the dust filter on the front side intake. Up to 3 120mm fans can be mounted on the front with up to 3x 360mm radiators. One would need to take off the front panel to access the fan mount positions.

PSU Shroud has a lot of going on, on itself. There is supporting bracket to mount the graphics card vertically on the left side of the shroud. This bracket can be removed if not needed. One can mount 120mm fan on the marked area of the shroud. This can be used to throw fresh air on the HDD cage. Next, on the right side, there is a cover which can be removed if 280mm or 360 mm radiator is to be installed. Even if said user is installing these size radiators, this cover would still be needed to be taken off to install the third fan (if so required) on the front.

We removed the support bracket to show our readers the possibility.

We also removed the cover to show our readers as we installed 3 fans on the front.

Underneath area of the cover comes very handy for tucking in the extra cables. However, in case of 360mm radiator installation, this might not be a possibility.

Below pic shows the pre-installed 120mm fan with Thermaltake logo on the fan motor hub. 8+2 PCIe slot covers are clearly visible.

Removing the back panel will reveal the backside of the motherboard tray and PSU shroud under area. Motherboard tray does not have much flex in it and is very sturdy. We can see a clear laid out cable management provisions. There are plenty of tie-downs which is a plus for this chassis. As many as 16 tie-downs are there. Large size CPU cooler cutout area is visible.

Chassis has enough space between the side panel and the motherboard tray for cable management.

There is a hidden SSD bracket on the backside of the motherboard. Though it has the capacity to fit two SSDs, only one SSD can be mounted using four screws.

Some pictures with SSD mounted on this bracket.


Next picture shows two SSDs can be installed in this bracket but only one would be fixed using 4 screws while other would be not securely placed.

There is a single drive cage with two caddies. 2 35.” Or 2.5” drives can be installed on these caddies. On the left side of the cage, there is an empty area which can be accessed by removing the top cover as mentioned earlier. Note that in order to install the bottom fan (third one from the top on the front panel), drive cage would need to be removed. My hands are large and need more space to work in.

Some pictures are attached below with empty caddies and with SSD and HDD installed on them.


These are the supporting brackets forming the drive cage.


On the right side of the drives cage, we have a PSU mounting area. There is foam on the inner side which stops the PSU from going further down while installing. One can see the raised surface on the bottom ventilated area. This comes handy if the PSU is to be installed with fan side facing up. There is not enough space between PSU and drives cage for cables and this is a serious complaint.

Removing the drive cages would enable the user to have more spacious room for cable tucking.

The height of the rear fan can be adjusted which is another plus of this chassis.

There are total 10 PCIe expansion slots. 8 are regular horizontal slots and 2 are vertically placed for vertical installation of a graphics card.

On the bottom portion of the rear side of the chassis has the opening for PSU. Bottom dust filter can be slide out in this direction.

Below is the picture showing the front side of the chassis with every panel removed. We can see mounting rail (fixed) for the 3 120mm fans. There is only one cut out for cables pass through.

Front side has a single large size dust filter which can be removed for cleaning purpose though with much hassle as entire front panel needs to be taken off and then fans installed on the front side would also need to be taken off.

Below pic shows the dust filter hidden behind the fans.

This is the backside of the front panel. From the overall design of the chassis, this area comes under spot light as front panel implementation is sadly strange. The panel is fixed on the front panel itself. Once you are done with assembling the PC and would need to take off the front panel, you would have to detach all front panel cables from motherboard first, take out the cables from any cable management channel and panel can be taken off. Any slight negligence could easily damage the motherboard headers for these cables or the panel itself. Thermaltake, please address this observation.

One can see the mesh dust filters on the left and right side of the panel and honeycomb design on the front itself.


Final Build
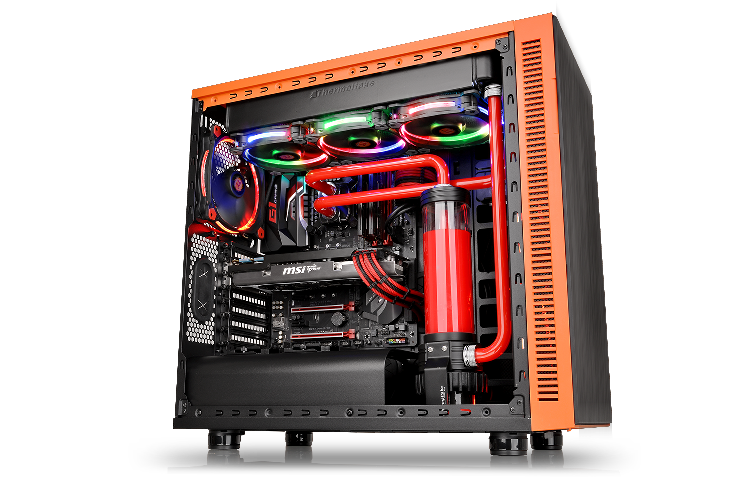
Following components were used for the test build:
Asus Rampage V Edition 10
Intel i7 6850k
Corsair Vengeance Red LED 64GB DDR4
Corsair H100i V2
Asus GTX 1080 Strix
Corsair ML Pro Red 120mm fans
Thermaltake DPS G 750W PSU
WD 6TB Black HDD
Samsung 840 EVO 250GB SSD
Below are some pics from the assembling.
This motherboard is E-ATX size and as such in not compatible with the chassis. But, chassis easily adjusted to the motherboard. The only downside was that it covered half of the cut outs for cables but we did not encounter any problem in installing the cables.

Remember, mounting for ATX or E-ATX size motherboards is same. There is plenty of space between the motherboard and top of the PSU shroud with two cut outs for cables passing.

Next picture shows the front mounted 240mm radiator. Three 120mm fans were mounted on the front in push config and two were mounted on the radiator in pull config. This chassis has totally positive air pressure built-in the design which is another plus. SSD mounts on the front are not affected with radiator and fans mounting.

Thermaltake’s PCI-e X16 riser cable was used to test the vertical mount of the graphics card. This cable is not included in the accessories and is an optional one. It can be purchased from Amazon.

Unfortunately, manual was silent on how to setup supporting bracket with the riser cable. Though, at the end, it was a simple step but should have been taken care of in the manual.

Suggested thickness of graphics card is up to 40mm (2-slot reference card standard) with 7mm space for ventilation. Take note of it.

This is definitely a stunning presentation and personally speaking, I love it.


Though there is good amount of tie-ducts on the backside of the motherboard tray, less space between hard drive cage and PSU leaves build in a challenging state of cable handling. This is evident from the picture. Though we did not spend much time with the cable management.

Video of test build can be viewed at
Thermal Performance
We tested the thermals by playing Battle Field 1 on Ultra settings at 1440p resolution. Maximum temps on the graphics card were 75C and maximum temp on CPU was 51C. Both components were not overclocked. Front fans were on their 50% rated speeds and the rear fan was on custom curve with these settings:
50% RPM on 30C to 50C
75% RPM on 50C to 60C
100% RPM on 60C+
Temps were good under stress testing of the graphics card and max temp was 77C. Ambeint temp was 21C. On idle, CPU was doing 28C and graphics card was doing 48C.
Final Thoughts
Conclusion
Thermaltake View 27 has an MSRP of $72.64 w/o VAT [Rs. 7500]. This makes it a budget chassis but don’t let the low price fool you for even a once. This chassis has a solid build quality, unique way of showing the marvellous builds, vertically mount capability of the graphics card with a plethora of other features. Its design is well thought out, though we found certain Cons as well, as mentioned in the review above. Biggest of all is the strange implementation of the front IO panel. Other than that, this chassis has my high praise to it.
This chassis has won our Value and Performance awards. Yes, both awards at the same time show how well Thermaltake has done their job with this chassis. For anyone, who is in the Chassis market and has got a limited budget but would need a Chassis with good quality and features, do check this out.


Future Upgrade
I would strongly suggest three things to Thermaltake for the improvement of the chassis:
- Fixed the front IO Panel on the chassis itself rather than on the complete removable front panel.
- Provide Rubber Grommets on the main cut outs
- Tempered Glass edition of this chassis would be a good addition.


