
When it comes to liquid cooling solutions for the PC enthusiast, Alphacool is among the top contenders for your bucks. The Germany based manufacturer not only provide custom loop gear at affordable pricing and good quality but also carries All-In-One liquid coolers for the masses who would want everything assembled and pre-filled with the on-the-go install and use feature. Eisbaer is the product series from Alphacool representing the AIO solution not only for the CPUs but also for the graphics cards. They are designed to be easily expandable and are built using the same custom loop components off-the-shelf that anyone could buy separately to assemble a custom loop for the cooling purpose. We have reviewed their Eisbaer 360, Eisbaer 360 LT CPU Coolers and Eiswolf GPX-N 1080 Pro-M01 for the Nvidia GeForce GTX 1080 Founder’s Edition graphics card. You can check our detailed reviews of these coolers by clicking on the links mentioned below.
Alphacool Eisbaer 360 CPU Cooler
Alphacool Eisbaer 360 LT CPU Cooler
Alphacool GPX-N1080 Pro-M01 Graphics Card Cooler
There is a reason why I have good praise for these coolers. If I have to mention them, they would go like that:
- Fully Modular
- Expandable Using Quick-Connect fittings
- Using standard G1/4” threaded ports
- Copper made radiator
- Copper/Brass made standard compression fittings
- DC-LT Pumps
- Refill port
- Easy integration into exiting custom loop
- Adequate cooling potential
As a reviewer, I am using a test bench chassis on my table. The test bench chassis is Praxis Wet Bench from the Primochill. For every reviewer, this is one heck of a complete solution to ease your life of continuously changing the hardware without a hassle and it is totally worth your investment. But, there is one caveat to it as well. It is designed around custom water cooling gear and bears great support to mount custom water cooling equipment. Unfortunately, it has no support for the AIOs and this lacking is coming right from the design. Their next generation is upon us and this time we are expecting support for the AIOs. Since the most frequent item to be tested on my test bench is the CPU Cooler, there is no way for me to employ custom loop set 24/7 without needing to take it out and install the cooler for the testing.
I had two requirements that would enable to overcome the above-stated issues:
- Possibility to install the AIO on the PrimoChill Praxis WetBench
- Possibility to remove the CPU water block without removing the complete unit.
- Additionally, support to use the pre-mounted radiator/fans for the testing of the new CPU water blocks.
Majority of the AIOs in the market are purely closed loop using the barbs. They don’t have refill ports though we are seeing a shift in this aspect. But the point with the majority of the closed loop cooling solutions is that it is hard to mod them as they lack modularity. This makes the Alphacool Eisbaer a prime candidate for my requirement. So, without further ado, here is my run time design on the little mod that would enable me to use the AIO on the WetBench that would enable me to achieve my above stated three pointed requirements.

I would dis-assemble the Eisbaer 360 (Non-LT) CPU Cooler. I will replace the existing black color tubing with the 13/10mm transparent tube. Exiting compression fittings will be replaced with the G1/4” 90° rotary fittings. The radiator, block unit, and the fans will remain the same. The modded unit will be filled with Alphacool pre-mixed transparent coolant. These steps would enable me to mount the AIO on the PrimoChill Praxis WetBench.
In order to achieve the other goals, I would need to use two quick-disconnect fittings with one on each tube. These fittings will allow me to easily disconnect the loop and take out the water block from the loop. This will not only allow me to easily test the other CPU coolers but would also let me test the other CPU water blocks without having to disassemble the complete unit. The Alphacool Eisbaer 360 is using copper made 360mm radiator hence it should suffice for any testing.
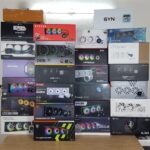
What are we waiting for? Let’s start. Here is the rundown of the stuff that I would need for this mod. I am humbly thankful to Alphacool for the provision of below-mentioned stuff.
- Alphacool Eiszapfen Quick Release Connector x2
- Alphacool Eiszapfen 13/10mm 90° Rotary Compression Fittings x4
- Alphacool Eiszapfen 13/10mm Straight Socket Compression Fittings x4
- Alphacool AlphaTube 13/10mm HF Tubing 1 meter
- Alphacool CKC Cape Kelvin Catcher Clear
- Alphacool Eisbaer 360 CPU Cooler
Before walking through the mod, let’s take a quick look at the stuff.
Alphacool Eiszapfen Quick Release Connectors

These are their premium quick-connect fittings that are made of brass material. The idea with Quick-Connect or Quick-Disconnect fittings is that they provide the easiest, safest, and quickest way to expand the loop with needing to drain disassemble the existing loop. The prime concern with any disconnect fitting is to avoid the leakage and spill over. Alphacool has taken care of this in the form of Eiszapfen Quick Release fittings.

These fittings come in a packing of single fitting per pack. The packing box is made of a cardboard box and is in total black color which is typical styling from Alphacool. On three sides, there is only OCool branding whereas the fourth side has a sticker pasted on it with 17282 number printed on it which is a part no of these fittings for identification. Inside the box, we have a single fitting placed inside a transparent container.


By pulling down the outer ring, these couplings can be disconnected. Both sides close immediately completely tight so that no water can escape. Thanks to the special N.D.S.L. Technology (no drip, no splash, no leak) a leak, drip or splash out of the water on opening the lock is excluded. By assembling again, both sides must click into each other audibly and shut themselves tightly by a double O-ring, which is simply compressed when plugged together. Here the specifications of these fittings:
- Dimensions (L x D): 64,6 x 23,9mm
- Material: Brass
- Colour: Deep Black
- Thread: 2x 1/4″ internal thread
There is an outer ring on these fittings with the text Push and directional arrows indicating the direction in which the ring is to be pushed towards. Simply, hold the fitting in your hand such as your free hand grasps the other end of the coupling while the holding hand grips on the outer ring. Now, just pull the outer ring using the holding hand and the fittings would come apart. A little practice will keep you going. In order to couple them again, use both hands such that each hand grasps the ends of each disconnected fitting. Simply, plug the fitting without any text on it inside the bulky head part and give them a little push. They should couple with a loud clicky noise indicating the successful connection. You can also use a single hand to couple them. These fittings have grease on the inner sides. This is to ensure the smooth multiple coupling/dis-coupling sessions without damaging the inner rings. The quick couplings should not be used permanently in a dry condition, since the O-rings may be too much strain and tightness is no longer guaranteed.
Alphacool Eiszapfen Compression fittings
Alphacool’s Eiszapfen Connector Series is the high-end execution of these tried-and-true connectors! The other two fittings that I would be using in this mod are straight and 90° rotary fittings. 90° rotary fittings are blessing to have as they make the tube routing easier and efficient. They also add to the cosmetic outlook of the complete loop. This connector has a ¼” thread on one side and is thereby compatible with 95% of components. The other side fits a 13/10mm hose. The middle of this connector is turned at a 90° angle in order to prevent complicated hose connections. The threaded side is rotatable for maximum flexibility. Here are the specifications of these fittings:
- Material: Brass
- Colour: Deep Black
- Dimensions: 34,5mm x 20mm x 33mm (LxWxH)
The other fitting is straight socket 13/10mm compression one. This connector has a ¼” thread on one side and is thereby compatible with 95% of components. The other side fits a 13/10mm hose. Here are the specifications of these fittings:
- Material: Brass
- Colour: Deep Black
- Dimensions: Diameter: 20mm, Height: 27mm
Tubing PVC 13/10mm
This hose is a highly flexible PVC hose with an outer diameter of 13mm and an inner diameter of 10mm. Here are the specifications:
- Material: PVC
- Colour: Transparent
- Inner diameter: 10mm, 3/8″
- Outer diameter: 13mm, 1/2″
- Wall thickness: 1.5mm, 1/15″
- UV – color: Non UV-active
- Color: Transparent
- Operating pressure: 4 Bar (at 20°C)
- Service temperature: -20°C ~ 60°C
Mod
Let’s get started with the mod. The first thing that needed to be done was to open the Eisbaer 360 cooler and drain the loop. That was an easy task. You can remove the fittings on the block and pour the cooler in the container or do it on the radiator side. Ultimately, you will be doing both at the end. Since fittings are installed on standard G1/4” port, there should be no problem in taking them out. Once the loop is opened, make sure to properly drain and then flush the radiator and the block using the distilled water.

Now, that we have dis-assembled the Eisbaer 360, it is time to assemble it but using the different tubing and fittings. First, let prepare the Quick Release Connectors.

These fittings have G1/4” inner threading on both ends. What we need to do is to install the straight socket compression fittings with one on each other as shown in the picture above. That is why I needed 4 straight socket compression fittings. Please, note that with two of these straight socket fittings, the overall weight of the assembled quick release fitting will increase as these fittings are already bearing much weight since these all are made of brass.

In the next step, the 13/10mm tubing is installed on to the quick release connectors. It is a simple task. All that you need to do is to remove the outer ring of the straight socket compression fittings, insert the tube on to the barb and secure it using the outer/compression ring. That simple!

The above picture shows the essence of the quick release fittings. It is that simple to disconnect the loop without sweating.

In the next step, two 90° rotary fittings were installed on the Alphacool NexXxos 30mm copper radiator.

Next, two 90° rotary fittings were installed on the block. Take caution not to install any fitting on the dedicated refill port. The word dedicated should explain why.
In the next step, I installed the tubing to the radiator and the block. This would complete the assembling of the modded cooler. Our next step was to fill the loop using the Alphacool CKC Cape Kelvin Catcher coolant. We were supplied with a 1000ml bottle. It is a clear pre-mixed coolant and you don’t need to do anything about it except pouring it in the loop and calling it a day. Filling the modded cooler was challenging due to less room in the small size reservoir on the block. It is better to refill it before installing the cooler as quick-release connectors are already a part of the loop to easily break it. I used 24 ATX jumper to power on the PSU and connect the pump’s 3 pin power cable to the 3-pin Molex to fan cable. Start filling coolant in the reservoir and power on the system, it will circulate the coolant. Make sure to power off the system as soon as coolant level drops so as not to run the pump dry. Repeat the step until the loop is completely filled. It will take time and patience. Even at one point, I had to raise the height of the block from the radiator. Ultimately, you will get to the point where no more coolant will be required and you will be all set. Disconnect the quick release connectors and voila. No spill; nothing and the loop is like cut off in half. Install the radiator and fans on the rear mounting bracket of the PrimoChill Praxis WetBench. Connect the fans to the power source of your choice. Install the block on the CPU and connect the quick release connectors to restore the loop in one connection and that is it. Remove the refill port cover and run the loop for some time to bleed it.


Here are the pictures with the loop disconnected using the Quick Connect fittings.


I will conclude this article with the thermal performance of the cooler before and after the modding.
Test Bench
Following test bench was used for testing this cooler: –
- Asus Rampage V Edition 10
- Intel i7 6850k
- Corsair Vengeance RED LED 4x8GB @ 2666MHz
- Asus GeForce RTX 2080 O8G
- Samsung 840 EVO 250GB SSD
- Seagate Barracuda 2TB
- Corsair AX1200i
Methodology
The thermal paste used is the Noctua NT-H1 thermal paste. CPU is overclocked to 4.3GHz with 1.350V manual Vcore. The Asus RealBench 2.44 is used to stress test the cooler’s performance for 30 minutes. Fans were set to run at their 100% RPM and water pump was set at 100% as well. The max temps on each core are summed up and divided by the core count to give the average figure. Delta temp is calculated by subtracting the ambient temp from the max average temp. RealTemp is used to monitor the temperatures.
Result

Interestingly, we saw a drop in temperature by 1°C after modding the cooler. It was doing a delta of 39.5°C before but the temperature dropped to 38.5°C though it is that marginal but still a bit of difference. I was expecting similar performance as an ideal case and it resulted well than what I had thought.
We are thankful to the Alphacool for the provision of the stuff needed to do this little modding project. The aim was also to show the true potential of the Alphacool Eisbaer coolers and the possibilities of the modding that could be done to them.


