


ALPHACOOL Core 1 CPU Water Block Review

Introduction
APEX and CORE are two brands from ALPHACOOL that the manufacturer will be releasing new products aiming at modders, water-cooling gamers, and enthusiasts alike. The Core series will be a more streamlined offering where APEX will be the pinnacle of what ALPHCOOL offers the best. They have shown some of their upcoming products at Computex 23, Taiwan. Among those new products is a new generation of CPU water blocks named Core 1. ALPHACOOL is excited about their new water block as according to them this is a more efficient design with better thermal performance than the predecessor (Eisblock XPX series). ALPHACOOL is offering following SKUs in this series:
- Core 1 Silver
- Core 1 AURORA Silver A-RGB
- Core 1 White
- Core 1 Black
- Core 1 AURORA Black A-RGB
One thing that ALPHACOOL focuses on is the new DIE layout on the AMD AM5 and Intel LGA1700 platforms. Their Core 1 series water blocks, will only be compatible with these two sockets in particular only and there will be no support for the previous generations. To achieve maximum heat transfer while remaining at a better efficiency (less heat wastage), ALPHACOOL has gone back to the drawing board and come up with a new design using a new jet plate what they refer to as 3D jet plate, the fins stacking and their layout on the copper base, brass threading and brass made housing, etc. At the same time, they have made the installation of these new blocks a super convenience. No more preparing long threaded screws using springs, washers, and nuts and then mounting these on the brackets. The previous generation brackets have triple slots or mounting holes on each corner leaving room for guessing when it comes to installing the block on a respective socket. This time ALPHACOOL is sticking with more of a retrofit style for the mounting and I just love this idea of how simple an installation can be.
Only the AURORA-based SKUs have integrated A-RGB LEDs in the top housing and even ALPHACOOL has made that lighting quite subtle and minimalistic to my personal liking. The non-AURORA SKUs don’t have A-RGB lighting. Other than that, all SKUs have same design and offer the same performance regardless. We have got Core 1 AURORA Silver and Core 1 White SKUs for testing.
ALPHACOOL Core 1 CPU Water Block Specifications

Packaging and Unboxing
Since both SKUs (AURORA Silver and White) come in the same packing, we are showing a single box in this section.

The water block is shipped inside a cardboard box and this shipping box is quite different compared to the Eisblock XPX series water blocks’ box design. CORE CPU Block is mentioned over here. ALPHACOOL is showing product dimension-labeled drawings over here. Surprisingly, the dimensions shown on the box are 71x72x26.50mm whereas the specifications mentioned are 72x72x26.50mm. However, as per our measurement, the dimension stands at 70x70x26.25mm with a margin of 0.5mm on length and width.

This particular SKU is Core 1 White. The Core 1 series of water blocks are designed in Germany and made in China. Take note of the text mentioning that pictures are shown for illustration purposes only. Actual products may vary.

There are two compartments in the packing box. The water block is nicely tucked in the left compartment whereas the accessories are placed in the right compartment. There is a white color Styrofoam pad covering over the top.
Contents
Let’s see what is provided in the accessories section.

There is a container having all the mounting hardware. ALPHACOOL has provided a user guide giving clear instructions on installing this block on Intel LGA1700 and AMD AM5 sockets. There is a scan to label for a digital user guide. When we scanned this page on our mobile phone, it landed us on 404 Page Not Found. Since this is a pre-launch sample, ALPHACOOL will be sorting things out. We have provided this data to them.

ALPHACOOL has provided:
- 1x set of black color mounting brackets for AM5
- 4x Pillars or Threaded Bolts

ALPHACOOL has provided:
- 1x set of black color mounting brackets for LGA1700
- 4x Pillars or Threaded Bolts

There are:
- 1x APEX Thermal Paste having a thermal conductivity rating of 17 W-mK
- 4x Thumb Nuts
- 1x Spatula
- 6x Washers [Pasting Washers for Intel LGA1700 only]

ALPHACOOL has provided a metallic backplate for Intel LGA1700 as well. The inner side of this backplate has a 3M self-adhesive to attach this backplate to the backside of the motherboard so that it does not move during installation. Personally, I am not in favor of any such mounting in which users are required to paste hardware on the motherboard’s PCB.
Closer Look
Let’s start with the statement from ALPHACOOL. “Alphacool presents the Core 1, a new generation of CPU water cooling. The latest desktop processors are continuously becoming more powerful, but also produce more and more waste heat. The Core 1 reliably solves this problem with the help of its entirely new 3DJetplate, which is also used in industrial applications. The all-metal CPU water cooler not only impresses with its elegant appearance but also features a new mounting system that simplifies installation.”
Let’s start taking a closer look at the block.

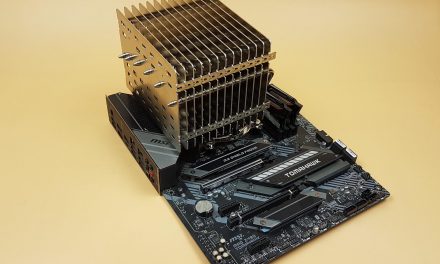
The above picture shows both SKUs. We have a Core 1 White and Core 1 AURORA Silver. The unit’s housing is made of brass material and stands at 72x72x26.50mm. However, our digital caliper is showing this dimension as 70x70x26.50mm (LxWxH). Our measurement tolerance is 0.5mm approximately. The Core 1 series of water blocks are only compatible with the Intel LGA1700 and AMD AM5 sockets. ALPHACOOL has focused on the placement of the fins ensuring the maximum coverage of Intel die and AMD CCD/CDX packages.

We can see a white color beauty without A-RGB lighting in the above picture. For the rest of the content, we will be showing Core 1 AURORA Silver along with a dissection of the block. We can see two G1/4” threaded ports over the top. These ports are a bit protruding over the top cover. The lower port is dedicated as OUT meaning it is an outlet port whereas the upper port (port in the middle) is a dedicated inlet port. Ensure to use these ports according to their purpose or you will not get a proper result given how the jet plate and distributor are implemented in these blocks. The lower right corner is angular in design which sits in tandem with the ports.

The above picture shows a close-up view and we can see that the ports are entirely made of brass material including the threads saying bye to plexi or acetal materials.

The above picture tries to show the OUT label that is engraved inside the port at the base of the threaded portion.

Now we can see what the A-RGB SKUs would look like. There is a thick diffuser lining across the borderline and covering the ports in quite some style. The picture is not serving the purpose as this looks really good and pleasant in person. I am looking at the block at the time of this writing. There is an ALPHACOOL branding over a black color background towards the top left corner. This is a bit inset design giving a complement to the overall outlook. The top cover seems to have a sand-blasted finish and it is quite a fingerprint magnet. Since the ALPHACOOL logo is upright, we have to install this block so that this logo always remains on the top facing right.

The above picture shows one side of the block. Since the housing is made of brass and nickel-plated brass, it gives a spectacular look to the block itself. ALPHACOOL has done a good milling job for these blocks. There is a discrete contour line over the brass housing that really adds to the quality finish of the unit.

There is a flat cable with three wires coming out from the main housing as can be seen in the picture. This cable powers the A-RGB LEDs.

ALPHACOOL is using proprietary 3-pin JST connectors on this cable. One connector is a 3-pin socket whereas the other one is a 3-pin male connector. This allows the users to daisy chain the A-RGB elements within the ALPHACOOL’s ecosystem.

Since we are at it, let’s see what the A-RGB lighting effect looks like on the AURORA Silver SKU. As we have mentioned that A-RGB lighting is minimalistic and pleasant, now we can witness that exactly.

The above picture shows another angle showing the lighting effect on the block.

There is a groove or an inset between the main housing and the lower metallic frame. This is where the mounting brackets are slided in during the installation.

The Core 1 series of CPU Water Blocks feature a nickel-plated copper base measuring 59x59x4mm (LxWxH). Here the overall thickness of the copper base is 4mm as per our measurement. We have taken pictures after completing the tests. The block on the left is AURORA silver taken right off the motherboard to take this picture and the right side block is white edition Core 1. There is a protective covering cautioning the user to remove it before installing this block.

The above picture shows a mirror finish on the nickel plate copper base.

The completed assembly is held in one piece using 6x screws. The short-length screw is used on the angular corner facing the OUT port.

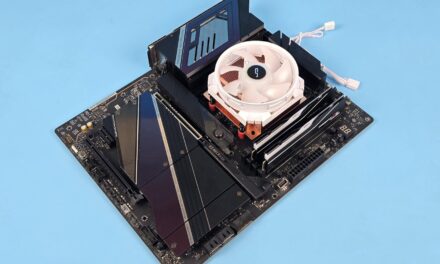
We have opened the block after testing so you can see some residue or coolant drops. You would need to remove the 6x screws from the base to open the block. Please keep in mind that the top plate and the diffuser can only be removed after removing these screws. Don’t try to pull the top plate. The copper cold plate is placed on the right side of the block. We can see a black color distributor on the block.

The above picture shows a nickel-plated copper cold plate. It has a thickness of 4mm as per our measurement. We can spot a total of 12 channels forming a fin stack. The fins are extended towards the edges. If we take into consideration the extended portion then a total of 14 channels are there. As per our measurement, the inset area fin stack has a dimension of 30x37mm whereas taking into consideration the extended fin stack, the dimension comes to 38x37mm. Each fin has a thickness of 0.4mm and there is a gap of 0.4mm between any two fins. This fin stack faces the IHS of the CPU in landscape orientation. If my eyes were working correctly, there are 65 rows of fins or simply putting 65 fin count.

The above picture shows the base area of the jet plate and distributor after removing the cold plate. We can see a thick O-ring on the outer perimeter forming a seal between the main housing and the cold plate. This is necessary as the coolant would flow back in from the left and right sides of the jet plate inside the mixing chamber.

The above picture shows the jet plate (placed on left). We can coolant splashes on the jet plate. This jet plate is made of plastic material and it has an integrated distributor. There is a rubber-made distributor that sits between the jet plate and the actual fins. This gasket is fragile so handle it with care.

ALPHACOOL calls this jet plate a 3D Jet Plate. The center of this jet plate directly faces the inlet port on the top cover of the block. The coolant enters the port in a spiral or circular cross-section. This is then transformed into a slit cross-section through the 3D Jet Plate. The coolant then spills towards both sides of the fin stack providing maximum coverage.

Here we can see a remix chamber or the main body. There is an O-ring under the inlet port forming a seal between the port and the 3D jet plate. There is a black color slope down or ramped cover right below the inlet port. The 3D Jet plate sits over it. We can see droplets of the leftover coolant since we opened the unit after testing. This O-ring is important otherwise cool and hot coolants would mixed up. Not clearly visible is the ramp-down design of the remix chamber going down toward the outlet port side. Hot coolant enters this chamber from the left and right sides and then moved to the outlet port.

The above picture shows the complete view of the chamber after taking off the plastic nodule. Here you can see the ramp design clearly.

The above picture shows the rubber-made distributor sitting over the fin stack. This gasket sits between the 3D jet plate and the fin stack to provide slit distribution over the fins.

Here we are showing the top view of the unit after removing the top cover. We can spot 18 A-RGB LEDs installed on a strip facing inward and side to side. The diffuser’s main body is facing downward which is why we only see the border line up top since the main body of the diffuser is covered by a metal cover.

The above picture shows a top cover. Notice the mounting holes (5x). The screws enter from the base of the unit and make contact with this cover firmly holding the entire body of the unit.

The above picture shows the upper chamber after removing everything it has. The milling and machining work is satisfactory overall.

Take a look at the backside of the diffuser.

The above diagram shows an expanded view of the unit.
Installation
The installation of this unit is simple, convenient, and more streamlined compared to the previous generation of water blocks and even Eisbaer AIOs from ALPHACOOL. ALPHACOOL has opted for a simple retrofit installation. The installation on Intel LGA1700 is as under:
- Install brackets on the unit.
- Place the Intel backplate on the motherboard.
- Place pasting washers.
- Install pillars or threaded bolts on the backplate.
- Place the unit on the threaded portion of these bolts.
- Use thumb nuts to complete the installation.
Almost the same mechanism is on the AMD AM5 socket except that we don’t need those washers. On AMD, this unit uses the stock backplate. The users would need to remove the stock mounting brackets. The rest of the process is same as is on the Intel platform. I would give 9/10 to the ALPHACOOL team for this user-friendly installation. Why deducted one point? Personally, I am against pasting anything on the motherboard’s PCB. The metallic backplate and rubber washers are required to be pasted though I can work around this by pasting those rubber washers on the threaded bolts. But this design should not be there in my opinion. Hence, I have removed one point.
Test Loop Setup
We have used following components to set up a custom loop for thermal performance measurement along with coolant flow restriction:
- ALPHACOOL Core 1 CPU Water Block [AURORA Silver]
- ALPHACOOL NexXxos HPE-30 Full Copper 360 Radiator
- ALPHACOOL CORE 100 AURORA RESERVOIR ACETAL/ACRYL WITH APEX VPP PUMP
- ALPHACOOL EISBLOCK XPX AURORA PRO DIGITAL RGB – FULL BRASS
- ALPHACOOL EISBLOCK XPX AURORA EDGE DIGITAL RGB – FULL BRASS
- ALPHACOOL tubing AlphaTube HF 16/10 (3/8″ID) – clear 3m (9,8ft) Retailbox
- ALPHACOOL Eiszapfen 16/10mm compression fitting 90° rotatable G1/4 – 4pcs Set Chrome
- ALPHACOOL Eiszapfen 16/10mm compression fitting G1/4 – chrome six pack
- ALPHACOOL 16/10 compression fitting 45° revolvable G1/4 – chrome
- ALPHACOOL Eiszapfen quick release connector kit G1/4 outer thread – Deep Black
- ALPHACOOL Sub-Zero Thermal Paste 20gm
- Noctua NF-A12x25 PWM chromax.black edition 120mm Fans
We have used a total of three water blocks for the complete testing. Following blocks were tested on Intel platform:
- ALPHACOOL Core 1 AURORA Silver
- ALPHACOOL Eisblock XPX AURORA PRO Chrome Full Brass


The following blocks were used for AMD AM5 testing:
- ALPHACOOL Core 1 AURORA Silver
- ALPHACOOL Eisblock XPX Edge Black Full Brass


The Eisblock XPX PRO and Edge have been ALPHACOOL’s premium water blocks pre-Computex 2023. Well, I have already given a spoiler alert.
Thermal Testing
We have used a below mentioned configuration on Intel platform for this testing:
- Intel i7 12700K
- GIGABYTE Z690 AERO G
- Sabrent Rocket DDR5 32GB @ 4800MHz CAS 40
- GIGABYTE GeForce RTX 3060 VISION OC [For Display]
- Sabrent Rocket 4 Plus 2TB NVMe SSD
- be quiet! Straight Power 11 850W Platinum PSU
- Thermaltake Core P6 TG Snow Edition converted into an open-frame layout
Here is the settings table for testing:
| P-Cores Clock (MHz) | Auto [5000 All Cores] |
| E-Cores Clock (MHz) | Auto [4000 All Cores] |
| Voltage (V) | 1.346 |
| C-States | Disabled |
| Speed Step | Disabled |
| Thermal Paste | ALPHACOOL Sub-Zero |
| Thermal Paste Application | Even Spread |
| Test Run Time | 30 minutes |
| Idle Time | 10 minutes |
| Fan Speed | 100% PWM Duty Cycle |
| Pump Speed | Full speed |
| Header | CPU_Fan Header |
| Stress Software | CINEBENCH R23.2 |
| Monitoring Software | HWInfo64 |
We have used a below mentioned configuration on Intel platform for this testing:
- AMD Ryzen 7 7700X [5.2GHz All Cores, 1.260V]
- GIGABYTE X670E AORUS MASTER
- Sabrent Rocket DDR5 32GB @ 4800MHz CAS 40
- GIGABYTE GeForce RTX 3060 VISION OC [For Display]
- Sabrent Rocket 4 Plus 2TB NVMe SSD
- be quiet! Straight Power 11 850W Platinum PSU
- Thermaltake Core P6 TG Snow Edition converted into an open-frame layout
The ambient temperature was in the range of 24°C to 24.6°C. Since the variation in the ambient temperature is within 1°C, we are reporting absolute temperatures in the graph. The testing is done on an open air bench system. Once inside the chassis, the temperatures are expected to rise and would largely depend upon the optimal airflow inside the chassis.
Disclaimer: Every silicon is different hence no two same SKUs are likely to take same voltage to yield same performance at same thermals per se but margin would be close. Not every stress test run may yield the same result which could be due to various reasons like thermal paste application, ambient temperature variation, mounting pressure of the cooler, etc. This is very why we have listed our variables and their settings. Variables not mentioned are on Auto setting. We are actually testing the cooler on all Auto and stock settings.
Let’s take a look at the results.
Result

The above is a result of Intel platform testing. The idle temperature was same on both blocks i.e 27°C but the equation changes quickly when CPU was put under stress test and we can a thermal difference of 3°C comparing both blocks. ALPHACOOL Core 1 CPU Water Block is clearly winning here hands down.

The above is a test result from AMD platform. The ALPHACOOL Core 1 AURORA Silver gives a slightly better idling temperature compared to Eisblock XPX Edge Black Full Brass block. Here, we saw a thermal difference of 2.4°C favoring the ALPHACOOL Core 1 AURORA Silver block.
Our thermal performance test results are showing that new Core 1 CPU Water Block is promising and delivering powerful performance. Given the high fin count and relatively large size fin stack area, we suspect this water block to have mid-range coolant flow restriction. We tested that using a simple setup. We have used Thermaltake Pacific TF1 flow sensor (digital) to first measure the flow rate of the pump unit without any component in the loop except the reservoir/pump unit. The flow sequence was:
Reservoir/Pump to TF1 Flow Sensor to Reservoir/Pump
This would set a baseline to compare the next tests. The coolant flow rate was 276 L/H. This is even below the ALPHACOOL’s rated 360 L/H specification for the VPP APEX pump.
Next, we introduced ALPHACOOL Core 1 CPU Water Block in the above configuration:
Reservoir/Pump to TF1 Flow Sensor to Core 1 to Reservoir/Pump
This time the flow rate was 179 L/H showing a somewhat restrictive flow design on Core 1. I am planning to take this testing one next step by getting Aqua Computer’s proper monitoring tools for proper and calibrated results.
Conclusion
ALPHACOOL has properly started using brand names CORE and APEX for their water cooling products and both series carry products catering to streamline water cooling enthusiasts and gamers and for the modders paradise. They have shown many new products and concepts during Computex 2023 at Taipei, Taiwan. Among these products are the new generation of CPU water blocks specifically designed to cater for the new platforms from Intel and AMD (Intel LGA1700 socket and AMD AM5 socket). Since these platforms have a different die design and placement compared to the previous generation coupled by their high thermal density require a radical cooling requirements capable of handling over 300W (13900k and related SKUs) power draw. Even, 360mm AIOs can struggle on such a high load, and demanding platform. The CORE 1 addresses to this requirement and is obviously for the custom loop category.
ALPHACOOL will be releasing following SKUs in this series:
| SKU | Price | Warranty |
| ALPHACOOL Core 1 Black | € 99.95 | 2-Year |
| ALPHACOOL Core 1 AURORA Black | €119.95 | |
| ALPHACOOL Core 1 Silver | € 99.95 | |
| ALPHACOOL Core 1 AURORA Silver | €119.95 | |
| ALPHACOOL Core 1 White | €109.95 |
The white edition is expensive compared to the other two NON-RGB SKUs due to white color coat paint job. We got the CORE 1 – AURORA Silver and CORE 1 White edition for testing. These new blocks are only compatible with Intel LGA1700 and AMD AM5 sockets as we have mentioned above. ALPHACOOL has mentioned that these blocks are likely to support future CPU generations.
These blocks have a different outlook compared to Eisblock XPX series CPU water blocks and even to the competition for that matter. The main housing of these blocks is made of brass with connections also in brass material having a nickel-plated finish. To add more aesthetics, ALPHACOOL has used contour lining on the border area to give one spectacular look and feel on these blocks. The AURORA series blocks feature 18 A-RGB LEDs that are using proprietary JST 3-pin connectors that would fit well within ALPHACOOL’s ecosystem however, same can’t be said when going for mixed brand use. We have tested the A-RGB lighting using GIGABYTE RGB FUSION 2.0 and found it working flawlessly. The A-RGB lighting effects are minimalistic and subtle to my personal liking. The non-RGB versions don’t have any integrated lighting.
The ports are implemented in a tilt design with an inlet port located right in the middle whereas the outlet port is towards the angular border of the block. There is a recessed ALPHACOOL branding over the top left. The logo’s orientation will help you in determining the placement of this block over the CPU as we would want this logo to be upright all the time. Given the very design of this block, the ports are dedicated to their purpose. Use the OUT label port for outlet meaning to take the hot coolant from the block to the next component in the loop. Don’t mix these ports or you may not get the true performance.
At the heart of this cooling engine, we have a 3D Jet Plate that is made of a plastic material. This plate sits right below the inlet port and there is an O-ring forming a seal between this connection. The coolant enters in a circular cross-section which is transformed by this jet plate into a slit cross-section and then spread using a rubber-made distributor that is placed right over the fin stack. The mixer chamber has a ramp-down design where the hot coolant is forced toward the outlet port.
Speaking of the fins, this unit has a total of 12 channels as per our counting from top to bottom in an inset area. These fins extend over to the two sides and by that very design, the total channels are 14. The fin count is 65. There is an inset area on the copper cold plate on which the main fin stacking is provided. This inset area measures 30x37mm. However, including the extended fins area, we have got a 38x37mm total fin stack area. This size fin stack would be handy to cover the large-size CPUs. The cold plate itself measures 4mm thick. Each fin has a 0.4mm thickness with a 0.4mm gap between the two fins.
The ALPHACOOL Core 1 is said to have a dimension of 72x72x26.50mm (LxWxH). However, our digital caliper is telling us that this block has a dimension of 70x70x26.50mm with a margin of 0.5mm. I have measured it several times ensuring the caliper’s zero is calibrated and every time it gives the same measurement. ALPHACOOL has mentioned the tolerance of the margin of error to be ±0.5mm. Their packing box is showing the dimension of 71x72x26.50mm. I am hoping that ALPHACOOL would sort out these issues. The scan label on the user guide did not take us to the digital user guide which is probably due to the pre-launch restriction.
The installation of this block is something I absolutely admire. From using long multi-threaded screws along with springs, washers, and nuts, they have come up with a simple retrofitting mechanism. On Intel LGA1700, we would need a total of 15 items whereas on AMD AM5, we would need 10 items only. The only downside in my personal opinion is the self-adhesive mounting of metal backplate and rubber washers. Other than that, I would love to see ALPHACOOL releasing similar mounting for their previous generation of water blocks and Eisbaer series AIOs.
The ALPHACOOL Core 1 – AURORA Silver has an MSRP of €119.95 and Core 1 – White edition has an MSRP of €109.95 at the time of this writing. All SKUs under Core 1 have a 2-year warranty, which in my opinion should be at least a 3-year. We have tested these blocks on Intel Core i7 12700k overclocked to 5.0GHz P-Cores and 4.0GHz E-Cores (202W) and AMD Ryzen 7 700X all cores 5.2GHz (118W). For comparison, we have used ALPHACOOL Eisblock XPX AURORA PRO and AURORA EDGE which are also full brass blocks. The Core 1 block has shown a good performance on both platforms taking a lead between 2.4°C to 3°C. These blocks are somewhat restrictive toward the coolant flow. Their superb thermal performance combined with elegant design, and simple installation is too good to have. These blocks come recommended by us.


