


Alphacool Eisblock Aurora Acrylic GPX-N 3080/3090 SUPRIM X with Backplate Review ft GELID GP Extreme
Introduction
Alphacool Eisblock Aurora Acryl GPX-N RTX 3090/3080 Suprim X with Backplate is a water block for MSI GeForce RTX 3080/3090 series graphics cards. Please check the compatible models on their website in this content. Alphacool has sent this block for our MSI GeForce RTX 3090 Gaming X Trio graphics card. Alphacool is using nickel-plated copper material at the very core of the block handling all the heat transfer from the critical components. The top is acrylic made of POM klar. The block has an integrated digital RGB LED strip at the base of the block to illuminate the acrylic which looks dope in operation. The main cooling engine has 0.6mm fins. This model comes with an aluminum backplate though Alphacool has provided the screws in case the user would want to use the original backplate with the block.
The block is listed at €149.99 at the time of review.
Specifications

Compatibility

Packaging and Unboxing

Eisblock GPX is the generic name of the Alphacool water blocks for the graphics cards.

There are pictures of the block in plexi and acetal.

The block is placed inside a black color ribbed container. The mounting hardware is placed in a separated container. The backplate is placed under these.
Contents

All the accessories are placed inside the container.

Alphacool has already cut the thermal pads to the required sizes. One thing that I would highlight here is that each type of pad has number coding like 1-7 is the 1.0mm thick thermal pad pouch which is to be placed on the cooler. The maximum number printed on this block is 13 whereas the installation manual shows the numbers up to 16. The backplate is using 2mm and 3mm thick thermal pads.

The above picture is from the manual of the block showing the numbers on the thermal pads. Now go back and read the above para if you have not done it yet.

We have:
- 2x Screw Plugs
- 1x Plug Tool
- 1x Sync cable for the motherboard

We have:
- 1x tube of the Thermal Paste
- 5x M2x5 Spring Loaded screws
- 4x M2x5 Washers
- 8x M2x8 Counter Sunk Screws [Use these for the stock backplate of the graphics card]
- 8x M2x11 Screws

There are 2x nuts and bolts sets.
Closer Look
Let’s start taking a closer look at the block.

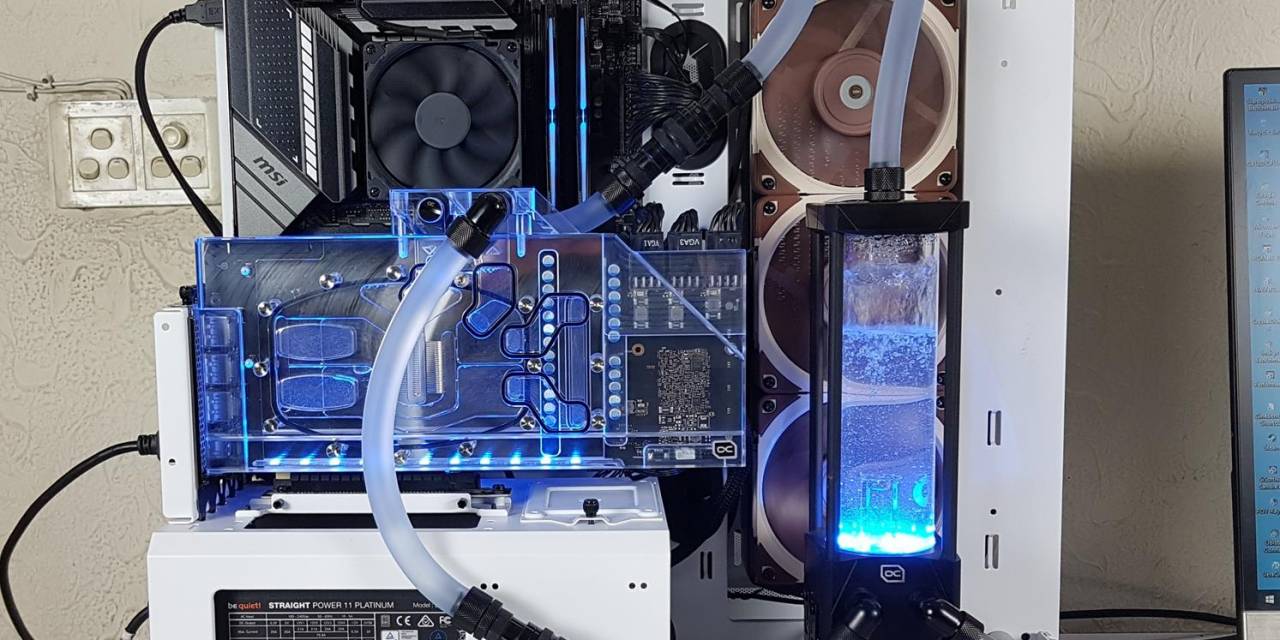
We have got ourselves a beefier water block. The block is heavier than I was expecting. The dimension of the block is 152x295x25mm where 25mm is the thickness of the block. The block is made of Acrylic, nickel-plated copper materials. As is the case with the water blocks for the graphics cards, this block has a full cover copper plate that is nickel-plated making direct contact with the critical heat-producing components. Then we have a middle layer of the plexi material with the water channels on it and the third is the top portion of the plexi covering the middle portion. The new design is more angular with all edges beveled. This promotes better light diffusion in the water cooler due to the reflections on these bevels. In addition, they create various contours, which gives the Aurora GPX-N RTX 3080/3090 Eisblock cooler its very own unique identity. There is an Alphacool branding on the bottom right which gives a good look with backlit illumination.

The above picture shows a clear view of the block from the front. The center has a cooling engine comprising 0.6mm thick fins forming a dense stack of 25 fins. The jet plate is right in the center of the stack. The machining and milling job is perfectly done. We have gaskets around the water channels to prevent spillage. The coolant flows from the left G1/4” threaded port and flows over the cooling engine and going to the channels on the left side and comes towards the right side channels before finally going out from the top right port.
The channels are designed to prevent holding the bubbles but it would depend on the orientation of the block. We have tested the block in the vertical layout and noticed the bubbles on the left side channels though the bleeding finally eliminated them. The right side of the block has only plexi portion as it is covering the entire PCB leaving the non-critical components located on the PCB towards the right side.

The above is a close-up view of the main element of the block which is the cooling engine.

The top head has a black color sticker with GEFORCE RTX printed on it.

Take a note of the Arrow symbols on the bulkhead. The down arrow indicates the inlet port on the block and the upward arrow indicates the outlet port on the block. Make sure to align with the directions as we have tested the block with ports reversed and saw up to 5°C difference. You would want to follow the inlet and outlet in letter and spirit for optimal performance gain.

Alphacool has re-designed the Eisblock GPX for some major improvements. They have moved the cooler closer to the components. This has enabled them to use 1mm thick thermal pads on the cooler all around. They have also reduced the thickness of the cooler from 7mm to 5.5mm. The nickel-plated copper has a mirror finish and is highly reflective of the surface on which it is placed in addition to being a fingerprint magnet. The raised surfaces in the center are making a contact with the VRAM on the PCB. The outermost surfaces have protruded areas that make contact with the MOSFETs. The insets on the exteriors are making the contact with the power delivery circuitry.

Alphacool has integrated a digital RGB LED strip at the base of the block. These lights tend to bleed once powered up but nothing to scary and I absolutely love the lighting on the block.

There is a 3-pin proprietary connector, as well as a 3-pin proprietary by-pass connector to power the LEDs and to daisy, chain them with the other Alphacool Elements. There is an adapter cable as well which allows the lighting to be controlled using the motherboard’s 3-pin, 5V header.

Alphacool has provided an aluminum-made backplate with Alphacool branding. The plate is quite a fingerprint magnet.

The above picture shows the underside of the backplate. This side makes contact with the backside of the PCB of the graphics card.
We did not open the block.
Installation
Now that we have taken a look at the block itself, it is time to set it up on the MSI GeForce RTX 3090 Gaming X Trio 24G.

Place the graphics card on the anti-static surface. We have used Alphacool Eisplateau which is their anti-static work and mounting mat measuring 120x60cm and comes with points to set up a proper grounding of the user. It comes with an anti-static wrist.
Remove the screws from the backplate of the graphics card. I would suggest taking a picture of every step so that it can come easy when re-assembling the stock cooler on the PCB. We have to remove 11 screws.

The above picture shows the underside of the stock backplate.

The above picture shows the backside of the PCB with the cooler still intact.

I would suggest removing the thermal pads from the rear of the PCB and putting them on the underside of the stock backplate for ease of identification and putting them back on the PCB.

Yup, I wore the anti-static wrist tie.

Slightly wiggle the block carefully and pull it from the PCB apart slowly. Remove the connectors which are two on the top and two at the base. Here we have the PCB of the graphics card.

The above picture shows the underside of the cooler itself. The thermal pads are intact.

Behold the naked PCB of the MSI GeForce RTX 3090 Gaming X Trio 24G. Clean the GPU surface and if needed the VRAMs using the iso-propyl alcohol and clean dry the surfaces.

It is time to set up the cooler of the block. Make sure to clean the entire surface using the iso-propyl alcohol and clean dry it. Then open the pouch labeled “For Cooler 1mm No 1 – 7”. The pads are already cut to size. Simply peel the protective covers from one side of the pads and place them on the designated areas of the cooler. YES, CONSULT THE MANUAL PLEASE.

Remove the protective covers from the placed thermal pads. Apply the thermal paste on the GPU surface and carefully place the block on the PCB. Use the M2x5 washers and M2x5 spring-loaded screws to secure the PCB with the block.

We took them apart to see the application of the thermal paste and it was just perfect.

Next use the remaining two pouches of the thermal pads labeled as 2.0mm and 3.0mm for the cooler. Peel the protective covers from the thermal pads and place them on the backside of the PCB as shown in the picture.
Alphacool is using 2.0mm thick thermal pads for the backside VRAM on the PCB and it is simply not working as we need 3.0mm thick thermal pads. The obvious reason for that the other thermal pads which Alphacool has provided for the backplate are 3.0mm thick so the backplate is simply not making tight enough contact with the VRAM pads. Something that Alphacool needs to take care of.

Peel off the protective covers from the placed thermal pads and carefully align and place the Alphcool backplate on the assembled block. Use the 8x M2x11 screws to secure the backplate with the assembly.

Take a look at the assembled block.

Use the screw plugs to cover the unused ports on the head of the block. Don’t forget to put on the fittings.

After the first round of testing, we saw no difference in the memory temperature and decided to open the block. This was when we noticed the use of 2.0mm thick thermal pads on the backside VRAMs of the PCB. We took out the GELID Solutions’ 3.0mm thick GP Extreme thermal pads and replaced the Alphacool’s pads with the GELID ones. Notice the 2.0mm thick light gray pad from Alphacool with dark gray 3.0mm thick pad from the GELID!

Here we are, using the GELID 3.0mm thick thermal pads on the memory chips on the backside of the PCB. Boi o boi, it worked wonderfully!


Here are a few pictures of the assembled water block.
Setup Configuration
I have set up the following loop to test the thermal performance and coolant flow restriction of the Alphacool Eisblock XPX AURORA Edge Digital RGB and Eisblock Aurora Acrylic GPX-N blocks.
Radiator

We have used Alphacool’s NexXxos 360 XT 45 v2 radiator.

The radiator is placed inside a bubble sheet whereas the accessories are provided inside a black color box.

Alphacool has provided various screws with the radiator making it easier for the user to set up the radiator in no time.

The side of the housing has Alphacool branding.

The radiator has a dimension of 400x124x46. The fins are made of copper material with a light black color coating. We can easily see the copper shimmering on the fin assembly. The radiator has 7x G1/4 threaded ports for which Alphacool has provided plugs.

There is a drain port on the far end of the radiator.

We have a total of 6 G1/4” threaded ports which are all covered with blue color covers.
Fans

We have used Noctua NF-A12x25 PWM fans on the radiator.

This is a perfect combination in our opinion for the optimal performance from thermal and noise perspectives. Salient specifications of the fans are:
| Dimension | 120x120x25mm |
| Speed | 2000 RPM (±10%) |
| Airflow | 102.1 m³/h |
| Noise | 22.6 dB(A) |
| Static Pressure | 2.34 mmH₂O |
| Input Power | 1.68 W |
| Input Current | 0.14 A |
| Operating Voltage | 12 V |
| MTTF | > 150,000 MTTF |
Reservoir

We have used Alphacool Eisbecher D5 AURORA reservoir.

Alphacool VPP755 PWM pump is used which is taken from the Eisbecher D5 reservoir/pump combo.
Tube

We have used Alphacool AlphaTube HF clear tube 16/10mm size.

The tubes have a blue tint to them.
Fittings

We have used Alphacool HF compression fittings of size 16/10mm.

We requested 6 fittings packs which come in a nice presentation.

Take a look at the fittings.

We have also used 16/10 90° adapters.

Their presentation is also nice.

The above picture shows the adapter.
Since we wanted to make the loop such as we don’t drain it for the testing of other blocks, we have used Alphacool quick disconnect fittings which sit between the block and the radiator & block and the reservoir. This has allowed us to easily swap the blocks for the testing without draining and filling the loop.

The above picture shows the complete, build ready for testing.
Digital RGB Lighting
The Alphacool Eisblock Aurora Acrylic GPX-N 3080/3090 comes with an integrated digital RGB LED strip. We have daisy-chained the block with the Eisbecher D5 Aurora and connected them to the JRainbow header on the MSI MAG Z490 TOMAHAWK motherboard. I am in love with the lighting. Here are a few pictures for your eye’s pleasure.


We made a wrong connection on the block reversing the ports to see the impact on the thermal performance. The pictures were taken at that time. We did not take pictures using the ports per their dedicated function.
Testing
Following test configuration is used: –
- Intel i7 10700k
- MSI MAG Z490 TOMAHAWK
- T-Force NightHawk RGB 16GB @ 3200MHz
- MSI GeForce RTX 3090 Gaming X Trio 24G Graphics Card
- addlink S70 256GB NVMe SSD
- bequiet! Straight Power 11 850W Platinum PSU
- Thermaltake Core P6 TG Snow Edition converted into an open-frame layout
We have tested the graphics card first using the stock cooler. We used the Time Spy Extreme stress test with 20 loops and took the maximum temperatures using the TechPowerUp GPU-Z sensor log. The idle temperatures were recorded the same way leaving the system idle for about 15 minutes. Then we used the Witcher 3 game at Ultra graphics settings without Nvidia HairWorks and 4k gaming. The temperature was taken after gameplay of 1 hour and average & maximum FPS were recorded. The same was repeated with the Alphacool water block installed on the graphics card.
Let’s take a look at the results.
Clocks

Our foremost focus is on the clocks that is how much of a boost we get using the powerful cooling. Here my focus is on the sustained clocks and we have impressive results. From 1810MHz to 1875MHz sustained clocks, this is quite a feast.
FPS

Then we recorded how much the above boost in clocks would turn out for the real-world gaming benchmark which is FPS. The result is self-explanatory.
Idle Temperatures

The MSI GeForce RTX 3090 Gaming X Trio 24G has an auto fan feature where the fans would stop spinning if the temps are below the 50°C. This is very why we are seeing high idle temperatures with the stock cooler. The idle temps are very close to the ambient using the Alphacool water block. The idle temperature would not tell any tale. It is the under load temperature only that would declare the winner.
Load Temperatures

Here we go. During the testing, the ambient temperature varied but I am still showing the absolute temperature values to provide a clear picture for a better understanding which is why I have added the ambient temperature in the graph as well. Remember, don’t make a head-to-head comparison here, and keep in mind the ambient values.
The maximum GPU temperature we saw under stress load was 71.8°C on the stock cooler which came down to 43.3°C. We have a roughly 24°C delta drop which is still impressive.
The maximum memory temperature was 86°C using the stock cooler. It dropped only 82°C using the Alphacool pads. We have already mentioned the reason for that as Alphacool needs to use 3.0mm thick thermal pads instead of 2.0mm thick pads. We introduced the GELID 3.0mm thick pads and the saw the memory temperature dipping to 62°C. This is a roughly 20°C delta drop.
The maximum hot spot temperature was 85.5°C using the stock cooler. It came down to 56.4°C with the Alphacool water block. This is a roughly 25.1°C delta drop.
We have an impressive performance on the GPU and Hot Spot temperature but the memory temperatures are not getting any improvement from using the water block. This is what Alphacool needs to address.
Noise
The stock cooler was making roughly 45 dB(A) sound in an ambient noise level of 33 dB(A) which is impressive. We are not producing noise normalized results because the Noctua NF-A12x25 PWM fans were making 46 dB(A) sound so there was no point of noise normalized performance measure. The stock cooler and the cooling loop configuration are almost silent which is damn impressive.
Conclusion
The Alphacool Eisblock Aurora Acrylic GPX-N 3080/3090 SUPRIM X with Backplate is a water block for the supported MSI GeForce RTX 3080 and 3090 graphics cards. Quite a long name! We have tested this block on the MSI GeForce RTX 3090 Gaming X Trio 24G graphics card. Please check the website for compatibility before buying. The dimension of the block is 152x295x25mm where 25mm is the thickness of the block. The block is made of Acrylic, nickel-plated copper materials. It is quite a heavy-weight block.
Alphacool has re-designed their GPX-N series blocks for the new generation of graphics cards. They have focused on revamping the cooler side of the block in particular. We have a nickel-plated copper block making a contact with the critical components with efficient water channels making sure that all related components get the effective water cooling treatment. The thickness of the cooler is reduced from 7mm to 5.5mm and it is now sitting closer to the components such that we only have 1.0mm thick thermal pads sitting between the cooler and the components on the PCB.
The machining and milling job is perfect and Alphacool is using gaskets all around ensuring the tight seal between the middle and upper plexi portions. The cooling engine comprises 0.6mm thick 25 fins forming a dense stack. We did not measure the coolant flow restriction of the block. The channels are well placed out and designed around reducing the chance of retaining the bubbles though that would depend on the orientation of the block.
There are arrow markings showing the inlet and outlet ports. The bulkhead has two ports on each side making a total count of 4. There are screw plugs to cover the unused ports. These ports are all G1/4” threaded. From the fittings perspective, the block is compatible with up to 16/13mm straight fittings and till 9/13mm angled fittings.
The complete front is made of Acrylic and Alphacool has integrated a digital RGB LED strip at the base to lighten up the complete block which does look dope in person. Alphacool is using proprietary 3-pin connectors for the lighting making it compatible in their ecosystem though I would have loved to see the use of standard 3-pin 5V connectors. Alphacool has provided a sync or adapter cable which connects the strip to the motherboard’s 5V header. There is an Alphacool branding on the front side as well whereas the GEFORCE RTX branding is on top of the bulkhead.
Alphacool has provided all sorts of the mounting hardware required to assemble the block. One good thing is that the thermal pads are already cut-to-size and placed inside clear labeled containers making it easier for the user to set up the block in no time.
This Alphacool Eisblock GPX-N block is listed at €144.99 at the time of the review. The block offers a stunning outlook and thermal performance is right on the money which is subject to the loop configuration as well but there is one caveat. Alphacool is using 2.0mm thick thermal pads for the backside memory chips of the PCB. This is not working as we did not see any drastic difference in the memory temperatures. We ended up using the GELID Solution 3.0mm thick GP Extreme thermal pads rated to handle 12 W/mK thermal conductivity and they worked like a champ. The memory temperatures dropped by 20°C. Alphacool needs to address this. Other than that, this is one fantastic water block for the RTX 3080/3090 supported models.
Update: Alphacool has replied on the VRAM pads thickness mentioning that “the card bends so much when mounting (all!) coolers that the 2mm pads on the back no longer get enough contact. This was not the case when the cooler was developed with the design provided for us (incidentally, this affects most models from Nvidia’s 3XXX series). Our support team will send the appropriate pads free of charge to any customer affected by this problem. We also communicate this openly everywhere, e.g. in the social networks, forum, etc”
We are thankful to Alphacool for giving us the opportunity to review the water block.


