


SilverStone SETA A1 Review
Introduction
SilverStone Technology was founded in 2003 on the principle of recognition that merely having innovative expertise within the industry is not enough. Their objective is to ensure that their expertise is delivered to all products with consistency, in response to user’s needs, and with maximum user satisfaction. SilverStone Technology thrives on challenges of rapid technological advancements and creating aesthetic standard for the industry. Their products are of high quality. Product lines include PC Chassis, PSU, Cooling Solution, Storage devices, etc.
We have got SETA A1 for the review from SilverStone. The SETA A1 is a spacious mid-tower chassis available in three colors combination; Rose Gold on White, Silver on Black, and Titanium on Black. The model we are looking at is SETA A1 Black with Silver. The SETA series based on the pricing seems to be their high-end offering in the PC Chassis market. The SETA A1 supports standard ATX, microATX, and mini-ITX form factor motherboards. The provision for cooling gear is quite good and chassis comes with 2x 200mm fans on the front with 1x 120mm fan on the rear. Here are some of the features:
- Brilliantly styled with combination of aluminum front bezel and tempered glass side panel
- Beautiful embedded addressable RGB lighting with controller included
- Support up to two 200mm front fans
- Front I/O includes USB 3.1 Gen 2 Type-C port and standard single 3.5 mm audio jack
- Extra expansion slot supports mounting graphics card vertically
Product: SETA A1
Manufacturer: SilverStone Technology
Price: $130 [At the time of the Review]
Specifications

Dimensions

Packaging and Contents
The chassis is shipped inside a white color cardboard box.

There is a picture of the chassis with the front bezel and ARGB lighting in focus. Some of the tag lines are:
- Premium case
- Substantial airflow
- Durability
- Compatibility
With fully covered or blocked front, one would expect the restrictive airflow. We will check that in our thermal testing section.

Features of the chassis are printed here along with the minimal specifications. Serial no and model no are printed on a white color sticker along with the weight of the package. The model of the chassis is SST-SEA1SB-G. Here SST stands for SilverStone. SE stands for SETA. SB means Silver and Black. I think G stands for Tempered Glass.

The features of the chassis are printed in 10 languages. There is a scan code on the bottom that the user can scan to download the manual from the SilverStone website. Why? Because they have not included the user manual in the box. Some may miss the manual!

The chassis comes sandwiched between two white color Styrofoam pads.
Accessories
The SilverStone has provided:
- Standoffs
- Standoff socket wrench
- Various Screws
- 1x ARGB Hub
- Zip ties
- 1x Warranty Guide

There is no user manual included in the chassis which in my opinion should have been provided. User can download the manual from their website. The downloaded manual is quite elaborative taking the user step by step towards building inside the chassis and showing compatibility/clearance aspects pictorially.
Closer Look
It is time to take a closer look at the chassis and see what it offers in this price range. The dimension of the chassis is 225x470x432mm (WxHxD). Chassis is made of steel, plastic, Aluminum, and tempered glass. Net weight of the chassis is 8.48KG. In terms of volume, this chassis has 45.7 Liters of space.

Exterior View
Let’s start with an exterior view of the chassis.

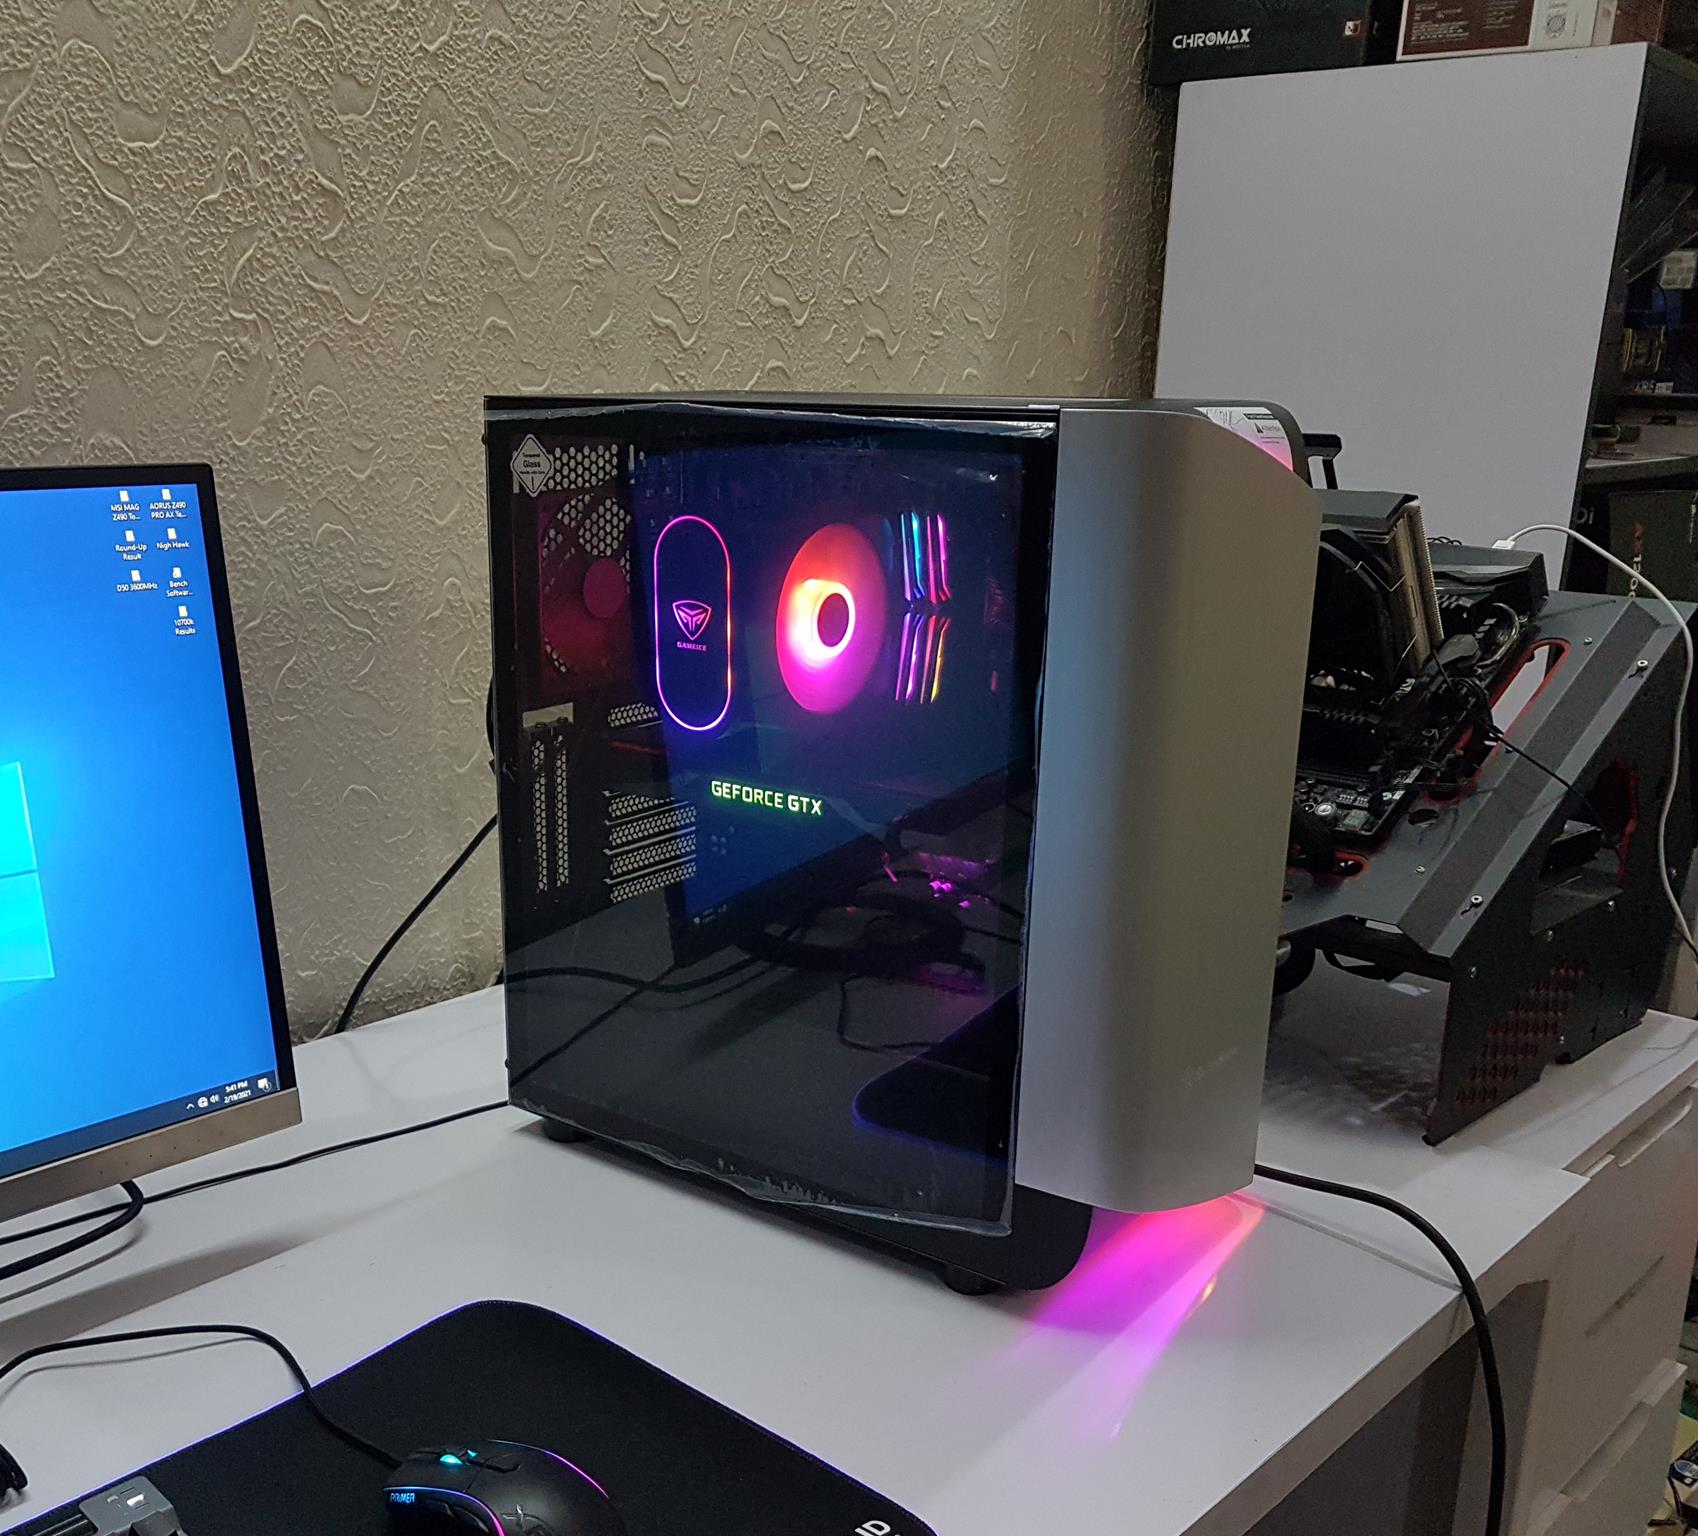
The front has a beautifully crafted single piece of aluminum finished in Silver color. As mentioned above there are three variants of this chassis based on the colors. This one is Silver on Black. We have a black color chassis on the inside/outside with a Silver color front façade. This combination speaks for itself and I wish we had opted for Rose Gold on White! The whole block is solid with SilverStone branding on the bottom. This would immediately raise a question about the restricted airflow in the mind.

There is a sticker pasted on the slope side of the chassis frame. It is cautioning the user not to exert excess pressure when taking out the front panel to prevent injury. SilverStone has used standard plastic tabs to install the panel on the frame which are proven to be hard initially but get soft down the road depending upon how many times you pull the front panel out. My observations are:
- The sticker is pasted where it should not have been as it is ruining the looks of the chassis.
- There are two ARGB LED strips under the front bezel with cables routed towards the back of the chassis. These cables don’t have enough length to safely remove the front panel. We experienced this first hand during the test build. The ARGB LEDs were connected to the bottom ARGB (5V) header of the motherboard. During the thermal testing, we pulled the panel out which stretches the cables resulting in twisting the pin on the motherboard’s header.

The above picture shows the side angle of the chassis elaborating the beauty of the front bezel from the side view.

A quick peek into the top side of the chassis shows a diffuser line with backlit ARGB lighting. The same diffuser is on the bottom side of the panel. There is like 10mm or so spacing between the front panel and the chassis frame to breathe some fresh air in.

Looking at the side panel, we have a dark black tinted tempered glass panel. The borders of the panel are finished in black color. The protective sheet on the tempered glass has a Tempered Glass, Handle with care sticker pasted. The side panel fully flushes with the frame of the chassis to my liking. There are no side screws on the panel itself. The panel is secured from the rear of the case using two thumbscrews. Place one hand on the panel while installing/removing as there is no catching mechanism to avoid the panel from falling. The panel needs to be slided a bit before taking out. The curve design on the bottom is more visible from this angle. The front side of the frame has a rounded design on the top and the bottom which is aesthetic purpose.

The rear side of the chassis has a standard layout. Up top, we have a cutout for the motherboard rear I/O plate followed by the mesh-designed 120mm fan place. The good thing is the user can adjust the height of the rear 120mm fan. In the middle section, we have 7 PCIe slot covers. There are two PCIe slot covers in a vertical layout. All covers are reusable. At the bottom, we have a provision for a standard ATX PSU. The solid steel side panel and the glass panel are secured using two thumbscrews that are not captive.

The vertical PCIe slot covers are secured using two Philips screws. There is no bracket cover as SilverStone has kept the design minimal and simple.

The area for the rear IO has more thickness and inset meaning the motherboard rear IO shield will be inside the chassis frame not on the frame.

The other side of the chassis has a solid steel panel.

The top side of the chassis has a magnetic dust filter. This filter has a black color magnetic belt on the inner side. The front IO panel is implemented on the top frame of the chassis.

The connectivity options on the IO panel are:
- Power Button
- Reset Button [Can be made to control the ARGB lighting]
- 5mm Combined Audio Jacka
- 2x USB 3.0 Gen-1 Ports
- 1x USB 3.1 Gen-2 Type C port

Removing the magnetic dust filter, we can see the vented design on the top. The user can install 2x 120mm fans or 2x 140mm fans on the top. The user can install a 120/240mm radiator on the top but with limitation with respect to the RAM height. The channel or rail design allows the user to adjust the position of the fans/radiator.

On the bottom side of the SETA A,1 we have a non-magnetic removable dust filter covering the full side of the chassis. SilverStone has gone an all-out option when it comes to filtration. There is a cutout on the bottom section of the front panel. This is where one has to grab the front panel and pull it over to take it out.

The bottom air filter has two tabs/hooks. One would need to press the filter and slide it out as it is secured to the frame using those two tabs/hooks as shown in the picture. I like the attention to detail.

We have 4 black color feet on the corners of the chassis giving it 16mm in height from the surface.

The above picture shows the bottom side of the chassis with the filter removed. We have a fully vented bottom.
Interior View
It is about time to take a peek at the inner side of the chassis. Let’s start with the front side.

The front panel can be removed by grabbing it from the base and pulling it out. There are 2x 200mm black fans rated for 800 RPM ± 10%. They are rated to generate an airflow of 61 CFM at 24 dBA using sleeve bearings. There is one a bit large size cutout for the cables passing on the right frame. As can be seen, the front panel is out but still connected to the frame of the chassis since two ARGB flat cables are pre-routed.
We have rail mounts for 120mm and 140mm fans on the front side.
The fan support is:


Looking at the inside of the front panel, we can spot a cut-to-size air filter secured on the panel. There are two ARGB LED panels. One is on the top side and the other is at the bottom. The front bezel is secured to the panel using 6 screws.

The above picture shows a LED strip on the panel. There are 10x ARGB LEDs on a single strip.

The above picture shows the front panel with the bezel removed. That is quite a large-size sticker pasted there which is ruining the looks of the case in my opinion.

Let’s take an inside view of the chassis. A quick glimpse is enough to tell we have standard tooling as can be found on SilverStone other chassis with a few changes. The overall look and feel of the tray give an average impression. I was expecting at-least rubber grommets in this price range. The layout is spacious and can house the hardware without trouble within the specs.

The motherboard tray is made of steel and is quite solid in quality. There is no flex as such in the tray. The markings are labeled for ease of identification for the installation of the motherboard. This case supports:
- Standard ATX
- Micro ATX
- Mini ITX
Only 6x standoffs are installed. The user will have to install the remaining 3 for the standard ATX motherboard. I am glad that SilverStone has provided a wrench so that the user can easily install the remaining standoffs or removing them. We have two cutouts on the top for the CPU power cable routing and other cables routing. We have three vertical cutouts on the side for 24-pin ATX and other side-mounted cables routing.

The above picture shows the limitation of the graphics card’s length for this chassis which is 350mm.

The above picture shows the limitation on the CPU cooler height for this chassis which is 165mm.

The above picture shows the dust filtration of the SETA A1.

We have a vented layout on the PSU shroud. There are mounting holes around the shroud giving the impression that one can install 120mm fans there though SilverStone has not mentioned in the specifications about internal fan mounts. Also, it is mentioned that the 2.5” drive brackets can be installed on the PSU shroud. There are 3x cutouts towards the wall of the tray on the shroud. This is where one can route the cables through for the connectivity on the motherboard’s bottom ports/headers. There is also a cutout on the vented portion from which the user can pass the PEG cable for the graphics card.

There is a roughly 52mm or so cutout on the front where the user can install a radiator of up to 360mm with the fans.

We can spot a rail mount on the inner side of the chassis’ front. The 200mm fans are not installed on the front rail mounts. Seems like they were not part of the design initially, and SilverStone decided to incorporate them at a later stage. I might be wrong about this! Also, given the speed rating of these fans combined with the DELTA A Noise Dampening certification from Cybenetics, it seems like SilverStone’s focus is on the better noise output for this chassis.

There is a black color 120mm fan on the rear which is powered by a 3-pin connector cable. It was running near to 1150 RPM mark at full speed and was silent.

The above picture shows the PCIe slot covers. Despite sitting in line with the outer frame of the chassis, the removal/installation of screws on these covers is convenient.

There is a displacement of roughly 33mm from the top of the chassis to the top of the motherboard PCB. Similarly, the displacement from the 120mm mounts on the top to the motherboard is 60mm and it is 40mm for the 140mm mounts. This has the RAM height clearance consideration for the AIO on the top. The 240mm AIO on the top should not pose any challenge.

Now, it is time to take a look at the backside of the motherboard tray area. We have a dual-chamber design. The layout is standard and we have 12x cable tie points. Two drive cages can be seen. SilverStone has taken a different and modular approach with these cages. There are two 2.5” drive brackets as well. These can be placed on the PSU shroud as well. We have roughly 16mm of space behind the motherboard tray for cable management.

There is a space of a total of 210mm for the PSU and the cables with the drive cages installed. PSU clearance is roughly 183mm per the specifications. The feet have anti-vibration pads where the PSU is rested.

There are two drive cages stacked in the lower chamber. Both are removable. The user can also remove one depending upon the requirement.

The above picture shows the modular aspect where we removed one cage.

The above picture shows both cages out of the chassis. This is an interesting design where the 2.5” SSD is actually rested in the space and sits in the frame, not on its top.

The above picture shows the 3.5” and 2.5” drives installed in the cages. The user can also install the 2.5” drive bracket on top of the drive cage (only when one cage is to be used). There is only one caveat with this design. The 2.5” drive sits far from the access point so installing the cables would be troublesome.

The above picture shows the bottom chamber with the drive cages removed. It is fully vented and has a length of 370mm.
Speaking of the storage, the following is the storage provision in SETA A1:
- 2x 3.5” drives
- 4x 2.5” drives

We have standard front panel cables with sufficient length.

We have a USB 3.0 header and USB 3.1 Gen 2 Type C cables. SETA A1’s USB Type-C port uses Key A as an internal connector to the motherboard.

We have an HD Audio cable.

The front 200mm fans both use 3-pin connectors to power them.

There is a single 3-pin standard ARGB connector for the ARGB LEDs on the front panel.

SilverStone has provided a hub controller to connect up to 4x 3-pin standard pinout ARGB devices to it. There is a SilverStone branding on the housing. The housing has a magnet as well for convenient placement.

The above picture shows the two 3-pin ports of the hub.

There is a 2-pin port where the user can optionally connect the case’s Reset cable and control the lighting effect using the Reset button on the Top IO panel.

The hub is SATA powered and there is a standard 3-pin ARGB connector cable that is to sync the hub with the motherboard’s 3-pin 5V header.
Speaking of the ARGB lighting, the SETA A1 is compatible with:
- SilverStone RGB
- ASUS AURA SYNC
- GIGABYTE RGB FUSION 2.0
- MSI MYSTIC LIGHT SYNC
- ASRock POLYCHROME SYNC
- BIOSTAR ARGB SYNC
Installation
Following is the configuration used to test the thermal performance of the SETA A1:
- Intel i7 10700k
- MSI MAG Z490 TOMAHAWK
- PCCOOLER GI-D66A Cooler
- T-Force NightHawk RGB 16GB @ 3200MHz
- Nvidia GeForce GTX 1080 FE
- addlink S70 256GB NVMe SSD
- bequiet! Straight Power 11 850W Platinum PSU
The installation started with 3 leftover standoffs. Since I was testing the PCCOOLER GI-D66A cooler, the RAM, NVMe SSD, and the cooler were already installed on the motherboard. All I had to do is to place the motherboard on the standoffs and secure it to the chassis. Walk-in a park! Next, the PSU was installed. I was not able to put the PSU inside without taking the drive cages first so take a note of this. In the next step, the graphics card was installed. The cables were routed and connected to the motherboard and the graphics card.

Connecting the EPS cable was difficult since the cooler was already installed. I would recommend connecting this cable before installing the cooler.

The 24-pin ATX cable was an easy installation. The MSI MAG Z490 TOMAHAWK has a USB 3.0 header in 180°, connecting the front panel’s USB cable proven to be difficult since the cable is not flexible enough and the bulkhead of the cable makes it further difficult. The USB 3.1 Gen 2 Type-C was easy to connect.

The SETA A1 has a cutout right above the motherboard’s right edge which makes it convenient to pass the ARGB/RGB and Fan cables through for a clean job.

The above picture shows the bottom connectivity on the motherboard. Though it seems like the ARGB cable coming from the front panel is flexing. This was not the case as this cable does not have enough length to remain flexible enough that even if we remove the front panel, it would not damage the header of the motherboard as in our case it bends the pin on the header.

The above picture shows the motherboard installed in the chassis before the graphics card was installed. Doing a clean build inside SETA A1 is an easy job.

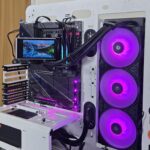
The above picture shows the fully assembled test build.

The above picture shows the rear of the chassis after the test build. Check that the rear IO shroud is inside the chassis frame.

The above picture shows the build powered up.

The above picture shows the backside of the chassis with minimal cable management done. The side panel easily installed with this management.
Here some pictures of the chassis:


Testing
Following configurations were used to test the thermal performance:
- Thermal testing with front panel installed [Stock Configuration]
- Thermal testing with the front panel removed.
The chassis was tested using stock 2x 200mm fans on the front and a 120mm fan on the rear at their full speed.
Each testing session was of 30 minutes using the FPU and GPU in AIDA64 Extreme 6.30. The maximum temperature of the graphics card is reported in the graph. The average of core temperature of Intel i7 10700k is reported. Delta temperature is in the graph. Between the testing sessions, the system was set on idle for a minimum of 30 minutes. The cooler’s fan was set to run on Auto PWM.

We have some interesting results. Before proceeding we can’t emphasize enough that we are not evaluating the thermal performance of the cooling solution of the CPU cooler or the graphics card’s cooler but the impact of the front panel and air flow restriction if any on these coolers. PCCOOLER GI-D66A is a decent cooler to get the cooling job done.
There is over 5°C difference with the front panel on and removed for the CPU temperatures which goes to show that the airflow is indeed restricted with the front bezel covering the entire front panel. However, the impact on the graphics card was well within the acceptable margin.
Acoustic
The noise level under load was 50 dBA at 32 dBA ambient which is too good for this chassis.
Conclusion
Recently, we got to test the SilverStone FARA series R1 and B1 Lucid Rainbow edition mid-tower cases and both got our praise particularly the R1 given the set of features and the price it carries. We were thrived to spin their high-end SETA series A1 chassis. SilverStone sent one for review. This is a mid-tower PC case available in three colors which are Rose Gold on White/Silver on Black/Titanium on Black. We got the Silver on the black edition. The basic chassis frame (inside/outside) is in black color. There is a sleek and beautiful bezel on the front panel in the Silver color. The dimension of the chassis is 225x470x432mm (WxHxD). Chassis is made of steel, plastic, aluminum, and tempered glass. The net weight of the chassis is 8.48KG with 45.7 liters of volume.
Cooling Provision:
- Up to 3x 120mm or 2x 140mm or 2x 200mm fans on the front [2x200mm fans are pre-installed]
- Up to 2x120mm or 2x 140mm fans on the top
- 1x 120mm on the rear [Pre-installed]
- 120/140/240/280/360mm radiator on the front
- 120/240mm radiator on the top
- 1x 120mm radiator on the rear
Clearance:
- Up to 165mm height for the CPU cooler
- Up to 322mm length for the graphics card with 170mm width
- Up to 160mm length for the Standard ATX PSU with the drive cages
Storage:
- 2x 3.5″ HDD
- 4x 2.5″ SSD
The SilverStone SETA A1 has a bezel on the front panel with two ARGB LED panels on the front and bottom of the panel for a cool lighting effect. This bezel is a solid cover and covering almost the entire front panel. It is restricting the airflow in doing that. There is a sticker on the front panel cautioning the user to remove the front panel with care to prevent injury. This sticker itself is ruining the looks of the case and in my opinion, it should not be there at all. The chassis has dust filtration all around. There is a full-length removable dust filter on the bottom. The top one is magnetic. The glass panel is dark tinted so you would need some light strips inside the case if you want to showcase the build. The IO panel is located on the top frame and it has a USB 3.1 Gen2 Type C port with A Key format on the connector. Good job on that SilverStone!
The chassis supports standard ATX, micro ATX, and mini ITX motherboards. There is a shroud on the PSU area with vents on the top. The whole bottom area of the chassis is vented as well. I was expecting rubber grommets in this price range and a tag line of premium chassis. The chassis comes with a magnetic mounting ARGB hub controller which can be connected to the 5V header of the motherboard. SilverStone is using a standard 3-pin ARGB connector on the ARGB LEDs which is a wise implementation. The user can connect up to 4x ARGB devices to the hub. There is roughly 16mm spacing behind the motherboard tray.
The 200mm fans are set to rotate at 800+10% RPM. These fans are not installed on the front rail. Rather there are mounting holes on the chassis frame. This when combined with the Cybenetics A1 certification, gives me an impression that these fans were not the part of the first design and SilverStone down the road decided to optimize the SETA A1 for better acoustic performance which it does but at a warm temperature as evident in our testing.
The SilverStone SETA A1 is listed at $130 at the time of the review. The overall build quality is very good as we have seen in their other cases. The basic tooling is standard and similar to their other designs. The SST SETA A1 comes with a set of overall good features with ample cooling and storage provisions combined with a sleek and stylish backlit bezel and glass panel. SETA A1 comes recommended by us.
We are thankful to SilverStone for giving us the opportunity to review SETA A1.


