


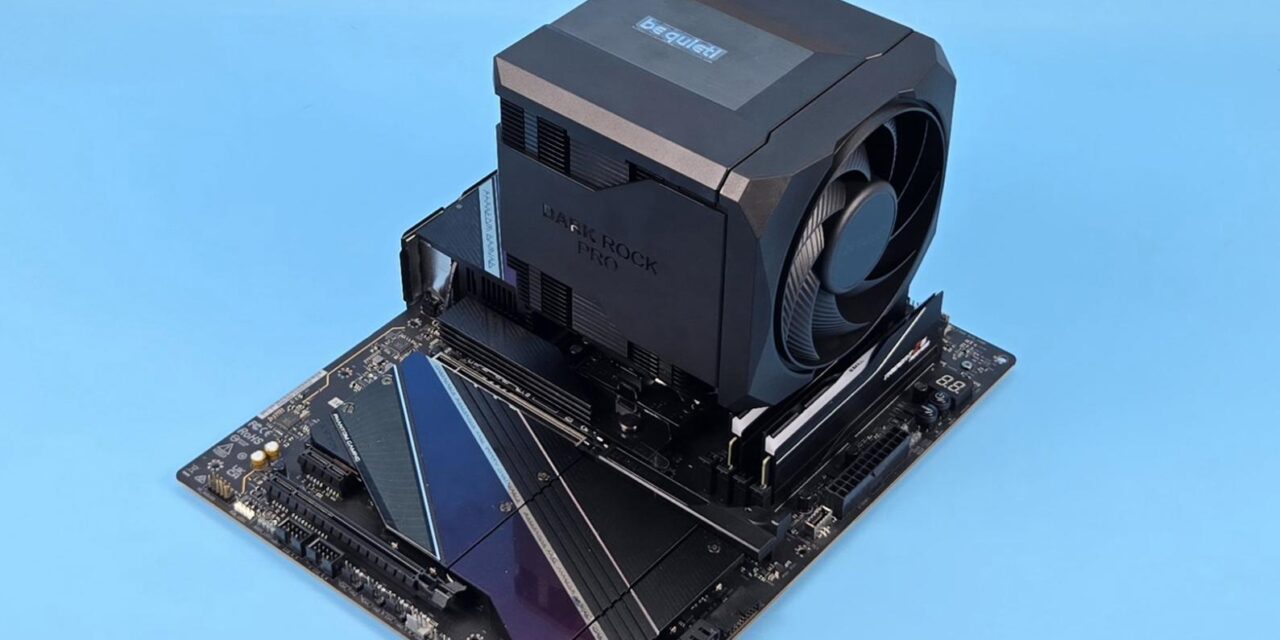
be quiet! Dark Rock Pro 6 Review: Flagship Cooling Solution
In my last take, I tested a new cooler from be quiet! Which is the Dark Rock 6. This time I am taking a look at the flagship new-generation cooler named Dark Rock 6 Pro. One salient highlight in both coolers is the new concealed design for tidiness, masking the surface and heat pipe tips while remaining within the be quiet! design language.
The design team has done a good job in this department, though dare I say that the design language on Dark Rock Pro 6 is not new for me (at least) since I have seen such a design on many other coolers from the competition. But it is good to see be quiet! adapting to the situation and remaining up-to-date with the competition.


The Dark Rock 6 aims at mainstream gamers who want silent cooling without a compromise and utmost clearance/compatibility, whereas the Dark Rock Pro 6 aims at the heavily overclocked systems and workstation users, keeping the temperature of the CPU in check while allowing heavy workloads. I praised Dark Rock 6 for its silent performance, and to my surprise, Dark Rock Pro 6 offers a similar noise profile, though a tad more when compared to Noctua NH-D15 G2.
Dark Rock Pro 6 is a dual tower configuration, and it is equipped with two customized Silent Wings PWM fans with different sizes (135mm and 120mm). Using two different-sized fans operating at different speeds reduces humming noise coming from frequencies and contributes to reducing the overall noise level.
Another salient feature is a rail-mount design on the front fan, which is retained from the Dark Rock Elite design concept. It is similar to Corsair A115. The middle fan, which is 135mm, is integrated into the top cover housing, and the complete housing is removable. Be quiet! has retained the design element of Dark Rock Elite. It is also similar to Sudokoo SK620V and ARCTIC Freezer 50. The fan’s handling is convenient, as you can slide it out and put it back in whereas the rail-mount design on the front makes the adjustment of the fan’s height a breeze.
Be quiet! has introduced P and Q fan curves as well, which are hardware-based. Q mode triggers semi-passive cooling in which fans will not spin under 40% PWM range whereas the P mode activates the performance mode, providing the full PWM range.
The salient features include:
- Semi-passive quiet mode with full fan stop feature
- Hardware switch to toggle between P and Q modes
- 7 optimized high-performance heat pipes
- 2 custom-designed Silent Wings PWM fans
- Optimized heat sink for more cooling power
- Height-adjustable front fan with rail system
- Heat sink cut-outs for high RAM and VRM cooler compatibility
- Top cover with brushed finish aluminum branding
- Integrated middle fan with the top cover for convenient installation
- Simple mounting systems for fans and heat sink
- Special ceramic-particle black coating and side cover create the signature elegant
- Compatible with liquid metal thermal grease
- 3-Years Warranty
The be quiet! Dark Rock Pro 6 has an MSRP of €109.90 and US $129.90. It comes with a 3-year warranty
Specifications

Packing and Unboxing


The product is shipped inside a cardboard box in black color theme. Be quiet! has retained its theme for the packing boxes. Inside, you can see a screwdriver on the top of the packing cover. You need to lift this cover entirely to expose the cooler and accessory box which are placed side by side.
The following are provided:

- 2x AMD Mounting Brackets
- 4x AMD Spacers
- 4x AMD Screws
- 1x Intel Backplate
- 4x Intel Screws for backplate
- 4x Intel Rubber washers for backplate
- 2x Intel Mounting Brackets
- 4x Standoff Screws
- 1x Thermal Paste
- 1x Long Neck Screwdriver
- 1x User Guide
- 1x Warranty Paper
Editor’s Note: The AMD offset mounting brackets provided with the Dark Rock 6 are not compatible with Dark Rock Pro 6 due to different sizes and mounting orientation.
Closer Look
Let’s take a look at the cooler and see its design and layout.

The dimension of the cooler is 147x140x169mm. The dimensions of Dark Rock Elite is 145x136x168. You can see that Dark Rock Pro 6 has more size, resulting in more surface area as well. This is why this cooler is rated at 300W TDP, whereas the Dark Rock Elite is rated at 280W TDP. The Dark Rock Pro 6 has a weight of 1336g, whereas the Dark Rock Elite has 1340g weight.
The new cooler is compatible with Intel LGA1150/1151/1155/1200/1700 sockets. It is compatible with AMD AM4 and AM5 sockets. There is no support for Intel LGA20xx so keep that in mind. The complete assembly is black ceramic color spray-painted. The special black coating with ceramic particles makes a perfect transfer of heat possible.
The overall closed design speaks for itself and creates a bold yet stylish outlook that will bode well in themed builds, particularly the neutral one.
Heatsink Design

The top of the heatsink has a non-magnetic cover which is made of plastic and has an aluminum plate in the center with be quiet! branding. You can see that the front fan is recessed compared to the top cover. This is because be quiet! has inserted packing material between the top cover and heatsink which needs to be removed during installation. Otherwise, the top cover and front fan housing sit at the same level, subject to the height adjustment of the front fan.

I have removed the top cover along with its attached fan. You can see the placement of heat pipes in each heatsink. The far ends have a group of two heat pipes side-by-side, whereas the 3 heat pipes are placed at the same interval in a straight line, providing maximum contact with the fin stack.
Also, check the 4x tabs (2 on each heatsink at far ends). These catch the top cover for a secure fit. Also check the labeling of L and R on the front side rail mount top pads. This is important as it provides visual aid to the user for proper fan mounting. The rail mounts are removable as well.

I am showing the top cover. You can see that the middle fan is attached to this cover. The four mounting holes are where this cover sits and contacts the tabs on the heatsink for fitting. You can remove the fan assembly from the top cover, for which screws are used.
You can see that both coolers have a similar outlook on the front side with the fan assembly. Dark Rock Pro 6 features a Silent Wings 120mm fan on the front. The fan is enclosed inside the housing, providing a closed look that looks brilliant. You can slide the fan upwards to release it from the heatsink. Be quiet! has provided a proper rail mount on the front, allowing you to adjust the height of the fan as per the requirement. This is not possible in Dark Rock 6.

I am showing the heatsink on the front side after removing the fan. You can see latches on the side rails on which the fan is slid. This cooler has 45 fins in total per tower. They are in a straight-line pattern on the front, which reduces the air drag and reduces the noise and vibration.
Also take note of the double-step design wherein 6x fins are offset compared to the top fins stack. They have full length but reduced width. The last 3x fins are further stepped. They have the same width as the 6x above fins but reduced length. The step design provides clearance for the motherboard near the socket/VRM area. Be quiet! has provided maximum clearance for the DIMM slots and motherboard areas from the heatsink perspective.

I am showing the rear of the heatsink. Here we have an alternate arrangement of the fin plates in groups of 8 and 7. The 7 groups are in an inset layout compared to the full width of the 8 groups. Each group has 3 fins forming a fin array design. This is similar to the Dark Rock Elite.

The top cover has a slider button with P and Q labels on the rear. The P stands for performance mode, and it runs the fan at full speed. However, you can achieve a semi-passive mode using the Q (silent) mode. Two important points are:
- You need to shut the PC off before switching the mode.
- For Q mode, you need to set the fan header setting to either Silent or Normal depending on the motherboard’s UEFI. Silent should work on the majority of the motherboards.
Under Q-mode, the fans would come to a stop under 40% PWM load, providing excellent sound output. Please note that your motherboard should support the Fan stop function as well.

Since the toggle button is implemented at the hardware level and is integrated into the top cover, you can see a cable going from the dedicated hardware under the cover towards the middle fan.
Editor’s Note: I appreciate the provision of two modes for the fan performance but it is not convenient to shut down PC every time to make a change and then open the PC case to access the slider button. A software-based control would rather be better. The location of the toggle button is not convenient as well. This button is on the rear of the cooler meaning you need to access this button by placing your hand between the rear fan of your PC and this cooler

Both sides are identical hence, I have shown one. Looking at the side of the heatsink, we can notice three things:
- The interlocking mechanism of the fins is located on the sides.
- The front tower has step-design fins providing clearance for the DIMM slots and motherboard area.
- The housing is extended on the sides as well, providing a closed look (almost). Be quiet! has left some areas exposed, which is understandable, as air vent is needed.

The cooler comes with an aluminum heatsink over the base that has a cross-bar pre-installed. The crossbar has two screws (non-spring) to install the cooler over the mounting brackets. This heatsink has 16×7 array layout, providing some surface area for heat dissipation as well.

This cooler comes equipped with 7x copper heat pipes which are also black spray coated. Each heat pipe has a thickness of 6mm. 4x pipes are grouped into two, whereas 3x pipes are placed on a straight line. Hence providing maximum contact with the fin stack for even heat spread.

The cooler has a nickel-plated copper base on this cooler. It has a protective cover to protect it from scratching during shipping/handling. Don’t forget to peel it off before installing the cooler.
Fan Design

Be quiet! has provided a customized Silent Wings 120mm fan on the front of this cooler that has dimensions of 120x120x25mm. It is encapsulated in a frame providing a unified look to the cooler. This fan has 9x blades with the same striped design that we have seen on other be quiet! fans. The center has be quiet! branding over it.
Be quiet! has mentioned that they have reduced the tip clearance of this fan to improve the airflow and increase air pressure. They have used advanced fluid dynamic bearings and a 3-phase, 6-pole motor for the fan.
Its maximum speed is 2000 RPM, generating 89.95 CFM at 12VDC at an air pressure of 2.5mmH₂O. The input current is rated at 0.2A. The input power is 2.4W.

Looking at the back side of the front fan assembly. The slide bars are secured using screws. A 4-arm assembly is in the spiral design. Each arm has a curvature providing a directional airflow. One arm has a wider body as wires are routed from the center to the frame over it.

Be quiet! has used a proprietary 7-pin connector on the front fan. I would have preferred a standard 4-pin PWM connector.

The middle fan is a Silent Wings 135mm, having a dimension of 135x135x25mm. it has 7x blades with a striped design. The center has be quiet! branding. It is rated for 1900 RPM speed generating 76.59 CFM airflow and an air pressure of 2.25mmH2O. It can be detached from the top cover.

The backside of the fan shows same spiral shaped 4-arms assembly, with one arm having wires routed towards the frame of the fan.

The middle fan has a 7-pin proprietary socket to which the front fan’s connector is attached, forming a daisy-chain connection. It also has a 4-pin PWM connector which is then connected to the motherboard fan header.
Editor’s Note: The limitation of this design is that you can’t control the speed of both fans individually since the toggle button is attached to the middle fan only. This is why be quiet! did not provide a standard connector on the front fan (probably).
Installation


We don’t cover the installation steps. You can use the user guide for that purpose. But we mention the observations noted during the installation/removal of the cooler. Be quiet! has used different mounting brackets for AM5 mounting. They have provided an offset of -8mm. Each bracket has two mounting holes on each end. One is labeled 0, and the other is labeled 8. Using 0 will provide maximum clearance for the motherboard. The 8 will provide maximum coverage of the hotspot area on the CPU die, providing good thermal exchange for maximum performance.
This is nothing new. Noctua was the first brand to come out with this idea, and they released dedicated mounting kits for their coolers, followed by integrating this design as a part and parcel of every new release. I have installed this cooler on the AMD AM5 platform and did not observe any issues. The overall installation was quick and simple.
Be quiet! Still uses the same Intel mounting kit that is on their other coolers, and it involves 19 items to set up the backplate and secure it with the motherboard so that the cooler can be installed on it.
Clearance


This cooler has excellent clearance for the RAM. The G.Skill kit has 44mm height, and there is still some space left under the fan, which gives the impression that you can use 48 or 49mm tall profiles with this cooler without needing to adjust the fan’s height.

There is no obstruction for the PCIe slot.

The cooler provides good clearance for the motherboard areas.
The height of this cooler is 169mm. You would need a 172mm clearance in your PC Case. Leaving some margin is fruitful.
Testing
I have used the below-mentioned configuration: –
- AMD Ryzen 9 9900X
- ASRock X870E NOVA WiFi
- G.Skill TridentZ Neo RGB 32GB 6400MHz CL30
- ASRock Phantom Gaming RX 7600 Graphics Card for Display
- Sabrent Rocket 4 Plus 2TB NVME SSD
- CPS YN1000 PSU
- Thermaltake Core P6 TG Snow Edition in an open frame layout

Here is the settings table for testing:
| Clock (MHz) | Auto |
| Voltage (V) | Auto |
| PBO | Advanced 243W |
| Thermal Paste | Noctua NT-H2 |
| Thermal Paste Application | 5 Dots Method |
| Test Run Time | 30 minutes |
| Idling Time | 10 minutes |
| All Fans Speed | 100% PWM Duty Cycle |
| Stress Software | CINEBENCH R23.2 |
| Monitoring Software | HWINFO64 |


The testing is done on an open-air bench system. Once inside the chassis, the temperatures are expected to rise and would largely depend upon the optimal airflow inside the chassis.
Result

Dark Rock Pro 6 offers excellent performance as it closes the gap between the Noctua’s NH-D15 G2 with only 0.1°C, which is negligible. The sound profile is also good, though not at the level of Noctua’s cooler. I am impressed with this cooler. The Dark Rock Elite got my praise when I tested it, and this time the Dark Rock Pro 6 has my praise as well.
Conclusion
After testing the Dark Rock 6, I have tested the Dark Rock Pro 6 this time. This is a flagship air cooling solution from be quiet! aimed towards the overclocked systems and workstation workloads where thermals need to be kept in check for heavy workloads. This cooler is rated for 300W TDP.
Be quiet! has provided the same concealed, unified outlook on this cooler as on the Dark Rock 6, providing a visually pleasing cooler that packs a solid performance punch with better acoustics. This cooler is compatible with Intel LGA1150/1151/1155/1200/1700 and AMD AM5 and AM4 sockets. No surprise there, as this cooler does not support the legacy LGA20xx socket.
This is a dual-tower configuration that comes with custom Silent Wings 120mm and 135mm fans. The cooler has a dimension of 147x140x169mm (LxWxH). It uses a ceramic black color spray coating on the assembly for better heat transfer. The complete assembly is black in color, including the heat pipes.
The foremost aspect of the new cooler is the overall look and feel of it. The cooler uses a unified closed design using a plastic frame or housing surrounding the heatsink. Even the front fan is enclosed inside a housing that bodes well with overall design symmetry.
The front tower has 45 fins in total with a stepped layout of 36+6+3 fins. This is a double-stepped layout on the front tower only, providing good clearance for the DIMM slots and motherboard areas from the front. The rear tower has 45 fins without stepping. The interlocking mechanism is provided on both sides of the heatsink. This cooler packs 7x 6mm thick copper heat pipes. The nickel-plated copper base can safely be used with liquid metal. This was also a feature of Dark Rock Elite.
Be quiet! has provided a customized 120mm fan on the front tower with a rail-mount design that allows easy height adjustment. Say bye to the clips. This fan is rated for 2000 RPM speed, generating 89.95 CFM airflow and 2.50 mmH2O air pressure.
The middle fan is attached to the top cover. The top cover is non-magnetic and can be pulled easily, removing the middle 135mm fan. This fan is rated for 1900 RPM speed, generating 76.59 CFM airflow and air pressure of 2.25mmH2O. Both fans use 7-pin proprietary connectors for daisy-chain, and then a standard 4-pin PWM connector on the middle fan is attached to the motherboard’s fan header. The only reason for the non-standard connector is the implementation of a toggle button for P and Q modes. This button is wired to the middle fan only.
The P and Q modes are implemented on a hardware level, which is something I would want on a software level since I am not comfortable opening the PC Case just to switch the mode. Plus, you need to shut down the PC before changing the mode. Also, don’t forget to change the fan settings in UEFI to silent for Q mode. The motherboard should support the fan stop feature. The placement of the toggle button on the rear is not helpful.
Be quiet! has provided offset mounting brackets for the AMD with -8mm. You can install the brackets in regular mounting using 0 labeled holes or use 8 labeled holes. The latter provides maximum coverage of the hot spot area on the Die for maximum performance.
Installing this cooler on AMD AM5 platform requires 10x items. The bundled long-neck screwdriver is needed for the installation since the rear screw on the mounting plate is under the heatsink. Overall installation is a walk in the park, and I did not observe any issues.
The be quiet! Dark Rock Pro 6 has an MSRP of €109.90 and US $129.90. It comes with a 3-year warranty. This cooler has performed at the level of Noctua NH-D15 G2, handling the 243W all-core load on Ryzen 9 9900X. The sound profile is good as well.
Pros:
- Excellent Thermal Performance
- Excellent unified, closed outlook
- AMD AM5 and Intel LGA1700 Socket Support
- Rail Mount for front fan
- Customized Silent Wings 120mm Front Fan
- Customized Silent Wings 135mm Middle Fan
- Removable Top Cover
- Middle Fan integrated into the top cover
- P and Q Modes via a slider button
- AMD Offset Mounting Brackets
- Better RAM and VRM Clearance
- Special ceramic-particle black coating
- Noise
- Price
Cons:
- Warranty Period
- Location of toggle button


