


be quiet! Light Base 500 LX Review
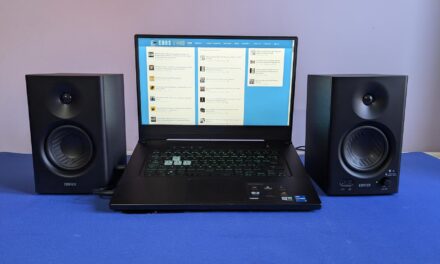
I have tested be quiet! Light Base 500 LX mid-tower case. This case is available in black and white colors in addition to the non-LX or basic edition, which does not have ARGB fans. This case features clear tempered glass panels on the side and front. The front glass panel is also removable, though I have noted that doing that produces flex in the top panel, which can easily bend down from the front right.
Among salient features, this case supports back-connect motherboards such as the previously reviewed GIGABYTE X870 AORUS STEALTH ICE, in mATX and ATX sizes, in addition to regular motherboards. The side of the motherboard tray is not straight, as it hasan angular implementation, and this is where you will find 3x reverse blades ARGB white fans. The fans are installed on a bracket that can be removed from the top of the case. You can install a graphics card in a vertical layout, but a riser cable would be needed. The floor of the case can house three fans for intake as well.
This case almost resembles the three-chamber design since the air intake on the side is sealed off from the rest of the backside of the case. Anyhow, this is not a three-chamber design in that sense since the CPU cooler is still inside the main chamber. The case comes equipped with a fan hub that supports up to 6x 4-pin fans and 3-pin ARGB devices.
This case has an MSRP of € 154.90.
Specifications

Packaging and Unboxing


The case is shipped inside a standard cardboard box finished in brown. The features and specifications are also listed on the box. Two thick white Styrofoam pads sandwich the case for safe shipping.
Accessories

Accessories are provided in a separate box. The following are provided:
- User Manual
- Zip Ties
- Vertical PCIe Bracket
- Motherboard Screws
- PSU Screws
- HDD Cage Screws
- Other Screws
Closer Look

The Light Base 500 LX has dimensions of 432x305x436mm (LxWxH). It is made of ABS, SPCC, and Tempered Glass. The weight of this case is 9.52Kg. This case comes with a 3-year warranty, though I am not sure what that warranty covers. This is a mid-tower category case that is quite spacious.
Exterior View
Let’s start with an exterior view of the chassis, starting from the front.

This case has a distinctive design on the front, which somewhat resembles the CORSAIR Air 5400. You can see a see-through/clear glass panel on the front with be quiet! branding over the base. The right side of the front has a gap which I will cover in the next paragraphs. The IO panel is integrated on the front as well.


The front right side has a gap. You can see an air filter behind the side-mounted fan. The idea is to draw fresh air from the side that is not affected by the other backside components. CORSAIR has taken this concept the other way. They have a third chamber or second chamber, however you name it, which is also sealed of,f but it is sealed off from the other two chambers as well, hence making it a perfect area for the liquid cooler of the CPU. However, be quiet! has implemented it for an air intake only. Even mounting a liquid cooler on the side (if possible) would not make it a dedicated chamber.
The gap or open area is on the front, and the backside utilizes the perforated area of the side panel. The top and floor are sealed. However, the floor has one cutout from which the fan cables are routed towards the backside of the motherboard tray.


I have removed the side fan bracket. All fans are daisy-chained with two cables for complete connection. One cable has a 4-pin PWM connector, whereas the other cable has standard 3-pin, 5V ARGB connectors. Active dust filtration is also provided.

The IO panel has the following ports:
- 2x USB 3.2 Type-A
- 1x USB Type-C Gen2
- HD Audio (Combined)
- 1x Power Button
- 1x Reset Button
- 1x RGB Button

The rear side of the case clearly indicates the dual-chamber layout. The left side has a cutout on the base for an ATX standard PSU. The upper cutout seems covered. However, it can be released, and the PSU can also be mounted on that area, and the covered bracket can be relocated to the base.
The right side has a cutout where the motherboard’s IO panel rests. A perforated area is for the rear. A 120mm fan comes pre-installed. You can also install a 140mm fan, though it would restrict a 360mm radiator/AIO on top.


The case comes equipped with 7x PCIe covers in a horizontal layout. You can switch to the vertical layout using the bundled PCIe bracket. However, the riser cable is not included.


The bottom of the case from the underside has a non-magnetic dust filter that runs the entire length of the fan mounting area. The fan bracket is not removable, and you would need to tilt the case over to install the fans on the floor. So, plan ahead. The feet have rubber mounts.

The backside of the case has a steep panel with its tool-less design. It has a large perforated area without a dust filter covering the entire area.


The top panel is removable and tool-less design. It has perforations in most areas. I did not see any dust filter on this panel. It uses push pins or studs for latching. The fan bracket has multiple slits. This bracket is fixed and not removable. You can install:
- Up to 3x 120mm or 2x 140mm fans
- Up to 360mm radiator in 120mm size


You can see the fan bracket top as well. It is secured using a screw. Undo the screw and disconnect the fans’ cables before pulling out the bracket.
The front steel bracket is removable as it is secured using a screw. I did not open the bracket.

The main side of the chassis has a clear tempered glass panel, which is also a tool-less design. It is not a pillar-less design, but both glass panels sit in well to create a seal.
Interior View
It is about time to take a peek at the inside of this case.

I have removed the side glass panel and shown the inner side of the case. You can see a relatively shorter (length-wise) motherboard tray. This is because of the angular side-mounted fans taking up that space. The case does not have fans installed on the floor.

The motherboard tray has bit of flex, but nothing too grave. You can see two cutouts over the top for cable routing. This case supports motherboards up to ATX form factor, including the back-plug motherboards for which necessary cutouts have been provided. The flex is coming from this excessive cutting, reducing the overall weight of the tray. Stands off come pre-installed.

be quiet! has installed 3x Light Wings LX 120mm white reverse blade fans on the side. Each fan rotates up to 1600 RPM, generating 51.5 CFM airflow with an air pressure of 1.34mmH₂O. Their noise level rating is 25.5 dB(A). The input power is 3.8W using 0.32A at 12VDC. Life span is 60,000 hours.
You can’t install a radiator on the side, and only 120mm fans are possible.

The floor of the case has a depth to it where you can install up to 3x 120mm fans above the rail mount. By default, this area has no fan in it. Two cutouts are also seen near the motherboard tray on the floor housing. This is to pass or route the cables for connectivity on the bottom of the motherboard.

1x Light Wings LX120 regular edition ARGB fan is pre-installed on the rear. It is PWM regulated and uses standard connectors. Part of the high price tag comes from these four LX120 ARGB white fans.

I have installed the vertical PCIe bracket, which can only fit in one location. I did a build using a vertically mounted graphics card. The default layout supports horizontal mounting.

The top has a near 55mm or so gap for the AIO with fans. However, this will do with most of the RAM except where tall-profile RAMs come into question. You can gauge the compactness of the case from this angle.

I have removed the front glass, which is secured with 3x screws. You have ample space to work in for your build.
Clearance
Since we are at it, let’s see the clearance restrictions of components in this chassis:
- 185mm CPU Air Cooler
- PSU maximum length is 200mm
- Graphics Card’s maximum length is 400
It is now time to look at the backside of the case.


You can see the partitioned backside. The left side is where the side-mounted fans draw fresh air intake, and the right side is where you do the cable management and storage drives. The front panel cables well well-sleeved for a neat and clean look.


By default, the PSU is placed at the base of the case for whicha raised platform is provided. However, the good part is that PSU can also be placed behind the motherboard tray by relocating the storage bracket.

Be quiet! has wisely provided a 6-port fan hub on which you can connect up to 6x ARGB fans using 4-pin PWM connectors and 3-pin standard ARGB connectors. It is SATA powered and can be connected to the motherboard via standard connectors. It hasa separate cable connection so that you can control the effects from the RGB button on the front IO without losing the reset functionality.

I have removed the storage bracket and am showing the backside of the motherboard tray area. We have ample space to work with, but you still need to plan the cable management

This is the holding plate in case you want to install a PSU behind the motherboard tray.

I have removed the storage bracket from the case. Speaking of storage, you have the option to install:
- 2x 2.5” Drives
- 1x 3.5” Drive

Above is a better view of the backside area after removing the cables.

I have relocated the storage bracket on the base so that the PSU can be installed behind the motherboard tray. This is just for illustrative purposes, showing the flexibility in the design.


Be quiet! has provided cables/connectors for the top IO panel:
- USB 3.2 Connector
- USB-C Type-E Connector
- HD-Audio Connector
- Front Panel Single Connector
- SATA Connector for Fan Hub
- Fan Hub Connectors (Already Installed)
- 4-pin PWM Connector for motherboard connectivity
- 3-pin ARGB Connector for motherboard connectivity
Installation
The following configuration is used:
- Intel Core i7 13700k
- MSI Z790 PZ
- V-Color Manta xSky 32GB 5600MHz CL26 White RGB Kit
- Maxsun iCraft B580 White Graphics Card
- GameMax Glacier 360 AIO
- Sabrent Rocket 4 Plus 1TB NVMe SSD
- 1st Player NGDP 1300W White PSU


I started with the motherboard. RAM and CPU were installed outside of the case. The graphics card was installed, and cables were routed from behind the card for a clean outlook. The AIO was next. It was easy to do.
PSU was installed, and cables were routed. Since I have used back-plug motherboard, you won’t see any cable on the front. Hence, all the cable mess is on the backside. I did not do much of cable management and stuck with basic cabling. I wanted to see if the side panel would still close off and it did.
The only observation that I have is that those AIOs that have extended width due to shorter tubes would be difficult since one of the two screws of the front glass panel would obstruct. I noticed it since I had removed the front glass panel. When I put it back on and tried to screw it, I was able to do it with only two screws. However, your standard or regular AIOs have no issue. Also, a 140mm fan on rear would obstruct the 360mm AIO.


The above are a few pictures of the build.
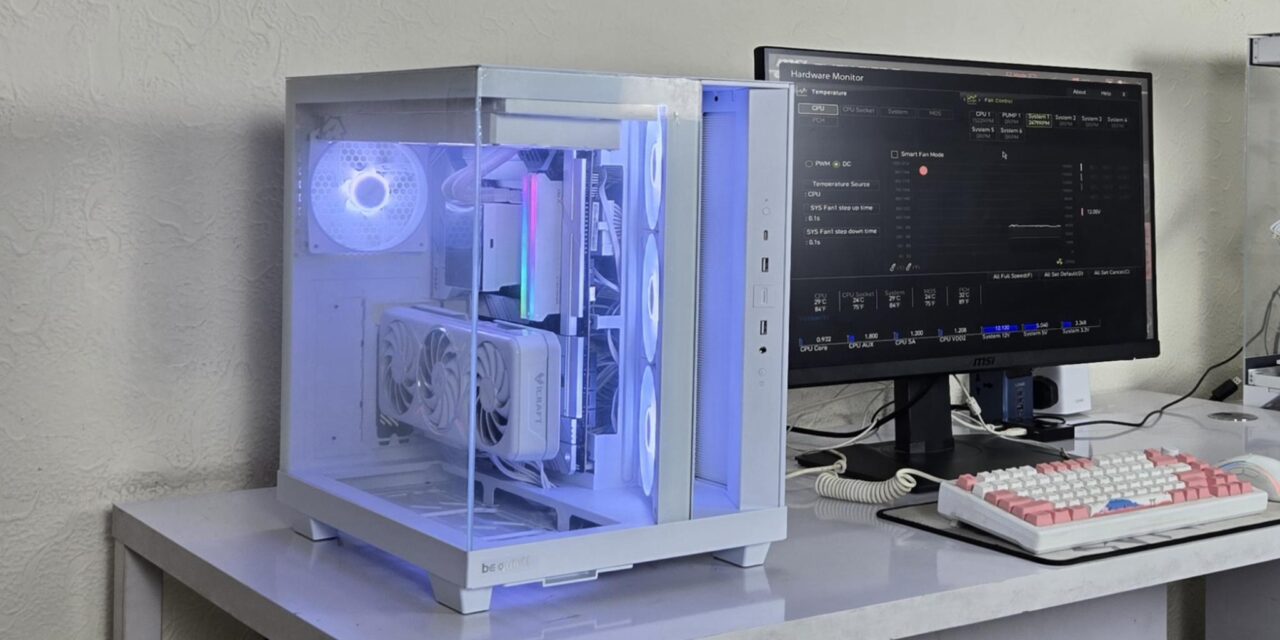
Thermal Testing
The test build configuration is already mentioned above. The fans and pump were set to run at full speed. The graphics card was running at stock settings. I have used Noctua NT-H2 thermal paste. The ambient temperature was 21°C.

The overall thermal performance is good.
Conclusion
I have tested a mid-tower PC Case from be quiet! which is Light Base 500 LX. This case is available in white and black colors and the non-LX edition as well. This case is based on a panoramic view, which is quite common these days and is a mainstream design.
The case main frame is made of steel, whereas the glass panels are tempered glass. This is not a pillar-less design, but it still looks that good in person. The front glass panel is also removable though not needed as such. The complete assembly is white coated. It has a dimension of 432x305x436mm (LxWxH). The weight of this case is 9.52Kg.
The fan support is as under:
- 3x 120mm fans on the side [Reverse Light Wings LX120 ARGB fans pre-installed]
- 3x 120mm fans or 2x 140mm fans on the top
- 3x 120mm fans on the base
- 1x 120mm or 1x 140mm on the rear [1x Regular Light Wings LX120 ARGB fan pre-installed]
The radiator support is as under:
- 120mm/240mm/360mm on the top
Clearance is:
- CPU Cooler Height: Up to 185mm
- Graphics Card Length: Up to 400mm
- PSU Length: Up to 200mm
Storage provision is:
- 1x 3.5” Drives
- 2x 2.5” Drives
Dust Filtration:
- Magnetic filter on the side
- Non-Magnetic bottom filter
This case supports mini-ITX, micro-ATX, and ATX motherboards. This case also supports micro-ATX and ATX backplate motherboards. This case can house up to 10x 120mm fans. However, you are restricted to only one place for the radiator installation.
The case has an interesting design on the front, which almost makes it feel like a three-chamber design, but it is not exactly that. The side-mounted fans draw fresh air intake from the side, for which an opening is provided on the front. The bracket used for the fans does not support a radiator, so there is to that. The IO panel is on the front and features a USB Type-C port.
The PSU is mounted vertically in the second chamber. However, you can alternate the location of the bracket with the PSU as per requirement, which is a plus. Cable tie points are provided along the channels, and you should not face any issues in cable management.
This case has 7 PCIe slots with reusable covers. A vertical bracket is also provided, but a riser cable would be needed for that. You can install air intake fans on the floor of the case. Reverse-blade fans would be an ideal choice for that.
This case has an MSRP of €154.99. This case has adequate provision for your build. However, it is not designed for custom water cooling unless you make some changes. It provides a spacious layout, adequate cooling, and storage provision. The thermal performance is satisfactory.
Pros:
- Two Tempered Glass Panels
- Tool-Less Panels
- Removable TG Panels
- Panoramic View
- Backplug motherboard support
- Side Frame with Light Wings LX120 Reverse fans
- Cable Management
- Dual-Chamber Design
- 360mm radiator support on top
- PCIe bracket for vertical mount
- USB Type-C Port
- Graphics Card Clearance
Cons:
- Price
- Restricted support for AIOs having an extended width


